Large Scale Central

LGB 20140 Sound and battery install

I picked up one of those tiny LGB 20140 in a weak moment, and decided to make it run. As most of my friends do not use track power, this means battery operation, and it didn’t seem likely that I could get enough cells, plus the RX and sound card into that boiler. I have a string of gondolas which would look good behind it, so I got out my spare LiIon 18650 battery box and it seems to fit.

The only mods to the engine are to fit a track/battery DPDT switch with a cable to the trailing car, and a speaker inside the loco somewhere.

This is the underside of the frame removed from the bodywork, and those 4 connectors on the front seem to be the track pickups (outer pair) and the motor leads (inner.) The pcb has a couple of chokes on the other side. There’s room above it to add the DPDT slider switch and I am debating whether it is worth making it accessible through the front pilot beam, or just leave it as it is very easy to reach by removing 4 screws. How often do you switch from track to battery anyway?

I poked around and found the coal box on the side of the cab is removed with one screw and the little 8 ohm speaker I got from Radio Shack looks like it will fit.

Not sure what it will sound like, but there ain’t room for a 2" speaker. With a slot in the side and holes in the bottom for the wires it is ready to fit. And here it is tucked in the corner of the cab.

Next job is to fit the switch at the front and run the wires.

I had intended to finish the loco wiring but the sound boxcar got me to sort out the LiIon battery pack, and solder it up to the protection board. Here’s the battery holder, tools and the little red pcb. The wiring diagram was printed from the website.

The 18650 LiIon cells fit tightly in the battery box and this particular box was an old one with springs that had been compressed in my old boxcab. Not only did the batteries not want to snug up to the positive end, they didn’t even make contact in some places.

The solution was to take some small brass escutcheon pins, wind a little solid wire around the end as a spacer, and put then through the center of the holes at the positive end. The wire back to the protection board was soldered on the outside to hold it in place. You can see the pin in this photo, and the rusty state of the springs. What you can’t see is that the bottom of the spring, where it sends a sprout off to the top of the next cell, isn’t even touching the rim of the positive contact insert. One finds this when the system doesn’t work and you have to test each connection individually. I soldered the spring to the insert and made the connection.

Finally, the system works. Those are regular 3.7V batteries, but fully charged they are 16.6V and the protection board cuts them off at about 9V as they discharge. [Do yourself a favor - buy a decent battery box if you want to reproduce this.]

Well, the sound boxcar was disposed of, so back to work on the LGB20140. First order of business was to finish the chassis wiring. As the whole chassis comes apart very easily, I opted to put a DPDT slide switch inside over the front pcb where there is plentyof room. On this pic you can see the back of it. The feed from the tender then passes along the top, with a couple of judicious slots cut in the chassis. The biggest squeeze was in the middle, over the metal crossbar, where it snugs up to the body. I filed as much as I could with the dremel, and even sanded down the wires!

After that, it was pretty easy to close it all up and paint the wires where they exit. I did re-route the speaker wires closer to the chassis to make them less visible, which meant taking the coal box off and drilling a new hole. So here’s the motor and the speaker feed.

Then back to the gondola. I fitted another slide switch in a corner but it is over the crossbar of the underframe and I think it will have to go somewhere else. The battery pack takes up plenty of room so I was reluctant to fit it in the middle. And there is nowhere to put the charging jack in the gon as the underside is completely obstructed by wheels, crossbars, etc. So I carved a space in the underside bar and fit the charging socket sideways with a metal clamp to hold it in place.

Here’s the side view. I doubt it will be visible once the gon is on the track.

Finally, the wiring was all connected. The battery attaches to the charging jack, which has an integral switch to disconnect the electronics when charging, via the barrier strip in the bottom left corner. The battery feed then goes to the slide switch and back to another barrier strip where the Electronic Speed Control will be connected, and the output of that will go to the motor. I put an LED across that to tell me when I have power turned on.

Still got to fit the ESC and the sound card, when they turn up in the mail from RCS. Probably it will need a clamp to stop the battery pack from falling out when the gon derails.

Be very careful about how much weight your are pulling with that LGB drive system. The motor only drives the rear axle. I limit my chloe to 3 frr cars max which have passengers and LGB frr wheel sets. I use LGB metal wheels as these are rims of metal and are not very heavy.

The motor only drives the rear axle.

Well yes, but there are connecting rods driving the front axle. However, I take your point - it is cute but not the most powerful device on the rails! I’ll restrict it to the gons that don’t have heavy paver loads.

While the motor block has the front wheel driven by the rear axle/gear, one must remember the single small plastic axle gear takes all the motor force to drive the engine and cars behind it. I have seen many failures of this rear axle gear.

Time marches on and now the family has left I can get back to real work…

My second package arrived from RCS with the 2 relay triggers (they plug into an r/c channel to turn on/off a feature, like the whistle or bell.) Here they are on top of the receiver which is on top of the ESC (Electronic Speed Control.) I’m just testing the fit - haven’t tied the battery pack down yet.

At the bottom is the MyLocoSound Blue board which needs connecting to the motor feed and to the speaker via the plugs on the loco. I’m getting fed up of untidy wiring, so I may try to clean this up a bit - I already tied the relay trigger cables, but a better solution would be to shorten them.

[You can see why the Crest recvr with sound built-in is so desirable. One PCB and a few wires and you are done.]

Having decided that it will all fit, I got out my TX and tested the ESC, which is a center-off type and includes its own relay for reversing (something a car ESC can’t do.) That’s my cheap chinese $6 RX hanging over the side, plugged in to the ESC, which provides regulated 5V and takes the signal from whichever channel it is plugged in to on the RX - in this case ch4 is the big knob. The servo is to test operation of the RX and figure out which channels work off which buttons on the TX.

Fortunately the loco wheels turned when I turned it all on. So back to wiring it all up.

To save a little space, why not use a SPDT switch to change from track to battery power? Interrupting one wire will be enough.

Dan Pierce said:

To save a little space, why not use a SPDT switch to change from track to battery power? Interrupting one wire will be enough.

Dan, it turned out there is plenty of space in the front of the chassis for the switch, so the question of using a smaller SPDT never came up.

I’m not sure about interrupting one wire. Leaving my battery connected on one side to a rail could cause future problems.

Incidentally, I initially used a micro slider from Radio Shack [my local store] on the gondola, which I had to move as I couldn’t get my finger in to switch it! So I used a regular small switch - and I’ve had problems with both due to contacts failing as I solder them. When soldering to the second switch (which has solder contacts) I used heat sinks and was very quick with my small iron, but 3 of the 4 contacts failed. I wonder if this is a new problem for the new Radio Shack.

I got some cheep rocker switches that did that. I had to get small barrel crimps and crimp the wires onto those darn switches.

There are several methods for soldering. Myself, I prefer to clean my iron on an old face cloth as a wet sponge will cool down the iron tip, cloth will not. Hotter tip makes for faster heat transfer to solder before lots of heat goes inside a small switch as the soldering iron heat can be removed real fast. Also I use liquid flux to precoat what I am soldering, and I pretin the wire. Have not lost a small plastic switch yet.

Funny, I do the same thing, and dial the tip temperature down to 850 or even 800, kester 44 solder only plus kester paste.

Greg

Have not lost a small plastic switch yet.

Well, I’ve been doing it for 60 years and this is the first time I lost 2 new switches that I bought a month ago. I even used 2 different soldering irons, so it wasn’t the iron that was the common factor. My tiny iron has hardly any volume to transfer heat so I was really surprised at the switches dying so rapidly.

This is the end of the story. I took the Feldbahn to Jack’s Calusa Creek RR and ran it today with no more than a few teething troubles.

I love to see those little wheels whirring around and the valve gear in action.

Here’s the gondola with a stainless 1/16th rod across the batteries so they stay in place even when we tip over (never do that, of course, but still . .)

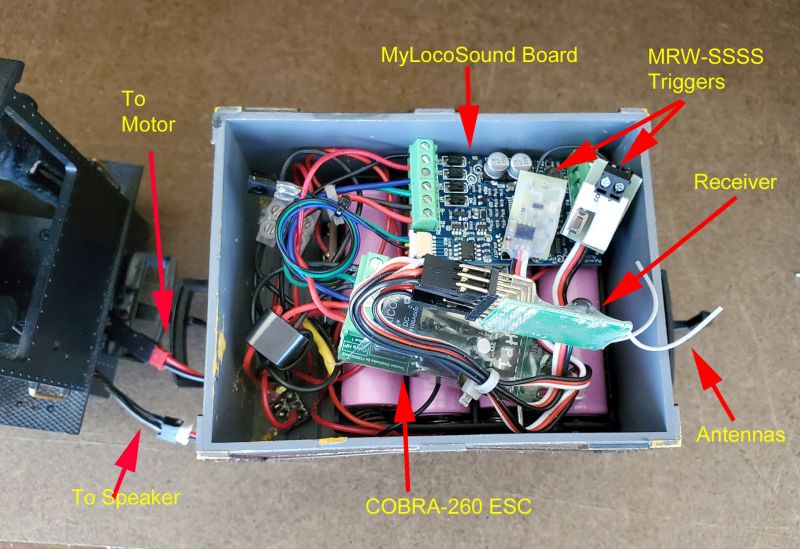
The electronics are a jumble so I labelled them for you:

And here is the wiring diagram supplied with the sound board. It shows duplex switcher units - mine are only single channel so they only have one connection.

I guess the last job is to make a cover to hide the electronics. A tarp? Some mineral aggregate? A wood pile? Hmmm . . .

Incidentally - anyone know if my loco is supposed to have a cover over the ?sand box? at the back of the boiler.

20140 part 14 is the rounded cover. search for LGB 20140 pdf and you will see the parts diagram.

Thanks Dan.

I ran today with the completed gon load so the project is complete (except for that sandbox cover!). It is a very cute little engine, and the Radio Shack speaker puts out a surprising amount of decent sound. The little black thing in the front top of the gon is the IR detector for controlling the setup on the Mylocosound board.

As a philosophical matter, you might ask why I bother with a full r/c RX, and ESC, some servo switches, and a separate sound board. Well, here’s the answer.

If you buy old ive steamers, they may have old RC gear in them. From left to right: 27Mhz for my Merlin Maestro, full DSM2 Spektrum for the C-19 and a Code RC for my Roundhouse “Stanley”. In front is an RCS DSM2 TX that can do what any of the others can do - if they have a compatible receiver.

The Code RC is 2.4Ghz but it is proprietary and won’t work with any other system and rx are no longer available. The Spektrum is essentially retired as the RCS can do everything it can do. I will replace the RX in “Stanley” at some point and obsolete that. And today I figured out the RX in the Merlin is right in the cab so I removed it and installed a DSM2 rx so the 27Mhz Futuba is not needed.

There’s a thread on GSC about installing a microprocessor and a single cell in the boiler to replace the weight, with a 12V amplifier to drive the motor. That does take some electronic knowledge, but removes the need for a trailing car!

https://www.gscalecentral.net/threads/battery-esp8266-based-remote-control-and-automation-for-an-lgb-24140-kjf-loco.314042/#post-578056

In that thread there was a comment about these little locos having more traction without the skates. As I didn’t want to preclude future track power, I put a stainless rod underneath to hold them up, with insulation of course, though the tracks I run on have no power - ever.

I also heard the latest version of this loco is the LGB 24141, which is double the price.

Yes, my little 4 coupled LGB locomotives are all skateless. Chloe could not pull 3 open cars up my 2.58% grade with the skates, she could barely pull herself up. Without the skates she can pull the 3 cars with power to spare. My other little engine pulls 2 2 axle boxcars, 2 2 axle gons and a heartland 2 axle caboose up the grade without the skates.

Pete, how do you insulate all those loose boards from each other when you actually run the loco?