Large Scale Central

2024 Mik's Build Challenge, Post your Photos HERE for Voting

PLEASE DO NOT POST COMMENTS ABOUT BUILDS IN THIS THREAD.

Post them in the individual build threads.

This thread is for pictures of the builds for voting.

Each participant needs to post his Glamor photos and comments of his finished or unfinished challenge build.

Please identify who you are, and what you built, and any other comment you would want to tell about your build.

Please keep this thread clean of comments about the builds.

And limit posting to the participants of Mik’s build Challenge 2024.

OK, I’ll go first

Rick’s MIK 24, a small line side industry, bulk fuel plant circa 1939.

Almost everything was scrounged up from my junk boxes, spare parts tubs and my, may need it someday boxes. I did however have to buy 2, 3inch PVC caps and one coupler to complete the horizontal tanks. Glad I had 4 of the caps on hand from an old 1 to 1 project as they are 10 bucks apiece now days. So altogether I spent about 25 bucks, more than I had spent on the last 4 MIKS combined.

Anyway, the pictures.

The back story is; this fuel plant was originally built in the early 1920’s and was remodeled and upgraded in 1938, the only thing retained from the old days was the office building and the vertical storage tank which is now used for Kerosene storage, a big seller here on the coast.

Here the plant is posed in it’s future home on the stub siding in down town Fields Landing.

The business is named after a childhood friend that went into the fuel oil business and later the appliance business in this area, Humboldt Bay.

Still have to get the truck repainted and lettered for Texaco, but as I said at the start this wouldn’t be part of the MIK Challenge.

It started threatening rain so I moved everything back into the shop and took a couple of night shots this evening.

Thanks for the fun and entertainment of the Challenge again this year, I really enjoyed all the beautiful builds and the great banter amongst everybody on the Forum.

And as usual it will be impossible to try to select the ones I like best because my gut tells me just select “all of the above”

Thanks
Rick

6 Likes

My entry, Sam and Ella’s Produce. This started as a small building built around cardboard box from many years ago. I planned to reuse it as is on the indoor layout but this year’s challenge gave me the opportunity to expand it based on an interesting old HO scale kitbash photo I had in my archives. The base is plywood and the framework basswood and the decking popsicle sticks. The roofing is asphalt roll printed on cardstock and the stonewall base is textured paper. The stairway is from a dollhouse supplier, the produce is painted wood beads in scratched boxes, I also had a bunch of fruit box labels printed so that was also a bonus. Overall I really enjoyed building this one .

IMG_20240213_105233710


4 Likes

Here is my first ever Mik entry.

It is a simple office annex that will be attached to a 2 bay engine house, assuming it will fit the rail line, when it gets built.

The build has been complicated not only by the four building inspectors who tended to show up during crucial gluing and clamping to test bonds, but by the available tools on hand.

But what a great learning experience I’ve had this month, as everybody’s build has been a mini-masterclass. From the builds I’ve learned new techniques and terms. (in fact I’ve started Devoning during my time off!)

I now have a pin nailer on the way from the US of A, found GOO on sale locally (even better), E6000 still on order, used canopy glue with great success, and finished a Mik.

I made it through the build without spending much. Probably used $3-4 AUD on wood. ($35USD = $54.23AUD). I still need to test the Masonite that I was going to use.

Thanks to everyone who have been so helpful in making my first Mik so much fun. I’ve really enjoyed everybody’s narrative and taking time to answer so many newb questions.


PS: the loco shed has been apparently accepted by the Birman Community Council for housing alternatives in the garage until the rail line is completed. I just need to decide whether to complicate the loco shed by making it usable with 2 or maybe 4 sets of working doors.

Once the roof is solidly in place, I’ll will be mildly cursing you all for encouraging me to shingle with titebond3! Until then, I’ll be as I have taught to say, I’ll be “Devoning” the rest of the build.


3 Likes

We were hit with a decent snow storm yesterday so I had to shovel out a spot to place the building today. This is not where it will be going but you get the idea.

I have been think about building one of these grain towers to add a vertical visual element to the layout and the 2024 Mik was a perfect excuse to do it. We don’t have farms that grow grain here on Cape Cod but we do have Cranberries, so this is a purely fictional piece that borrowed elements from the new and old styles of elevators. The back “shed” was designed for a train car to enter.

All in I spent about $23 dollars on supplies. The boxcar I found locally after the start date, for $30 but that is more of an accessory to the building and not a part of it. The Ocean Spray decal on the front arrived just in time to be added on. The billboard sign on the side I cut off a juice bottle, glued it to a piece of plastic, clear coated it and tacked it on. It will be interesting to see how long it lasts before it fades out.

This just might be my new favorite building on the RR.

8 Likes

You can come into the “He-Man Wimmen Haters Club”, but you have to have the password.


This was made just like the “Lil Rascals” would have, use what you can find. This was an Aristo Watchtower. I can’t believe I bought it missing so many parts.
Club22
Fits right into the yard.
Club29
The kids can be right up there and see everything.

The columns are left over handles from shades. Stickers wherever I could find them.
Total cost: $0.00!

6 Likes

So this year’s project was an all around great theme for something I have been wanting to do in a place that I had no idea what I was going to put there. I have a corner that has a spot for a not yet installed spur track. It’s a back corner that is small, it needed a small industry. Check the first box.

Rooster got me started on a project to create an iron furnace in the fashion of the Carrick Iron Furnace. I have the furnace blower and boiler already made using 3D resin printing.

c4_20240112_15285893_neYWr7BJ4H_v3yCPo543d

This needed all the supporting facilities to make a nice little side industry so for the challenge I decided to build a shipping and recieving building for the operation. Check box number 2.

And then I really miss my late friend and LSC contributer and club member Steve Featherkile. I have always wanted to do a tribute on my railroad to him. So this furnace is named for him. . .Featherkile Furnace & Foundry. Check box number 3.


I have no money into this. Everything is scratch built. I did buy some concrete patch for an attempt at the loading dock/foundation but that was a fail. If we include that cost I think it was like 9 dollars. But since it didn’t make it into the project I am not counting it. Either way I am nowhere near the budget. And in a break from my last few builds there is nothing 3D printed.

Main structure is 1/4 plywood. Base for both the building and the lean-to are made from PVC lumber glued up, carved with stones, and layered with paint and weather chalks and washes. The main roof is crimped pop cans and the lean-to roof is styrene that has been sanded to represent rolled roofing.

Oh this is not the final resting place. As I said th real spot is yet built. I just found a straight spot and plopped it down

5 Likes

Nocturne Deep (so named for the shadows that persist there even under cloudless skies) is the site of an ‘Unobtanium Mine’ on… some other planet. The deposit was discovered accidently during construction. To access it, a shelf just big enough for a siding was blasted out of a sheer cliff, with enough additional blasting for the mine building. These days, the vast bulk of the unobtanium has been extracted, and the bean counters were thinking hard about shutting down the mine and railroad both in a few years. Then the ‘strange sky’ happened - unfathomable celestial objects that wavered in and out of view above the mine. Nervous officials sent assorted eggheads and military personal to Nocturne Deep to investigate the matter. These people, in turn, requisitioned all manner of strange equipment - and sent back stranger objects and creatures connected with Strange Sky, giving the line a new lease on life - at least until the government contracts run out.

That said, Nocturne Deep on the layout has two parts - a rail side hamlet, dominated by the Nocturne Arms (a ‘haunted hotel’) and the mine proper, the whole of which is built on a shelf that is mostly a mere 12 inches wide. I had to redo the siding at the end of the line to fit in the mine site - a mere three inches of depth for the backdrop (an old poster), distant mountains, and the cliff face/mine itself. There are 1/4-inch gaps between these elements to give the illusion of distance. The ‘distant mountains’ are cardboard flats covered with construction paper, while the cliffs are plaster over a scrap wood frame - this project ate a lot of wood scraps. The mine building is made of Colorado Model Structure panels I had laying around, and the pathetic detail items are, well, trash. The figures are a mix.

I forked over about a dozen bucks for two bottles of glue (which seems steep to me), nut only used the one, so call the expenses six bucks.

Some of the pics are not that great, Nocturne Deep is in one of those corners of the layout where the light is poor no matter what I do.

Final 1

Final 2
Final 5

Final 4

Final 7

2 Likes

Freight Direct Farmington…

Not to bad of a job from a shipping pallet, A couple of cedar fence slats and a sign that was run over in the road…

The tin on the roof and the resin cast doors are the only non re-cycled stuff on the whole thing…

The build started out as just a common freight forwarding business that would be along the tracks in AnyTown USA… The original napkin had an extra set of barn doors, but that made it much larger then I had a place for it, so cut the overall size down to about 24" wide and 16" deep…


The inspiration and Dedication is to Shanna Bird ( note proprietor), She is a business partner of mine for the past 26 years, And she owns “Freight Direct Furniture” here in Farmington NM. And her store is in Red & Yellow.


And the back side ( this is not the permanent place for this )


And another Mik Build is in the books… Great fun, and great bunch of Mik Nuts…
EDIT: Only out of pocket expense was about $9.00 for two tubes of E6000!

7 Likes

On my fictional ( at this point in time) RR, the Waverly Southern Railroad, one of the focal points will be a an elevated mining loop that will bring gold ore from several small mines to a central bin for the WSRR to pick up. The unfinished ore bin presented here is the central bin, hence its overall size. The entire structure is 930 mm/36" tall, 400 mm/15.75" wide and 280 mm/11" deep. The timbers are cut from WRC and the bin interior, shed walls and roof underlayment is 3 mm exterior plywood. I spent less than $5.00 on filament printing the windows, chutes and gates. The corrugated tin used on the roof is 0.002" steel shim stock that was cut to size and processed through my homemade corrugator.

The project is unfinished at this point due to running out of glue (Goop, the big ape version) on the last day. I thought I had another tube , but couldn’t put my hands on it. That has now been remedied. I have designed a mechanical chute and gate system, but wasn’t able to get it printed because some DA broke the resin tray while attempting to change the FEP film. That too has been remedied and parts are coming off the printer.

Without further adieu, I present Shatzi’s Goldmine Ore Bin.


IMG_2791

5 Likes

I have yet another year of a DNF. This year was an attempt to make a hay feed storage shed…

I ended up just short of completing.

3 Likes

I had hoped to take a better “beauty” picture, but the weather had a different plan. Two snow storms kept the rock garden Ohio River & Western Railway covered all week.

Here is the the picture I took last Sunday night after I completed the oil derrick. (Just in time)

The patio block cost $4.67
Tube of glue $10.48

Almost enough glue to finish, but I got a second tube to complete the derrick.

Total cost: $25.63

I have again, learned more about model building from this year’s Mik Challenge. Thank you all!

2 Likes

Well some life things got in the way, so it’s not finished, and more importantly the the spot on the layout to show it isn’t prepared, or close to ready to show it there. Tried a new method for me , using cement to cover foam, but actually did a few things wrong. I thought taking some rough sandpaper to the foam would help the cement stick and hold better, and didn’t pay attention and rounded corners and edges , giving the building a Southwest vibe I wasn’t planning on, but oh well. Second oops was I bought the patching cement with polymer resin for extra hold but this tub I got has sand added to the mix, giving more of a Southwest look and vibe, I guess seeing it all the time in our houses here, it was subconsciously playing in my mind.


The only expense was the 3 USA trains 48” fans at $5.95? Each, so call it $20.00 with shipping!. Anyway it’s close to finished and the location need some work then I can add some final pictures and fix some small issues

1 Like

Coming it at the closing bell, Team Mueller presents Mik 2024 – Hui Laulima Mahi ‘Ai na M&K / the M&K Agricultural Cooperative. As a reminder, we chose to diverge from our home’s history of industrial agriculture to a world that might have been, where the large sugar and pineapple concerns leased their lands to family farmers as part of crop diversification. In addition to letting other farmers bear the economic risks of new crops, it allowed the M&K to share some of the financial burden of needed infrastructure to more efficiently service, ship, and store No’u’ea’s burgeoning agri-business.

As we did last year, we tried to let each participant find some portion of the project to complete. O.D.'s grain elevator (not to be judged, as it was partially done at the start) is the centerpiece. Everyone else raided the scrap bins to build their1:24-ish PLAYMOBIL scale creations to his or her own mind’s conception of the project. This year, we spent $0.00!

We will introduce our projects in reverse order from our build log due to our arrival on site as we hitched rides on work trains across Triple O and M&K tracks. Like last year, we are indebted to @Ray_Dunakin for his drone services. Other shots are largely courtesy of Y.D.

Yours Truly – Small Station

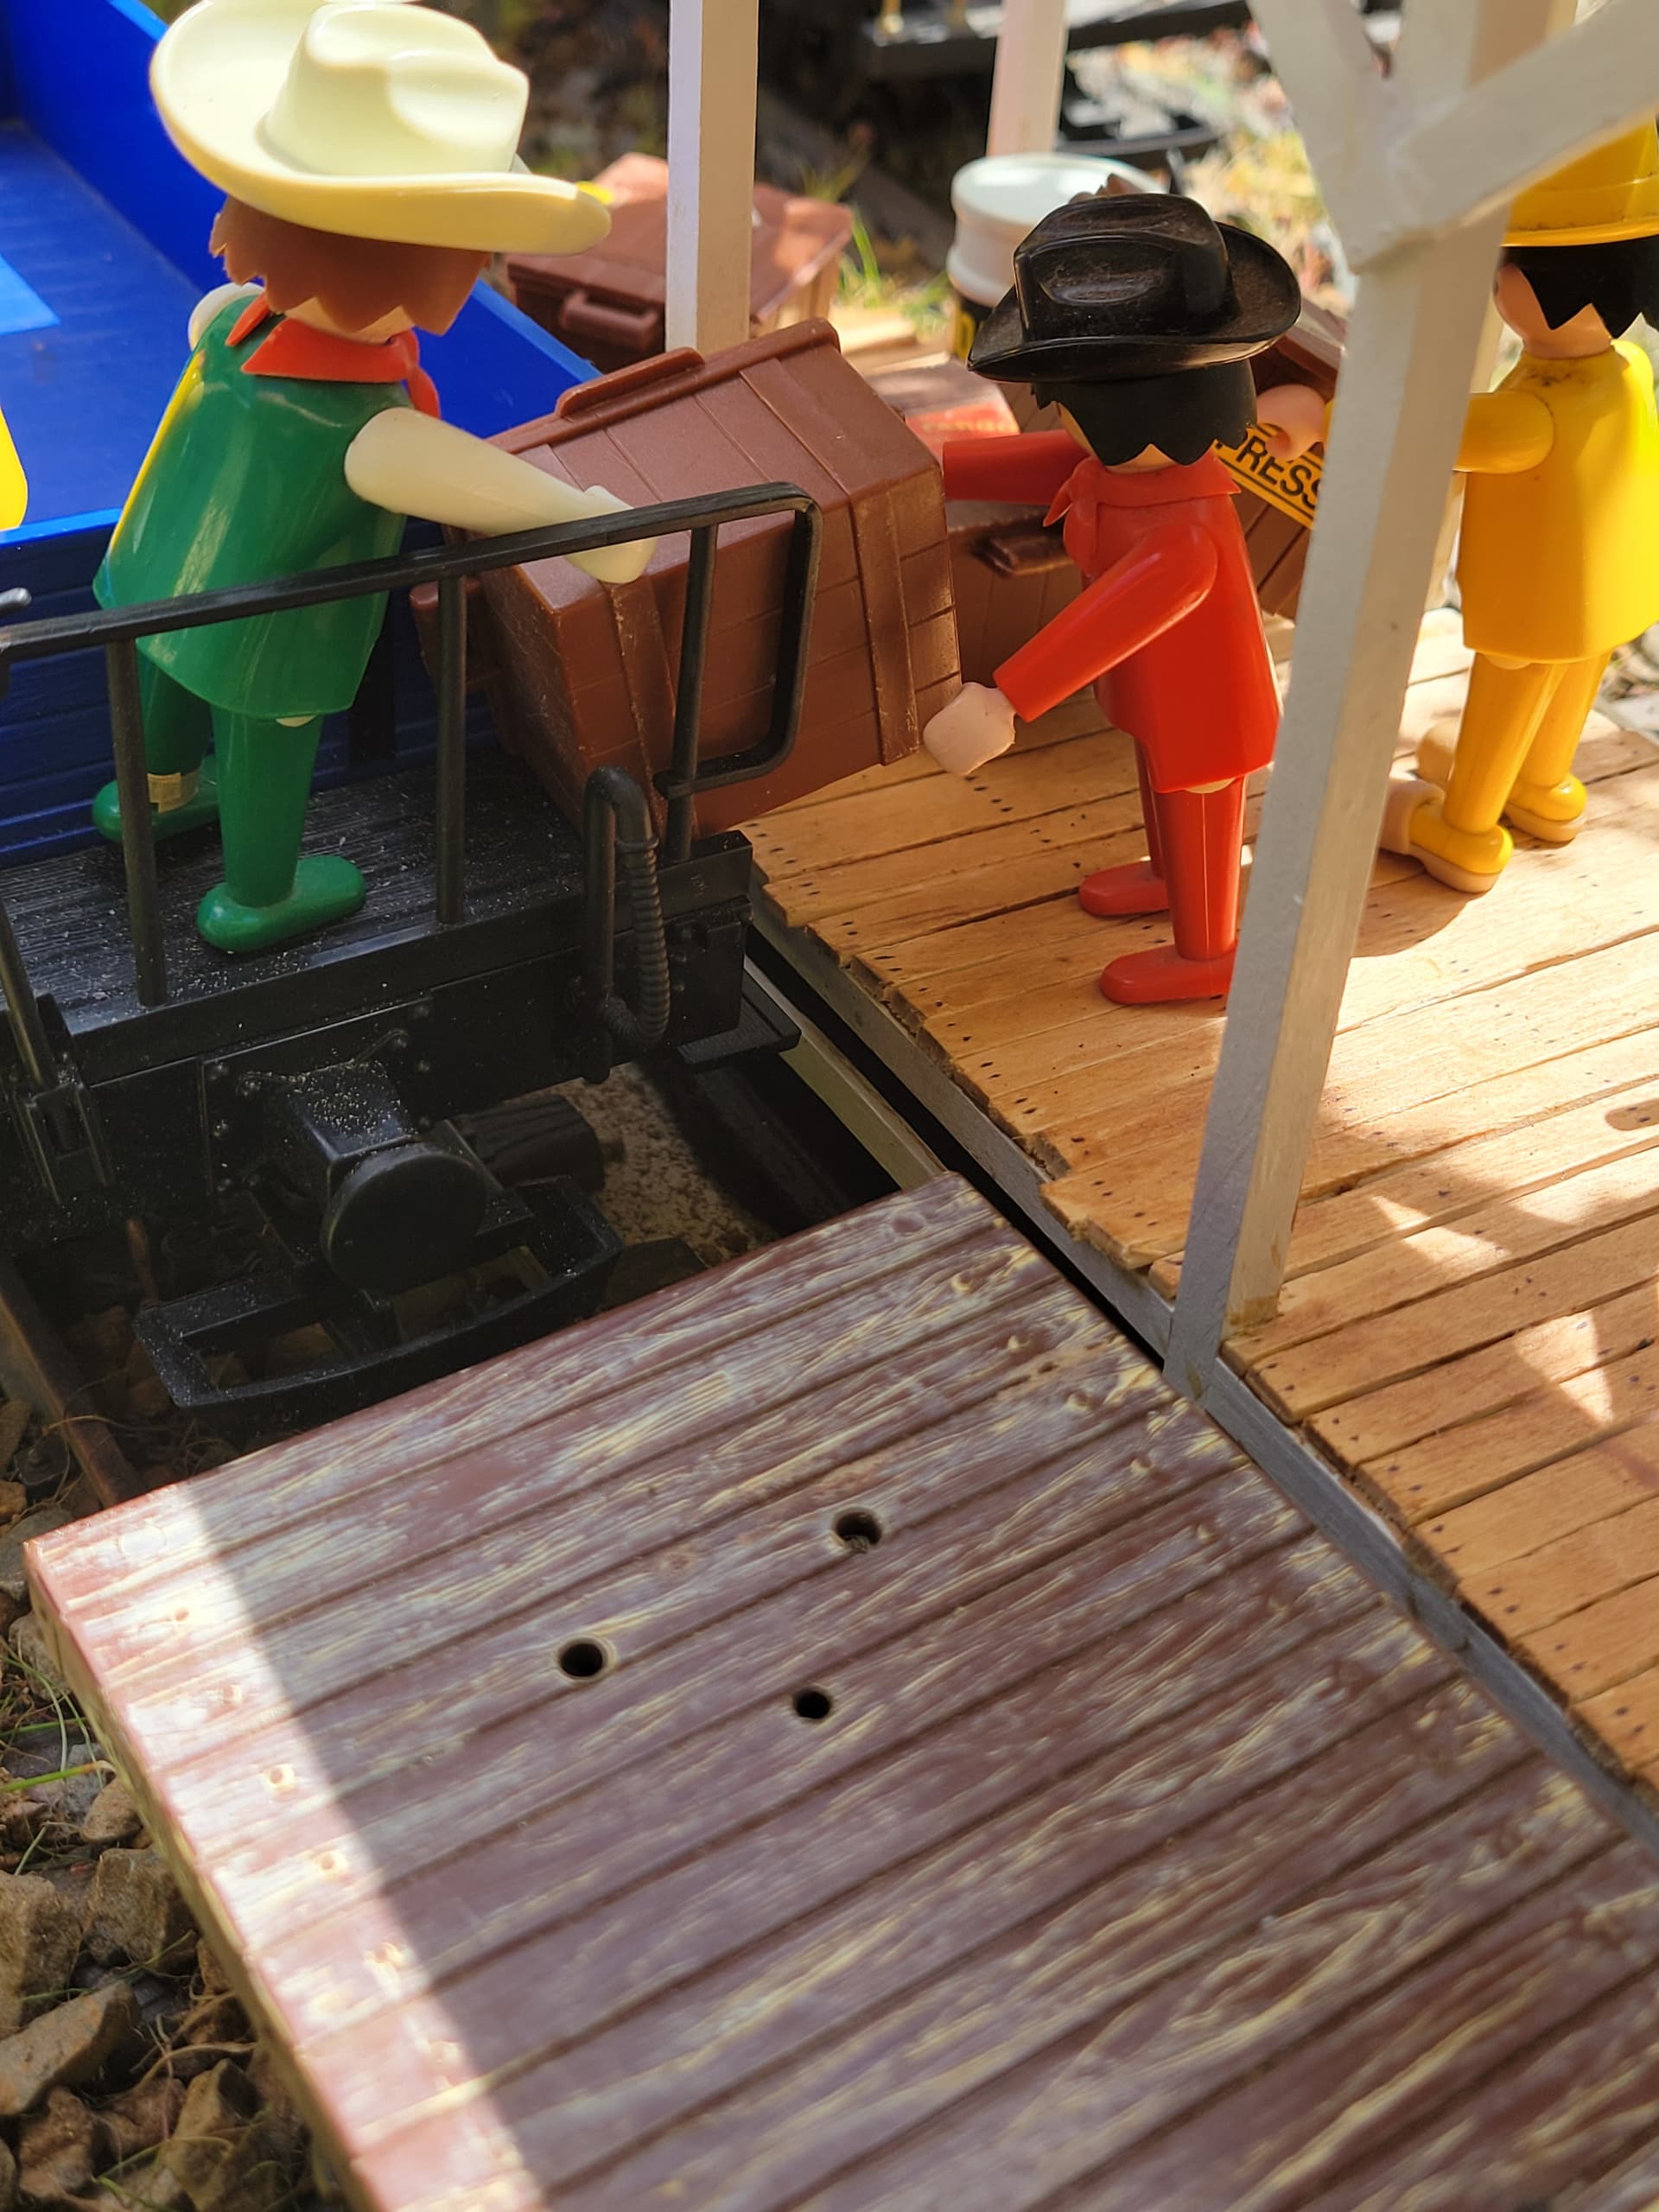
The M&K and tenant farmers both decided a small station would speed up the transfer of goods from the semi-regular trains the serve the big sugar concern’s permanent trackage. Ray’s drone captured the action as Kolea pulled a small combine away from the new station after dropping off goods and workers.

'I’iwi stood ready to make the deliveries to farms, fields, and other work sites after the paniolo /cowboys finish transferring the just-delivered freight.

Y.D. captured the small station in its entirety and risked injury to show the station in its entirety and to capture the action.

! 20240218_122214|375x500, 50%

After a fond “Aloha!” from a local farmer…

…we boarded another passing work train for Pu’u’oma’o, the big mill town. Unfortunately, massive construction caused the Triple O to close all approaches to the mill area.

Ray captured the hubbub from his drone.

…as the rest of us made our way to the mill. Finishing work on the new grain elevator necessitated the track closure and our short hike!

O.S. - Silo

Making our way across the bridge on foot, we noted a group of ruffians had not gotten the word, and a local official, backed by the police, served them a warrant to cease and desist. Apparently, they were on the way to the new grain silo in hopes of selling their presumably ill-gotten gains!

The silo itself towers above the yards, but it will sit in the shadow of the even bigger elevator rising alongside of it!

Y.D. & Kid-zilla - Office & Outhouse

The last site before we viewed before picking up a regular passenger train on the far side of the construction area was a small office that will serve the elevator in time but for now is an auxiliary office for Triple O crews.

Lucky for us, one of the buildings turned out to be a newly dug privy. It can be a long, hot ride home on the islands!

After a necessary stop at the necessary, we caught the outbound passenger train and headed back to the port city of Halukuili’o for a complementary luau that came with our rail excursion. Due to the indiscretions of certain people (you know who you are!), we decided to refrain from publishing photos from that event. Enjoy a picture of Opal instead!

Fun build, fun times, and thanks to @Dave_Taylor for again herding the cats on the site and inspiring this crew on the island through another MIK!

Good Luck and Thanks to All the Participants!

On Behalf of Team Mueller,
Eric

5 Likes

I’m a DNF this year. Sorry about that. I’m loathe to post my pictures as I didn’t get very far, but here you go.

The project is meant to be a furniture factory named after my grandson: Dom’s Furniture. Powered by steam, belt driven.

The steam engine:

Some doors to the workshop, copied shamelessly from Dave:

And some of the platform framework:

No excuses here. Just didn’t get it done.

I need to finish it before my grandson comes to visit.