Large Scale Central

Working Water Tank Build

Found a machinist that will tackle the boring out of the spout, He said that he probably couldn’t get to it for the better part of a week tho… Best shot i have… we’ll see how it comes out. He was worried about the scarring from chucking.

The time delay will at least give me a chance to get on to my mountain devision expansion of my pike.

Dave Taylor said:
He was worried about the scarring from chucking.
That's what they make wood putty for ;) Ralph

Dave,
I have followed this from the beginning and what a neat build and great craftsmanship with problems and solutions to them with some help from the LSC crew. I think the machine shop will do you well with minimal marking on the wood , if so like Ralph stated just sand it down and fill it. I think you probably could have drilled the holes before assembly then slid some PVC tubing inside. Awesome progress so far!
:slight_smile:

Thanks for the complements, Guys… I still haven’t got water out of this thing yet… Soon though…

@David I had thought about carving out the “bore” before glue up of the pieces.

1; I hadn’t turned much on the lathe for a couple of years and I wasn’t really confident of my ability not to cut into the hollow center at the neck end, and getting the inside taper to match the outside taper.

2: I sorely underestimated how tough the hickory turned out to be on the end grain. I thought that I would be able to bore it out on the drill press with an 1 3/8 spade bit, not even trying to use a Forestner bit due to friction and amount of bite at any one time, and then step down in size as I worked down the tube from the other end. In order to cut the end grain, I did not have the right vice for the Drill press to hold tight enough on the taper to get the bit to cut, and not just burnish the end grain, or scorch it.

3; the 20/20 hindsight…, I wanted to use a tough wood to handle the punishment that the spout would surly receive, realizing that a sheet metal tube would have been easily kinked and once kinked easily folded. Looking back I think that yellow pine, or white oak would have worked better. I could have done my own boring. I should have bored the center first, while still square, and vice ready, used a faceplate to mount it on the lathe, and used a cone live center on the other end… again lathe work is not my best suite…

Once bored and the two haves assembled, I plan to swab the bore with 2 part epoxy, two coats to give it some protection. Anyone see anything wrong with doing this? And finnish it off with the required “silver” paint.

I’m scheduled to take it up to Durango this week, and do the final install on Sunday…

Dave

We want lots of pictures !

So are you not going to put the sheetmetal around the spout?

I’m sure the epoxy will seal the inside. However, I am always weary of water and wood together. Would it be better to place a piece of pvc pipe down the center and then you wont have to hastle with the epoxy except on the ends.

@Jake I’ve pretty much given up on the sheet metal on the outside, If you look I’v cut some “joints” in the wood that I hope will look like the seams around the spout. I’ve even entertained the thought of carving the lateral joints, and putting some pins along the “seams” to look like rivets. Thou a 1/4 " rivet scales out to be about 1/32"

I don’t know how I would sleeve the pipe inside, The thought has crossed my mind to just put a thin clear flexible hose inside, and permanently mount one end to the delivery tube, and have it flex when the spout is raised…

I’ll sand it smooth and paint it silver, with the “Cast iron” end Flat black.

I’ll know better tomorrow, the 4th when I get the spout back…

It looks really nice Dave. You might want to try some of the metallic textured finishes from Rustoleum or Krylon.

Got the spout back yesterday from the machine shop. It has a hole thru the center now and not to much damage. I worked a 9 hr day, picked up the spout and started to carve the butt end out, carved for a couple hr’s and then off for Friends, Fireworks,BBQ and Brew. Happy Birthday America. The Butt end:

(http://i1234.photobucket.com/albums/ff403/dave2-8-0/WT-170.jpg)

Sharp chisel and a mallet:

(http://i1234.photobucket.com/albums/ff403/dave2-8-0/WT-171.jpg)

2 hr latter:

(http://i1234.photobucket.com/albums/ff403/dave2-8-0/WT-173.jpg)

I’m feeling more like there may be vinyl tube thru this thing, in the end. We will see about tonights progress. Dave

As good and hard as hickory is; I think you will be doing the owner a favor by installing a water tube. Several reasons…

It will prevent the wood from absorbing water leading to cracks.

It will allow removal and cleaning (or replacement) of the waterway if algae grows.

Simple to add a pinch valve if lifting the spout to stop water flow is too messy.

Yep I’m with Jon on this. You have put so much work into this build. You are a true craftsman. But, I think the liner in the hole will no only allow the watertank to be more functional but also perserves your wonderful work.

I agree. The hickory will absorb water, swell, and split that spout apart, probably at the joint, and at other weak spots in the grain, ruining all your work.

Using the tube will prevent that.

Its a small price to pay. Do it and move on, knowing that your work will still be filling tanks 20 years from now.

3 Days to go… till install on Sunday. Tackled several things last night; Drilled and mounted the eye-bolts to the Butt end of the spout, scene the original had cast tabs molded on this seamed like the best alternative. These will “hook” onto a matched set on the tank.

(http://i1234.photobucket.com/albums/ff403/dave2-8-0/WT-175.jpg)

(http://i1234.photobucket.com/albums/ff403/dave2-8-0/WT-174.jpg)

Made up the collar for the weights to attach to. Cut it from 30 Gage sheet metal, bent the tabs and drilled for #10 40 1/2: screw. Also bent the loop to attach the cables to. Pounded it flat to look like it would have been hand forged in the shop.

(http://i1234.photobucket.com/albums/ff403/dave2-8-0/WT-179.jpg)

Carved the groove in the neck for the collar to fit in the recess.

(http://i1234.photobucket.com/albums/ff403/dave2-8-0/WT-178.jpg)

Fitted the collar to the neck. BTW its more secure then I thought it would be.

(http://i1234.photobucket.com/albums/ff403/dave2-8-0/WT-177.jpg)

(http://i1234.photobucket.com/albums/ff403/dave2-8-0/WT-176.jpg)

Tackled the tubing and the ball valve on/off control. The vinyl tubing needed to start further under (back) to allow for flex at the base of the spout, so I moved the connection right up against the ball valve and did not hard fix the end to allow for movement, it could be changed latter if need to be. Here’s the tubing , valve and the pvc pipe(gray piece) cut to fix over the valve stem(red) to turn on/off from the outside. looking front to rear.

(http://i1234.photobucket.com/albums/ff403/dave2-8-0/WT-182.jpg)

and straight up from the bottom.

(http://i1234.photobucket.com/albums/ff403/dave2-8-0/WT-184.jpg)

Drilled 1 1/4" holes to hold the valve control lever in the mounting brackets and attached so the valve could be controlled from the outside.

(http://i1234.photobucket.com/albums/ff403/dave2-8-0/WT-185.jpg)

(http://i1234.photobucket.com/albums/ff403/dave2-8-0/WT-186.jpg)

Gave it all a good coat of paint, the new stuff with the primer in it. amazing what a coat of paint does (and hides the sins)

(http://i1234.photobucket.com/albums/ff403/dave2-8-0/WT-188.jpg)

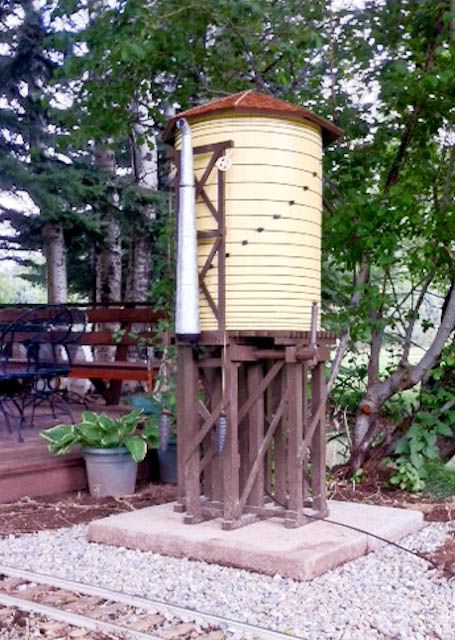
I’ll cut down the pipe when I figure out what I’ll do for a handle. And of course I had to test mount the butt end of the spout. HOORAY it worked!!!

(http://i1234.photobucket.com/albums/ff403/dave2-8-0/WT-181.jpg)

(http://i1234.photobucket.com/albums/ff403/dave2-8-0/WT-180.jpg)

I epoxied the two halves together, and waiting for the cure time… Tonight… Mount the tip, and Paint, Maybe a detail or two…

Looks real nice. For a handle, Id just use a couple of 90 degree bends and some more pipe, and make a crank. Bonus points if you use reducers down to 1/2"

What Bob said. A reducer down to 1/2", then a T and some stubs of 1/2" ought to do it :slight_smile:

2 Days to go… finishing things up… waisted a couple of hours on the counterbalance weights. Here is what I thought would work. Cut the weights(1 1/2" steel), drilled and tapped them.

(http://i1234.photobucket.com/albums/ff403/dave2-8-0/WT-193.jpg)

(http://i1234.photobucket.com/albums/ff403/dave2-8-0/WT-192.jpg)

Wow did I get it wrong on the weight that it would need. I got them hung and they were way to heavy, cut off an 1 1/2" off the end, re hung them ant they were still to heavy, took the cut off piece, and tried that and it was just right. Ugly shape, funky size, bounced around on the rigging, got hung up on the way up and down. Went back to my dads (the clock maker’s) house and low and behold found the perfect weights

(http://i1234.photobucket.com/albums/ff403/dave2-8-0/WT-190.jpg)

Ya they aren’t prototypical, but they are just right and work great. Adds a charming look also. Epoxied the tip on the spout, 2 coats of sanding sealer, and what I thought was silver paint, I grabbed chrome instead of silver, It’s shinny but not quite right, it will do for tonight.

(http://i1234.photobucket.com/albums/ff403/dave2-8-0/WT-191.jpg)

It will do for tonight… @ Jon & Bob The valve is a Ball valve. 1/4 turn from full OFF to full ON. I placed the valve so that OFF will be with the handle in the UP position, and ON will be Pulling the handle 90 Deg. forward and down (like the spout) will be ON. For now I will use a 90 reducing joint with a Stub for the handle. I would like to carve/turn one that looks like a engineers control handle (air breaks, or similar), not this week thou.

Thanks, Dave, for all the great pictures of your build. I know it can interfere with the flow of work to stop and take pix, but I think I speak for all of us when I say we really have been enjoying this journey with you…

I love the pinecone clock weights - they’re a great, a just slightly wacky/amusing finishing touch… right in keeping with this whole slightly wacky hobby that we love so much - in other words, perfect !! Ha! Ha!

Looking forward to hearing about the installation and your buddy’s reaction…

John Le Forestier said:
I love the pinecone clock weights - they're a great, a just slightly wacky/amusing finishing touch... .
I agree.......it's the catass Dave! :)

Last Day… Install tomorrow… Not a whole lot to show tonight… Worked on finishing up details. We got RAIN!!!, Being a true New Mexican we never slight the rain when it comes… Good Lord knew we needed it, hopefully it will keep the fires down for a few weeks, but today it did get in the way a bit, not complaining, we’ll do with the rain whenever it comes. While it rained… Inside work. Got the weather stripping along the ridge lines. It gives it a finished look.

(http://i1234.photobucket.com/albums/ff403/dave2-8-0/WT-196.jpg)

Murphy showed up with the rain. I finally filled the tank with water, to check for leaks, Guess what? Ya, I got some… Spent the next 2 hrs removing the valve, re-tefloning the joints, and re tightening, twice, of course. finally no leaks… but I thought that I was about to break things, I had to tighten so much. I’m not a big fan of threaded PVC, but the pipe don’t rust, and should come apart again, if needed. Painted the spout base black… It dosent want to dry, I have it in the oven, (no fire, just the pilot light for heat) dry or not it goes on the tank tomorrow. Removed the Tank base from the construction base in preparation for transporting, and the bottom of the base had escaped painting. Got the bottom painted, hope it dries over night.

(http://i1234.photobucket.com/albums/ff403/dave2-8-0/WT-195.jpg)

And the final part. The final… A topic of discussion several weeks ago… I decided that I would turn it myself. Glued up some pretty Mahogany. Should look pretty nice just natural and polished up.

(http://i1234.photobucket.com/albums/ff403/dave2-8-0/WT-197.jpg)

11pm and time for bed. Durango Tomorrow…

GOT IT DONE !!! Installed. and looking great.

(http://i1234.photobucket.com/albums/ff403/dave2-8-0/WT-198.jpg)

It’s pushing 11:30 PM It’s late, I’m Tired, and if anyone is interested I post how we did it. Oh yah, Andys place is pretty cool for train guys.

(http://i1234.photobucket.com/albums/ff403/dave2-8-0/WT-263.jpg)

The tank is on the left, and his real live depot is in the back ground. He also has a working Semaphore that changes every 1/2 hr, his own Caboose, oh ya also a working wig wag signal too. Till tomarrow. Dave