I think this whole thread would make a great “How-To” for the Articles section if for no other reason then to show the working part of an actual water tank. Interesting stuff, Thanx!
Back to my tank… I have three weeks to have this thing installed and operating… Andy, the guy that benefits from all of this madness, has a steam up at his railroad dead ahead…
If I’m to pull this off I need help!
What and how am I to make the base end of the spout out of? Would a glued up cube of PVC work, My thoughts are that I could turn it in the lathe, and cement the tabs on. If I were to use Alum. I would have to find someone to weld the tabs and where would I come up with the blank? Making a master and casting in low temp metal probably wouldn’t work. Thoughts?
On the “Sheet Metal” side. I believe I can roll up short lengths of what ever I use to form the tube. Rivets are another problem, it appears that smaller then 3/32 are very hard to come by. I thought that I would roll, clamp and wire tie and then sweat solder the seams. Then solder the sections together forming the tube. The flat layout patterns for the curved neck would be a issue, Maybe Gary A. could work his computer magic again? Hint hint. What sheet stock, cleans up, and solders the best? Would roll roof gutter flashing work? For the rivets “Look” I could cut the heads off copper pins and solder them on. Or could the pin be used as rivets?
Some collective thoughts here needed.
In response… Here’s where I personally would make some compromises for the sake of the model. I think roof flashing would be too stiff and thick. I personally prefer copper; one of the other guys would use steel sheet, and if I were going that way I’d be OK with it but I’d use the thin stuff from a big rectangular olive oil tin. I’d plan on blackening the spout after assembly.
Next compromise: I’d probably make the spout in one piece rather than four sections as on the prototype. I think that’d be far easier. I might consider “scoring” my spout to fake seams around the circumference.
Next compromise: I’d skip the rivets. I MIGHT consider embossing my metal sheet to fake them, but that’s all. Why - more trouble than they’re worth, IMHO, and a chance of really damaging that spout in the riveting process, I would think…
As for the cast base, I’m not sure what I would do… Both turning and casting have occurred to me. I think an effective one could actually be made of wood, BION… But this might be tricky. It could be cast in resin, or metal if you go that way, maybe in a sand mold. Right about now I’d be looking at stainless steel bowls or eggcups or mugs or teacups or balls for inside that might be used as molds… you want about 2-1.2", right? Since I don’t own a lathe I’d be thinking of molding something in resin, I think. If I had a lathe my first instinct would be to turn the thing out of hardwood, then either use my turning as a pattern or straight up. I don’t have any serious worries about using wood for this part.
Gary might come through… on the other hand you can make paper or thin cardboard templates for the odd little shapes at the spout end. Maybe you could use a plumbing elbow as a pattern, pencil or chalk your seams on that and go from there…
Don’t forget about the ladder and trapdoor !!! Oh, and the finial! 
You may have a busy three weeks ahead of you! 
See that casting that looks like a marine bollard on top of the elbow of one of those spouts? (third pic from the bottom on this page 14.) They sell thumbtacks like that in both metal and plastic.
Dave
THANKS for all the photos. I’m will be starting on a water tank before long and they will help a lot.
I don’t know how big your lathe is, but I like the alum idea. I have a chunk of 2" round here in the shop that I could cut a piece off and send you.
The PVC would work but it might get beat up a little on the pipe when lowering the spout. Glue one up and turn it and see how it works.
Rodney
FYI The spout needs to be about 30" long. The “Fat End” will need to be about 2 1/4 " diam. And the neck about 1 1/4". I do have the neck that I made from PVC that could be used.
(http://i1234.photobucket.com/albums/ff403/dave2-8-0/WT-115.jpg)
I could epoxy it on. The tank will not be used multiple times every day, Likely only for steam ups and mostly weekend running. I think that the PVC or protected wood would last a long time. Dave
That neck looked good to me. You?
30" is longer than I thought…
I can see making it out of more than one piece now, if you want to go that way, but I’d still rather do it in one piece if I could. I think those circumferential joints could be a real pain, worth avoiding if possible.
Lacking a form that size, I’d probably form it over a length of pipe, then widen the fat end to match whatever’s going on up there, clamp it, slip it off the pipe, trim it all as required and get the bottom to match my neck, clamp it all, and then solder.
If the darn thing wanted to close up on me I’d cut out a couple of circles of wood the right diameter(s) to shove inside and push it into shape. At 30" length, I’d also have a couple of lengths of wire ready to twist around and hold it closed here and there along its length. I’d take all the time I needed to get it all nicely closed up, trimmed, clamped and looking pretty perfectimundo before I began soldering. At some point during this process I’d have paste-fluxed that long joint. I wouldn’t tin it, as tinning would interfere with the shape. I’d just use the heat and flow method that plumbers use. I’d prefer an iron for this job rather than a torch… It’d have to be a fairly substantial one, say 80 Watts.
I’d plan on soldering up to those wires in both directions, letting it cool, then removing them, then finish soldering where the wires had been. Mind you, that joint really doesn’t have to be waterproof, It’s along the top of the tube, there’s no pressure, and the water will be flowing down the bottom of the tube.
Then, as you say, epoxy any nonmetallic parts to it.
I am averse to ‘protecting’ wood parts. Whatever keeps water out also locks it in.
I say if you use wood up there leave it untreated. Just let it wet and dry out again, like the old barns.
There’s a watermill up here that had a 100 year-old tubular wooden flume several hundred feet long. Worked fine right up 'til it was replaced just a few years back. That was a shame…
Anyway, believe me, that very long, huge example of the cooper’s art never saw a lick of paint or ‘protectant’. If it had, it’d have rotted away PDQ.
Moving on the spout issue. Heres what I have decided to do: Figuring that sheet metal stock that I can stand to be fairly successful on rolling tightly would be thin and there for not very rigid and would not hold up to minor abuse, I have decided to make a core to roll the sheet stock over. I went to our local Hardwood store and bought a stick of Hickory 1 3/4 thick by 6" wide by 10 ft long, for turning the base and core of the spout. I chose Hickory for its strength, and toughness. I have never worked with Hickory of this size… It is heavy as He#$. And tough to cut, I can see why it is used for ax and hammer handles. Drew up full size plans with dimensions for turning… (It looks like an ancient Cannon…with a droppie nose). Cut the stock to length. Laid out the cut lines for re sawing.
(http://i1234.photobucket.com/albums/ff403/dave2-8-0/WT-150.jpg)
Now… either my 3tpi re-saw blade on my bandsaw is dull or this wood is really tough, I believe it’s really tough as the cut speed was realllllllllyyyyy sslllooooooooow. I have to glue up two thicknesses of the wood to get the size that I will need to turn the base and tube.
(http://i1234.photobucket.com/albums/ff403/dave2-8-0/WT-149.jpg)
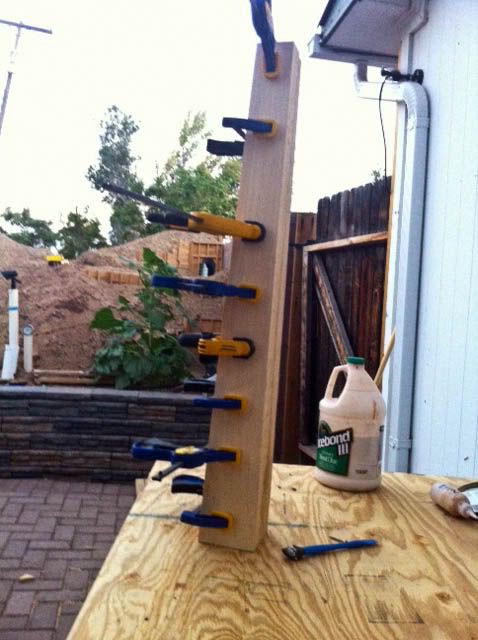
yah, they look like rifle stock blanks. A good coating of Tightbond III on each side, and Clamp.
(http://i1234.photobucket.com/albums/ff403/dave2-8-0/WT-148.jpg)
I’ll have to wait a couple of days for the glue to cure before starting to remove the scrap wood.
(http://i1234.photobucket.com/albums/ff403/dave2-8-0/WT-147.jpg)
My plan is to turn the spout in two sections, and turn a lip on one end, and a cup on the other to join them back together after boring the hole thru the middle. On the neck end, turning a collar on the end to receive the PVC neck that I have already. I bought a length of 30 gage 4" vent pipe, that I will cut down, and wrap the “pipe” with for the authentic look. Probably adding the heads of brass pins for the riveting look. Finish with the obligatory silver paint. Dave
Sounds like a great plan. Looking forward to the next installment 
Started the turning of the spout tonight. Split the blank in two halves. I took the haves into the bathroom scale, and they weighed out to 10lbs 10oz. this Hickory is heavy stuff.
(http://i1234.photobucket.com/albums/ff403/dave2-8-0/WT-151.jpg)
Got the butt end roughed out to round. I thought that my gouge was sharp enough… NOT! this stuff is tough, and hard on tools. I haven’t done much turning in the past couple of years, and boy are my skills rough, and add this tough stuff wood, and I had to take it kinda slow to keep from hurting my spout, and oh yah me too.
(http://i1234.photobucket.com/albums/ff403/dave2-8-0/WT-152.jpg)
A simple thought… The Hickory tree started out round, we cut it down, sent it to a mill, and they cut it into square pieces so we could buy it, we take it home, cut it into pieces, glue them together, put them on a lathe, and make them round again, Seems like we should have taken notes from mother nature, you think? Anyway, laid out the pattern lines for the sizing.
(http://i1234.photobucket.com/albums/ff403/dave2-8-0/WT-153.jpg)
Next up… do it again for the neck end. Dave
Work on the neck end of the spout… @Mike R. Thanks for the E-mail. I’ll take the space to explain for you in some detail on the pattern to wood process here. For those that know the process this might be a little boring, those that don’t might learn something, and those that don’t care, just look at the pictures and nod your head. I drew a full size drawing of the spout that I want to turn, that gives me 1:1 measurements. When you turn a square block to round, Picture the end view of a square then draw a circle within the square and that is what you will end up with, you have to remove the corners, and get down past the flat sides.
(http://i1234.photobucket.com/albums/ff403/dave2-8-0/WT-158.jpg)
Once I got it round, I then transfered to the wood a series of lines, exactly the same spacing as the lines on the drawing.
(http://i1234.photobucket.com/albums/ff403/dave2-8-0/WT-153.jpg)
These lines will be used to transfer the size of the drawing to the wood, by cutting down the outside of the blank to the size of the finished spout.
(http://i1234.photobucket.com/albums/ff403/dave2-8-0/WT-157.jpg)
I achieve this by using a “outside caliper” that I set to the desired size on the plan.
(http://i1234.photobucket.com/albums/ff403/dave2-8-0/WT-159.jpg)
Then using your “Parting Tool” I cut a groove jest deep enough so the caliper jest slides past the widest section.
(http://i1234.photobucket.com/albums/ff403/dave2-8-0/WT-155.jpg)
Keep cutting, and checking, until you have the right size.
(http://i1234.photobucket.com/albums/ff403/dave2-8-0/WT-156.jpg)
When you have all your reference cuts done, You then remove the unneeded wood between the cuts, using the cuts as a guide for the finished size. Here is the neck end, turned pretty close to the final size and shape. I have yet to turn the collar for the spout end, nor have I turned down the “cup and collar” for the joint between the two halves.
(http://i1234.photobucket.com/albums/ff403/dave2-8-0/WT-154.jpg)
In the AM… the other half. With some luck it will be done tomorrow!
Golly, I’m impressed. You’re not just playing tiddley-winks here, are you, Dave… ;>)
Dave,
Looks like Norm Abrams and “A New Yankee Workshop”.
Outstanding!
Very nicely done. I am learning a lot from this wonderful thread.
Thanks. Tom
Well beyond me skills Dave. Excellent looking work.
Spout turned… But not done … Got the spout Turning on the lathe finished, I think that my choice of using Hickory turns out to be a bad one… Here is the butt end. I decided to cut a small notch/grove around where the Cast Iron end would attach with the sheet metal spout, kinda looking like the real thing.
(http://i1234.photobucket.com/albums/ff403/dave2-8-0/WT-162.jpg)
Fitted up the neck end with the PVC curved spout. Not attached yet, but fits.
(http://i1234.photobucket.com/albums/ff403/dave2-8-0/WT-161.jpg)
And the two halves.
(http://i1234.photobucket.com/albums/ff403/dave2-8-0/WT-163.jpg)
Here is the joint ends, I had to hand carve the cup part with a chisel and mallet. HARD TOUGH STUFF!!! BTW, My chisels are sharp enough to shave with, and still heavy blows with a 1/4 inch knife.
(http://i1234.photobucket.com/albums/ff403/dave2-8-0/WT-164.jpg)
And the whole thing.
(http://i1234.photobucket.com/albums/ff403/dave2-8-0/WT-160.jpg)
(http://i1234.photobucket.com/albums/ff403/dave2-8-0/WT-165.jpg)
And I jest had to stick it up on the tank to take a look.
(http://i1234.photobucket.com/albums/ff403/dave2-8-0/WT-166.jpg)
(http://i1234.photobucket.com/albums/ff403/dave2-8-0/WT-167.jpg)
(http://i1234.photobucket.com/albums/ff403/dave2-8-0/WT-169.jpg)
I tried to bore the center hole… This stuff is to hard for my setup to cut an 1 1/2 hole in the butt end, and an 1 1/4" from the other end of the lower half. I have come to the conclusion that if I’m going to get a hole thru this thing, I’ll have to have a machine shop bore it for me. So tomorrow I’ll see if someone want’s to take on the challenge. Wish me luck. If it can’t be done… I’ll start over with a softer wood, and maybe cut the bore before I put the two haves together. Dave
I think baseball bats are made from Hickory. It is pretty hard, so I can see why it’s making things tough.
Sure hope you can make it work and don’t have to start over 
Ralph
It looks fantastic. Hope you can make it work.
Nice work, it’s looking like the real thing.