Large Scale Central

Working Water Tank Build

Starting a new project. My train friend, Andy Saez in Durango Co. has a 7.5" railroad called the Animas Valley Rail Road (AVRR). Located just 1 mile South of Hermosa on the Durango Silverton NG Line. Last summer he honored me with the thrill of running his live steam 3 truck Shay.

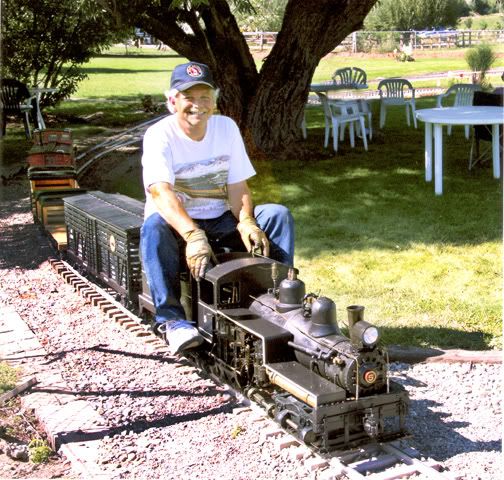
Yah thats Me and the grin took days to wear off… What a thrill. We loaded it up with a number of friends and ran it out to meet the Silverton south bound into Durango. We traded whistles and waves to the passengers and rolled back to the depot to take on water, Grabbed the hose and filled it up. He really needs a working water tank. I spent the afternoon cutting up the wood. This thing will be huge!! 1 1/2 Scale.

This is just the wood for the base, from the platform that the bottom of the tank sets on, down to the ground. I’ll start the assembly as the week goes on… I’ve never built a water tank before, so wish me luck… and any help or hints are welcomed.

Dave,
Great project.
I think the bottom bases should be treated wood.
What are you going to do about the tank?
Open top?
If you are going to fill it with a hose, no problem.
But if it is having water piped to it, it would need drain cocks and a frost free hydrant under it.
If your friend runs in the winter, more ice/frost free items would have to be added. (Tank heater=electricity, eg.)

Leave it to LSC guys to add work to your list :slight_smile: Nice start Dave. Ride-On’s sure are fun. Wish I could afford one as I almost have enough room for a small loop. Me and my friends seem to fall off them a lot though…

(http://lsc.cvsry.com/Ken_Dump-1_640.jpg)

I fell off that day too, but luckily no one with a camera was near by.

Dave you couldn’t get that smile off your face with a jackhammer !
Neat project …keep us posted

John et all: I found a 8 gal. bucket that will be the actual “water holder” part of the tank. The plan is to have it plumbed to a garden hose in a semi permament summer hookup to a facet 4 foot away.

(http://i1234.photobucket.com/albums/ff403/dave2-8-0/WT-4.jpg)

Keeping it full falls to using a toilet bowl filler. BTW the threads on the filler aren’t standard pipe thread, nor are they “hose” fitting either!! The “tank” will set on a concrete pad, and spend the harsh Durango winters inside.

What a neat project and a good idea to use the toilet tank float. Instead of building the water tank why not just buy a barrel. That way you just need ot build the base. If you keep the barrel seperate from the base you could jsut carry the barrel in for winter. Or use a bucket adn clad it with wood strips. There are lots of ideas and I’m sure I’m not he only one interested in your build.

Not every one is at York this weekend! Finally got some time to start the assembly on the tank base. Got the pillars glued and screwed together. The bottom of the tank is to set 24" above the rails.

(http://i1234.photobucket.com/albums/ff403/dave2-8-0/WT-7.jpg)

Test fitted the pieces to get a hint of the size and shape. The bucket is an 8 gallon one, and is 23" tall on its own.

(http://i1234.photobucket.com/albums/ff403/dave2-8-0/WT-6.jpg)

By the time i put the finale on the top it should top out to be 6 foot tall. Next up … The diagonal braces to tie it all together…

Cool…and it begins!

That base looks like your off on the right foot

Started back on the Water Tank today by tying the pilings to a construction base to keep everything square and flat.

(http://i1234.photobucket.com/albums/ff403/dave2-8-0/WT-10.jpg)

after squaring everything up, I didn’t like the “Look” of the 16 up posts in the base. Took another look at a different set of blueprints and decided to go to the more common 12 up posts to get a hexagonal base.

(http://i1234.photobucket.com/albums/ff403/dave2-8-0/WT-9.jpg)

Chopped the 4 corner posts off.

(http://i1234.photobucket.com/albums/ff403/dave2-8-0/WT-11.jpg)

I like the look much better. Now to figure out the new plan for the diagonal bracing!

Neet project. The toilet bowl filler idea is a great one. What are you going to do about the filler spout for the loco?

Jon,

I think your suppose to ease up on the adult beverages until after the run… :wink:

Tackled the new post layout and figured out the diagonal bracing. Got them glued and nailed up.

(http://i1234.photobucket.com/albums/ff403/dave2-8-0/WT-12.jpg)

Got the tank floor joists glued and screwed. This thing is starting to look like it should hold up a tank (pun intended)

(http://i1234.photobucket.com/albums/ff403/dave2-8-0/WT-13.jpg)

Jake, I don’t know yet… the spout is still down the road… hints tips and ideas are welcomed. Looks like it’s time to break out the primer… The templet is the size of the what will be the tank.

(http://i1234.photobucket.com/albums/ff403/dave2-8-0/WT-18.jpg)

That would make a great looking lawn ornament.

Some people have light houses and wishing wells on their front lawn, I think a water tank like that would look good.

I’m following this build with interest. I think you’re making your pal a fabulous gift here, Dave, and he’s a lucky man! You’re right, twelve up looks far better, more in proportion to that tank, than sixteen up.

I measured one of my wife’s wine buckets - she buys her wine from a wholesaler in 20-litre buckets. They measure 16" h x 12" diameter.

This isn’t my scale, but I can still admire what you’re up to!

Are you relying on adhesives to hold this together outdoors? If so, have you actually discovered one that you can trust even in the rain? I have always been adamant that glues don’t work outdoors as moisture will work in behind any glue eventually, so I avoid adhesives for outdoor construction and rely on mechanical means, but they sure do take a lot longer. I could be wrong, and I’d be really happy to learn that there are truly effective alternatives! :expressionless:

Oh, I forgot… About the spout:

You won’t need a valve if your spout is long enough so that its opening rises above your water level. You could simply attach a length of garden hose to the tank bottom, if you like disguise it inside a length of pipe, and hook the hose end to the tank top so the opening is higher than water level. Yes it’s amateurish, especially after that very professional refil mechanism you’ve devised, but it will work fine until you can devise something more realistic.

I like to use an epoxy resin (preferably WEST Systems) for projects like this. Strong, and will outlast the wood. But those PVC glues (like Gorilla Glue) seem to offer a lot of durability as well, I just don’t have as much experience with them. Easier to use, because the PVC glues are one-part and work as gap-fillers.

John, thanks for the kind words… I use Tightbond III, its rated as waterproof, and I have been using it for years, with great results. Living in the Dry SouthWest we don’t have to deal with the moisture levels from the Rockies East. Today the humidity was 17%. I used stainless screws on the bigger pieces and 16 gauge brads on the 3/8" bracing with liberal amounts of glue.

I feel that the sealing out of weather is as important as the screw and glue. I typically use 2 coats of premium primer on raw wood, allowing a day between coats for curing, and then two coats of a premium exterior paint with 2+ days between coats for the curing process.

I’m a great believer in using premium paint products as well, Dave. In my case, I really don’t enjoy painting things very much, and I consider that labour to be my biggest cost, so I feel as long as I have to do the job I may as well use the best stuff money can buy, get a really good, sound finish for my trouble, and hopefully, never have to do it over again!!!

Actually, when it comes to painting or finishing, the actual brushwork is the least of it, IMO. I’m sure I spend far more time doing prep work prior to the actual brushing. Thanks to both you and Michael for your replies.

I used the WEST system, maybe twenty years ago now, when I built a cedar strip canoe. It involved encasing the entirety of the wood in a clear fiberglass-epoxy coating. Beautiful result. I had forgotten about that experience!

I’m going to experiment with all three of the adhesives you guys have pointed me to. Try 'em all and leave them outside for a year or two. Thanks again!

Got the 1st coat of primer on the tank base. It took an hour and 3/4 of painting time to cover all the sides and crevices on this beast…

(http://i1234.photobucket.com/albums/ff403/dave2-8-0/WT-19.jpg)

The white primer gives it a “Lawn Ornament” look like Ken thought of using it. BTW i like the thought of that, but this one has to really work.

(http://i1234.photobucket.com/albums/ff403/dave2-8-0/WT-20.jpg)

Tomorrow it gets it’s second coat of primer, which should set me up to painting the base this weekend

Need help and input on the tank part of the build. Got the 2nd coat of primer on the base, and it looks jest like it did after the 1st coat, so if you want to see what it looks like, see the last pic i posted. Looking onward to the tank build portion. I’m not and engineer type and i want your feed back on these plans.

(http://i1234.photobucket.com/albums/ff403/dave2-8-0/WT-23.jpg)

(http://i1234.photobucket.com/albums/ff403/dave2-8-0/WT-24.jpg)

Do you think that it will work? See any major faults in the design? I’ve got only enough 5/8 exterior ply for a couple more of the tank forms. Do you think that 7" spacing will be to far apart to keep the staves straight and in place? Will I need more spacer blocking to keep things in line and level? Now is the time for all you’re experience to come forward. Im hoping to make some saw dust this weekend, if I can finalize the planes.