Large Scale Central

Up-Scaling a Delton Classic to FN3

Photo Update: Minimal progress this week, but I did spend some time on it today. I have been looking at the frame every meal while it sits on the dining room table. I decided that the needle beams and bolsters needed to be visible from the new outside edge of the car. The needle beams needed beefing up and extending. This was accomplished with a couple of strips cut from .040 styrene sheet and a chunk of 6mm PVC.

The extensions were made in pairs, then installed and glued on from each end…

The Delton bolsters have very little thickness at the car side. To extend them I glued together two pieces of .040 then glued that to the bottom edge of the car to represent the end of the bolster…

Additions with the frame in place…

I have maintained the ability for the frame to be removed from the body…

And finally, a track level view of the frame enhancements…

I also worked on the roof today. I have decided that even though this is a representation of a second generation wood car, it is a what-if the car survived to present day tourist operations. As such, I decided that the roof would have a tin coating similar to the extant steel frame boxcar. To represent this I coated the roof with aluminum foil tape. I started on the car lines but didn’t have a proper glue. I’d rather not mess with epoxy so tomorrow I’ll pick up some the 3M Emblem Adhesive to try.

Cool build. Nice work on the wood grain, too.

Ray Dunakin said:
Cool build. Nice work on the wood grain, too.
I was thinking the same thing ....the graining looks very good

Thanks. It’s nothing special, just dragging a razor saw against the surface. I do try and do some curving action as I drag and I go up first, then down. The pictures are taken with my old digital, a Fuzi S700Z. It does a really nice job with macro focus. That helps too!

Another photo update: We took a ride today to do some shopping and I picked up a tube of 3M Plastic Emblem Adhesive as I needed something to bond plastic and metal for assembly of the ladders and to do the car lines on the roof. First, the roof. It was a mathematical challenge to come up with spacing that would look similar to the prototype but accommodate my shortened length. I ended up drawing it in Visio so I could play with the spacing, then printed the plan out full-size for final approval. The roof was fist covered with aluminum tape, then the Car lines were installed with the aid of a spacing jig…

The car lines are cut from 3mm PVC board. Good thing I have a large supply because it sure does waste a bunch cutting 3mm strips of 3mm board on a 10:" table saw :o

Not wanting to try and miter cut the center joint I simply notched the bottom to allow the PVC to bend over the peak…

Finally, I got started on ladder assembly. The rails are made from 3mm PVC. Rungs are brass rod and fit into notches cut in the rails. Some 3M Plastic Emblem Adhesive holds the rod and the NBW casting in place as they are built in a jig. They are surprisingly sturdy once assembled. I can’t put them on the car until after the end rods are fabricated and placed. First out of the jig…

They were supposed to have 6 rungs but the top one was too close and wouldn’t allow the cut corner, so I left it off. Next up is some brass work to create the mounting hardware for the end rod as seen at the left corner of the front car in this picture…

SLOW DOWN!!
:wink:

Looks good Jon.

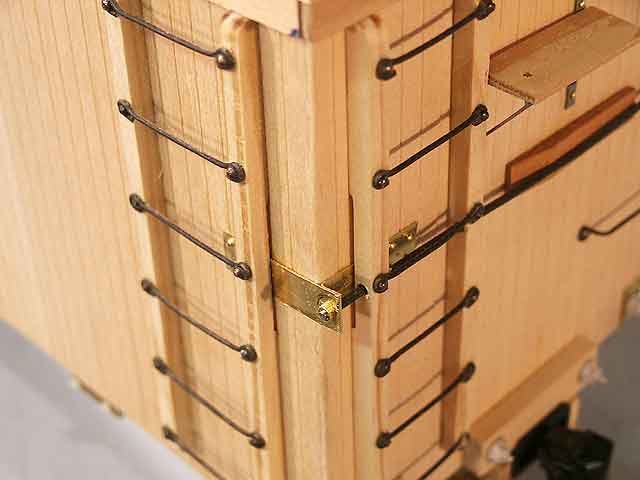
I keep getting hung up on the details. I can’t install the ladders until the brackets that support the end rod are fabricated. I’m talking about the black hardware at the edges of the car in this pic…

I’ve been rattling this around in my head for a few days as to how it could be made. Today I looked at some brass flat bar I had in in stock and it scaled out almost perfectly for height. I decided it needed to be made in two pieces and soldered together. The brass stock was cut to about 22mm long then the last 3mm of half of them were bet at a 90 degree angle…

In order to solder the two pieces together I needed a jig to hold them. My pin nailer comes in real handy when building things like this…

The two pieces of brass are cleaned with emery cloth where they will join, then tinned with solder. The tinned pieces are placed in the jig then heated with an iron until the solder flows…

A little clean-up, drill a a hole for the rod and they are ready to install :slight_smile: Now if I could just come up with such a good plan to make the roof walk supports!
You only have to make 2, Jon. :wink:

Bruce Chandler said:
You only have to make 2, Jon. :wink:

Easy for you to say. You don’t have pictures like this in your collection…

And NO, I’m not modeling all of the NBW’s on the car lines :o

And to give credit where credit is due, I copied Kevin Strong’s method to build the rod hardware…

That’s from Kevin’s box car build. I read it again before I started this build. I forgot that I had studied this shot for ideas on how to do the ladders. Thought I came up with the bracket idea on my own :open_mouth: Thanks Kevin!

Jon, you are just too fussy. If I ever come up with a box with 8 wheels under it, I will call that good enuff!

Great work.

Steve Featherkile said:
Jon, you are just too fussy. If I ever come up with a box with 8 wheels under it, I will call that good enuff!

Great work.


I never used to be. Then I started following the work of the fantastic modelers who post on here. I was going to name names, but I’d probably leave too many out. You all know who I’m talking about :slight_smile: There are limits to my madness. Like all of the bolt detail on the roof and attaching the ladders. I’m just not willing to drill all those holes.

I do enjoy figuring out how to make the details. Like the ends of the rods that go through those brass brackets. Kevin threaded the end of the rod and attached a nut. I don’t have the die nor the nut, so I looked at my collection of cast details and found a NBW on a plate that was big enough to drill from the back. The EBT cars don’t have the plate, but I’'m willing to ignore that in order to come up with a solution. Also, the time it takes to make these time spent doing something I like rather than sitting in front of the TV or computer.

Jon Radder said:
Also, the time it takes to make these time spent doing something I like rather than sitting in front of the TV or computer.
That's a bit ironic, since you sat in front of the computer and learned all these neat little tricks and stuff from all those guys and are now putting them to use so you can sit in front of the computer again, and show us your fine lookin handy work........................just saying is all...........;)

Ken, now that you said it, tell us you don’t enjoy the build photos as much as the rest of us. :slight_smile:

Jon, I always enjoy your builds and, like you, watch for the techniques I might some day use.

Bob C.

it is a catch 22 ! but glad you post the pics and info Jon. Looks like you’re doing right well on the details , nice build here.

Steve Featherkile said:
Jon, you are just too fussy.
Yeah anyhow! :)
1 Like

I’ll bet y’all thought that this was yet another build that wasn’t going to get finished. Well, it hasn’t beat me yet. Progress has slowed because I’m working some extra hours at job #2 getting the year-end tax filings prepared. Today I was determined to make some progress. I needed to get the corner brackets / end rod finished and installed so I can get back to the ladders. It took me some time to get a drill jig made up, but I finally got all the holes drilled…

Finally they are ready to glue on. I used Rooster’s famous Emblem Cement to attach them. The rod is held in place by the brackets…

Once the glue set, I drilled the body to accept NB castings and fitted a nut/bolt/plate to simulate the nut at the end of each rod end…

My hole alignment is less than perfect, but it seems to hold up pretty good in close-up pictures once the NB’s are inserted…

Ladders are next, but not soon as I have to work Sunday this week.

Jon thats looking great. Going to be a nice looking boxcar when done. I have to admit Im slowly going the route of being more detailed. After seeing Kevin, you and others with the details it has gotten me thinking more. I want to start putting more focus on making more of my own rolling stock from scratch with the details like you are doing.

After pointing out the flaws and still not seeing them, all I can say in good job!