Large Scale Central

Triple O Salvage Project - Pu'uoma'o Yard Office and Observation Tower

Or first project, Miks 2018 – Pu’uomao Yard Office and (Maybe) Observation Tower had fallen on hard times. Part of the Triple O - 2025 Plans & Objectives included restoring this tower and analog power on/off station to some of its former glory. As with our collective efforts at Refurbishing Mama’s Bakery No Ka Oi, part of the challenge will be to preserve some of its childish charm while still incorporating lessons learned over seven years of garden railroading! This balance has become especially poignant as this project began just as Oldest Son’t PLAYMOBIL legio, pirates, and knights began a slumber that will not end until his own children discover the magic in their smiling 1:24 persons. “This cannot be just your hobby,” CINCHOUSE once admonished, yet I feel the day when it is mine to pursue alone coming ever closer.

First, this little building was only supposed to control two tracks. As the picture below shows, the number of tracks in this area is now four:

To the left are the permanent tracks of the M&K sugar company (power source A); to the right are the engine service tracks and mainline of the Triple O (power source B). The rebuilt tower will need to be able control DC power to all four tracks. To do this, I intend to tap the “hot” rail on each side of the yard, run it to a common bus, then use switches to turn the various tracks on/off, before running the lot back to the individual track. I sketched out the concept for Triple O tracks below:

This would be repeated on the M&K tracks. All wires would route back to the building where they would feed their buses and switches. We also want to be able to quickly disconnect this building between runs.

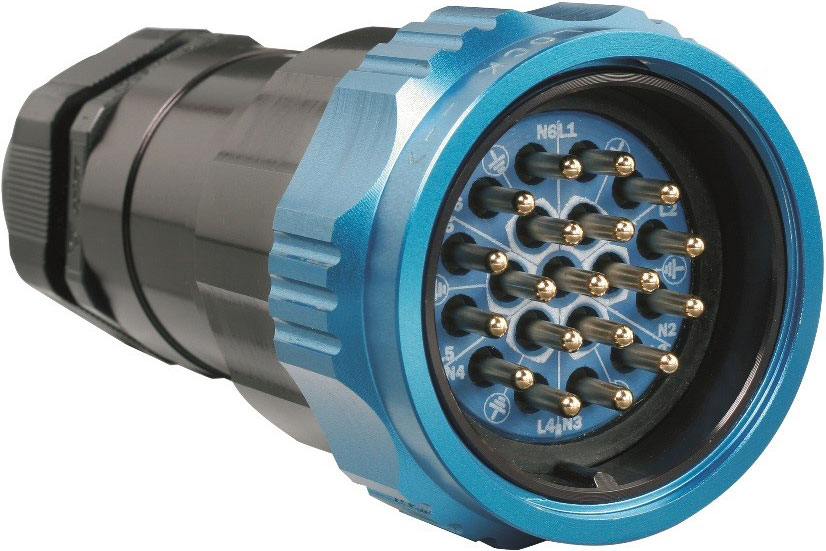
Question #1: Are their six wire connectors (two “hot wires” coming in; 4 “cold” wires running out) that would enable this project? The idea is that one “hot” wire would run from the Triple O to a bus, power the switches, and then individual “cold” wires would run from the switches to the track. The same would be true on the M&K side of the yard.

Question #2: What is the best way to take two “hot” leads and combine them into one? I found both outdoor twisty-doo-dads and three point crimping things at our hardware store. The cost is an effective wash.

Question #3. Are knife switches OK, or will corrosion over time make them a maintenance issue? These are just cool.

They also make it obvious that a track is live. The final product will be stored outside, though, so I’d prefer not to get something that is too susceptible to corrosion. Whatever switch we use, it will be in a new second story, with three of four sides closed to the elements.

This project has priority on the bench, so the 1:24 gang got orders to help to prevent errors from 1:1 desire to rush. Over the weekend, they helped Kid-zilla and I disconnect the tower from the tracks…

…and strip bad wood from good.

I thought a materials study would be of interest. In general, the treated 2x4 core is sound, as are almost all of the tongue depressors that formed the cladding, as seen in the post-stripping photo below.

The presumably basswood parts were a mixed bag. Horizontal elements in contact with the Hardiebacker floor showed rot…

…as did timbers facing the prevailing winds.

Almost all vertical components also showed rot.

The basswood and tongue depressor deck was finished.

It now serves as an abandoned dock on Lake Inferior.

The kebab stick lattice for the roof, to include TiteBond III soaked lashings, came through pretty well…

We plan to reuse this.

I would note that the expanding foam we used to simulate a “rock” foundation is all but gone. I plan to see if I can recreate this using the bag of scrap foam we’ve saved from countless other projects.

The light switches did OK, too, though we’ll see if the rust that formed on the various screws will preclude swapping out the wire for lamp chord wire!

And there you have it. When this is done, it will:

  • Control four tracks.
  • Have a second story.
  • Keep its tropical observation deck.
  • Maintain some (most?) of its whimsy.

Updates as progress merits!

Eric

5 Likes

You do have some fun projects.

You might want to consider a ‘barrier strip’ that is designed to terminate various bits of wire. Here’s 2 types. Besides tidying up the wiring, you can run a wire between 2 or more connectors to make a multi-connection. Note that they are easiest to use if you tin the wires (add solder to keep them together.) I sometimes solder or crimp a ring connector on a wire if using the first type.

This version can be cut to length.

6-pin cable connectors are also readily available. I have some with JST-style connectors, or you can get waterproof ones on Amazon:
https://www.amazon.com/dp/B0C8NMRBHS/ref=sspa_dk_hqp_detail_aax_0
The waterproof one might be useful if you plan to leave one end out in the rain?

See above.

I have no experience, sorry. If you can find one designed for maritime use, you might have a chance of it lasting a little longer!

If you want to remove the building between operating sessions and store it under cover, then marine switches probably aren’t necessary.

1 Like

Eric, there are a number of corded low-voltage switches available, such as:

I’ve also used a toggle switch with a rubber boot, and wrapped the whole thing (including the wire terminations) with self-fusing rubber sealing tape.

Eric;

The thing about knife switches in a salt air environment is, yes, they are going to corrode. However, they have large contact surfaces that are easy to maintain and clean. Also, an application of conductivity paste may help slow the corrosion.

Just my $.02, David Meashey

1 Like

supposing, that you have wet air and enough rain, i would not recommend these things for outside. not only because of corroding, but the possibility of shorts caused by water.

even here in the half-desert we learned, that knife switches need to be indoors.

I agree! There’s something electrically tactile with knife switches. :grinning_face_with_smiling_eyes:

Thanks everyone for the response. Here are few other design parameters:

  1. We want a quick disconnect style of plug so that we can easily take the building inside.
  2. The building will be stowed on our lanai, so it will be out of the rain. It is also on the leeward side of the house, which will minimize some of the wind-blow salt issues.

We have successfully used two-pin trailer connectors to attach our power supplies to the wire leads to the tracks. The plugs on the railroad have worked for years. Can we use the 4-pin style, one for each pair of sidings? Obviously, one of the pins will be left for “future, to be determined projects.”

Assuming that would work, these would feed a barrier strip, which, in turn would send power to the electrical switches, which, when closed, would send power back to the barrier strip and off to the respective track.

Speaking of switches, our light switches were functioning but corroded, so this is an opportunity to replace them, which opens up new avenues to make this building even more fun, even as it becomes more functional. I envision having the plug(s) exiting the building from the now vacant wall, with a big “DANGER HIGH VOLTAGE” sign over them. On the roof would be an access hatch to the ladder or stairwell leading down into the building. There would also be the covered switch platform, where the Triple O crew (1:1 or 1:24) could direct power to the sidings. May as well incorporate those switches into the visual! We’d replace the “tiki style” observation platform because we like it.

To close, I noted the switches you mention, @Cliff_Jennings , had 12V ratings. Our power supplies deliver 5A / 24 V. Is this an issue?

I am going to get some of the physical supplies tomorrow, but I will hold off on the electrical stuff until I am sure I am getting the right things!

Thanks Again!

Eric

Eric, since the switches handle 20A @ 12v, I’d think they’d also be good with 10A @ 24v. Your lights in the building would be drawing very little power though, so I don’t think it’s an issue. If anyone disagrees, please chime in.

Here’s a connector style to consider, 2 to 6 pins, waterproof.
https://www.amazon.com/dp/B01A6LTK44


Yes. And they are designed for outdoor use, as you found with your 2-wire version.

2 Likes

Thanks for catching that Pete!

Eric they are perfect for the application and if you want to go crazy you could pack the terminals full of dielectric grease (or Vaseline in a pinch which IMO is more than fine) .

On a side note…save some of the Vaseline for YOUR future. That way when the boy is building and bashing Amtrak and you need him to change your diaper you have some available!

Third rail or overhead catenary ? That gauge wire can easily handle 440 VOLTS / 3 AMP per leg.

Eric, Our (Au / NZ) standard trailer plug and sockets are 7 pin and would do the job just fine. Not sure what your local version is tho…

image

Any auto parts store here carries them.

Edit - Seems walmart has heard of them (Link won’t paste without an error…) There must be must be something similar locally Eric.

Cheers
N

Eric, Neil,

The Triple O could go on a global tour with these baby’s! Making third rail and catenary options endless!!

Just saying
:rooster:

I have a cousin-in-law who’d pay money to see that flick.

:crazy_face:

Update.

We’ve been cleaning up the mess of a ransomware attack. The hackers weren’t able to cause anything beyond annoyance, thank goodness. Despite this, I sourced and bought most of what we need to proceed on this project.

Eric

This kind of stuff happens when surfing Amtrak porn at 2am.

Update:

Ugh…cleaning up from this hack has been a real pain, but CINCHOUSE has doggedly navigated all the various sites associated with her and most of those associated with running a household. It is surprisingly tough to change e-mail addresses, and the TELCOM company “ghosted” her. Still, this could have been a lot worse…

Anyway, I did return to this project, and started sanding and picking away at anything that looked rotten. The core, a mutilated 2x4, is in really good shape, though I did see some algae or mold.

This would have been on the inside, and I don’t remember seeing it before. I suspect that most wood exposed to sunlight is a great place for algae, just like it is in my aquariums! Is there something I should soak this in to kill whatever fungus or algae is waiting to sprout?

Overall, muck like with the bakery, I am discovering anything lathered in exterior latex paint has held up to 7+ years of constant exposure pretty well. This makes me wonder if I should treat and paint the core, then use wood screws to hold in the tower legs. No one will ever accuse this structure for a scale reproduction, so I am wondering if sealing the core behind paint then screwing on the tower legs may be the best long term optio. Those legs suffered most of the rot, and at one point were replaced after a 1:1 coconut frog fell on them. Screws would make them easier to replace in the future.

While I am ruminating, the plan is to have a removable roof to allow easy access to wire / rewire / repair wire. I have to look for something is flat, durable, and able to support the switch stand.

Updates as required!

Eric

P.S. Kid-zilla was busy attending to rot on another building and repairing our water tower. The tower failed to miss the ground when he let the thing test gravity.

Bleach will kill the unwanted growth. I use pure bleach spray on the wood products that come on the lot at times to do the deed.

I have often mentioned that with all the comments on what will last outside in our environs, and have noted that in most areas we have hundred plus years old pine buildings that still stand and, as long as they have been kept painted, the wood is still strong.
Some may pine that they used a different paint back then but I have been able to find oil based primers in the stores to somewhat waylay those thoughts. Prime as you build, even latex is better than nothing.

. Even pressure treated when used, tells you to seal the cuts with wolmanizer to keep the seal.

To properly seal saw cuts in pressure-treated wood, apply a copper naphthenate-based end-cut wood preservative or a sealant specifically designed for pressure-treated wood. Ensure the wood is clean and dry before application, and follow the manufacturer’s instructions for best results. For ground contact applications, two applications of the preservative are recommended,

Once painted(all exposed surfaces) moisture and insects need to hunt for an opening so regular maintenance is still needed…

Rogering all that Hollywood said.

FWIW, I’m reading an older book on making structures for British garden railroads, and the author repeatedly says to adhere and then “paint” the structure with slightly diluted PVA glue such as “carpenter’s glue.”

Oddly, doing a search, PVA is widely said to not be good for outdoor use. For example, Titebond says don’t use their PVA (“Speed Set”) outdoors, but use TBIII instead.

Putting those points together, I’m thinking of coating one of my failing wood structures with TBIII and seeing what happens in a couple years. Has anyone done that?

I have never done an entire structure but have done ends and edges with TB III prior to painting.

Where I use it at all times is in my table building, all ends and edges of the LP siding that I cut for trim are coated and let dry prior to painting. This stops the moisture swelling on these cut edges and holds up for years.
Just my opinion.