Large Scale Central

South Fork Sawmill

Finishing up the Office/Warehouse,

Siding all done on the warehouse and the inside painted, the office building almost totally complete. I used a black roofing shingle for the office roof just for some contrast with all the brown roofing.

The doors built from Styrene, painted and ready to install.

All finished and sitting in place.

Next we tackle the Slash burner, should be a fun project.

Awesome as usual, Rick. I particularly like those styrene doors. Nicely done. Very detailed but I bet they will last foreverā€¦

I agree! The doors, especially the detail parts are awesome! Iā€™m assuming the handles and hangers are castings. Did you make them too? Beautiful.

I have few excuses left to not finish my large indoor flat ā€˜McCown Freight Forwardingā€™ (Mik 2018?). One was how to to the freight doors. I think you just solved that!

I may have a junk box part that might be perfect for the top of your slash burner. I saw it yesterday when looking for something and Iā€™ll probably never build one. Iā€™ll take a picture with a ruler and PM it to you tonight.

Great pictures of a great building. It really looks good there.

Structures for burning sawmill waste originated in the 1880ā€™s and were common in the west coast lumber producing regions until the Clean Air Act of 1970. By the mid 1970ā€™s literally all sawmill waste burners were shut down but thankfully not all were torn down. If you care to look you can find some 150 plus of these structures scattered through the Pacific Northwest still standing sentinel over abandoned mill yards and now open fields.

When I say common I mean like gas stations on every corner back in the day. This picture of a region in Northern California will give you some idea of what I am talking about.

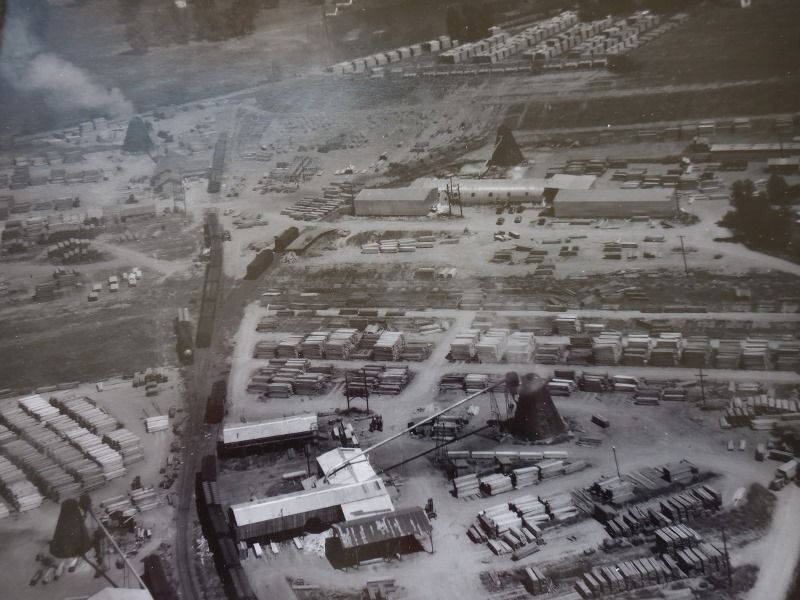
They were called; Burners, Slash Burners, Wigwam Burners or Teepee Burners depending on where you were located. In my region of Northern California in the Redwood country they were known only as Teepee burners and they were everywhere.

One of my best childhood memories was playing inside the burner on a rainy Saturday or Sunday while a small maintenance fire kept everything toasty warm and dry. I was first introduced to this activity by other kids while living in various sawmill camps in the mountains. We moved to near town for a while when I was about 6-7 years old and just down the road was a mill with a nice burner so I quickly introduced the local kids to this great fun. Unfortunately we only lived there a few months then off to another mill camp in the mountains.

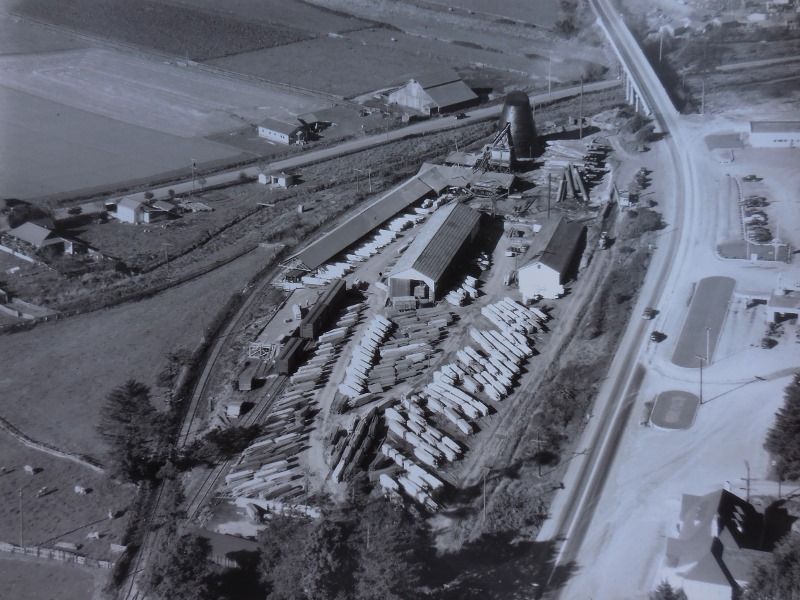
Years later in a collection of photos I acquired there was/is a picture of that very mill and burner taken 2-3 years before our fun there. The place we lived is just out of site along the road that runs to the left. This is the G.L. Spires mill near Arcata, California. Circa 1950

A brief history of burner development.

The first patent issued for a structure specifically designed for burning sawmill waste was to a Michigan company in 1888, and this basic cylindrical design dominated the industry until about 1915.

The concept of the waste burner was an immediate success. This is because the huge amounts of wood waste that accumulated around a mill site created an extreme fire hazard making fire insurance for mill owners almost impossible to acquire.

As an example of waste accumulation; Even by the 1950ā€™s only about 30-40 percent of every logged tree was utilized, and this included the use of waste in the manufacture of paper, plastics, rayon, turpentine, broom handles, pressed fire logs, and particle board. In earlier years the percentages of usable wood was even lower.

Colby Engineering of Portland, Oregon introduced in 1916 a new type burner with a patented ā€œair cooledā€ design. This introduced the teepee shape but used an inner and outer skin with air induced at the bottom between the skins and drafted upward to help cool the skins.

This design was effective and far less expensive to build and install than the old methods that used refractory brick liners or water jackets to cool the outer skin.

Of course nothing stays un-improved. In 1917 the Seattle Boiler Works applied for a patent for the first truly light weight wood burner design. ā€œIt relied on a single layer of thin-gauge plate steel cladding arranged in a simple conical form with spot footings at each vertical support. Air was introduced into the burner by means of adjustable dampers on the lower circumference of the shelled surface. Practical and affordableā€”almost crudeā€”this design proved enormously popular with mill owners throughout the Pacific Northwest.ā€*

The only major improvement to this design was in the air intake system. Instead of just a hole with a damper, the holes were provided with horizontal scoops on the outside, this caused the air all the way around the burner to enter in the same direction creating a cyclone effect that kept a hotter fire burning and sped the rise of the smoke and gases out the top.

Probably way more than anybody wants to read but couldnā€™t help sharing a little information on these iconic structures that once dominated the skylines of most western towns.

*Quote from; Wood Burners by Daniel Mihalyo, Princeton Architectural Press, 1997

If interested in further information here are a couple of web sites to visit.

https://www.flickr.com/groups/wigwam-teepee/

http://www.livinggoldpress.com/teepeetopiclist.htm

Thanks for taking a look

Love the history Rick, thanks for taking the time.

Jon Radder said:

I may have a junk box part that might be perfect for the top of your slash burner. I saw it yesterday when looking for something and Iā€™ll probably never build one. Iā€™ll take a picture with a ruler and PM it to you tonight.

Rick said he had the top already figured out, so if anyone else could use this itā€™s availableā€¦

No slash burners in your future, Jon? (https://www.largescalecentral.com/externals/tinymce/plugins/emoticons/img/smiley-foot-in-mouth.gif)

Great information interlaced with a wonderful personal narrative! Thanks, Rick!

Bruce Chandler said:

No slash burners in your future, Jon? (https://www.largescalecentral.com/externals/tinymce/plugins/emoticons/img/smiley-foot-in-mouth.gif)

I donā€™t think so. Still trying to figure out our future plans. Pretty sure they donā€™t include any more railroad construction outside. At least not on the ground.

Rick Marty said:

Instead of just a hole with a damper, the holes were provided with horizontal scoops on the outside, this caused the air all the way around the burner to enter in the same direction creating a cyclone effect that kept a hotter fire burning and sped the rise of the smoke and gases out the top.

That was a hell of a read but I gotta quote this because at a mere 51yrs of age it sounds a lot like a woman to me and Iā€™m still learning!

Good stuff and thank you, I always enjoy your posts even if you are a wheel barrow abuser! (will never forget the tire story)

(https://largescalecentral.com/externals/tinymce/plugins/emoticons/img/smiley-cool.gif)

Jon Radder said:

Jon Radder said:ā€¦

Cool screen man !

Guys;

Just a guess, but the screen dome looks like half of a tea infuser. They are used for brewing ground loose tea leaves. They keep the ground tea leaves from floating all through the beverage.

Have fun, David Meashey

Well finally on to the construction.

Through the early years the shapes and sizes of the Teepee burner varied widely but by the 1940ā€™s some general ā€œrules of thumbā€ developed to produce somewhat standardized shape/sizing in the industry.

Those rules were; 1, the diameter of the base equal the altitude of the frustrum and 2, the diameter of the cap or top opening should be half that of the base.

With those rules in mind I laid out my pattern on paper to get a feel for the finished size. Using a base diameter of 16 inches and a top diameter of 8 inches. Using the formula I needed a height at the frustrum of the cone of 16 inches but I thought it gave me a better look if I added a couple of inches so went to 18 inches tall and to 7.5 inches at the top to assure that the 8 inch kitchen strainer would fit down over the cone.

Here the pattern is cut out, I was able to roll this up and tape it together to get a 3D picture of the finished product out on the layout. Just the right size.

The pattern was then laid out on 26 gage galvanized metal and cut out. The scribed lines are to reference the break (bend) points and the numbers are also just for reference.

The 8 inch strainer before alterations. Good thing I reduced the top diameter as the strainer turned out to be about 7 3/4 inches ID when it arrived. I say arrived because it turned out I could not by one locally, unbelievable.

Speaking of that does everyone know there is a shortage of spray paint, also a shortage of bottled water because of the lack of chlorine, and 2-3 other things I have ran across in the last few weeks.

Better stop here for now, almost started to get into forbidden areas.(https://www.largescalecentral.com/externals/tinymce/plugins/emoticons/img/smiley-foot-in-mouth.gif)(https://www.largescalecentral.com/externals/tinymce/plugins/emoticons/img/smiley-laughing.gif)

Re-reading before posting it dawned on me that some my not be familiar with the term ā€œfrustrumā€ that word is used to discribe the point or level that the cone is cut off to establish the desired height. If you look at the first picture of the layout you see the side view of the cone. The 16 inch base is at the bottom of the paper and a center line goes up, you go up the center line your desired height and draw a line parallel to the base. Then layout your top diameter on that line then extend a line from the edge of the base through the top point and on up, do this from both sides and it gives you the point of the cone to swing the arcs from for the pattern. Now that upper line through the cone is the frustrum of the cone, it can be parallel to the base or at any angle to the base, of course if it is at any angle it makes the layout much more involved. There, way more than you wanted to know.

Very informative and useful, Rick. Thanks! I need one of theseā€¦ somedayā€¦

(https://lsc.cvsry.com/Post2021/BurnerTop.jpg)

I think that comes off the stove cover from a travel trailer ā€¦

Very nice Rick. So now I know how to make a cone for that part!

Sean - Not from the RV, But you reminded me I tossed a kerosene space heater and probably is the burner top from that!

More progress.

Went down to the local Tin shop and traded him the price of a six-pac for the use of his break for 15 minutes. Break rolled the cone and itā€™s now ready to solder together.

The strainer after cutting off all the hooks and the handle and sldering on the walkway platform.

The burner completely assembled, the top will be a seperate piece, not fastened to the cone, for easier painting and future maintainence.

Kinda looks more like a flying saucer landing platform than a slash burner(https://www.largescalecentral.com/externals/tinymce/plugins/emoticons/img/smiley-foot-in-mouth.gif)(https://www.largescalecentral.com/externals/tinymce/plugins/emoticons/img/smiley-laughing.gif)

Will have the finish photos in a few days.

Ha! Ha! I thought the same thing! If this were the Mik, Iā€™d say go with the UFO theme!

That is spiffy! Love the guard rail, ladder as well. And yes, definitely a UFO feel to it: