Large Scale Central

Salmons Produce

Back in December 1974, Model Railroader published a how-to article on building Perkins Produce House. It was a great article; it included plans as well as very detailed step by step directions. It was one of my first scratch-built models. The magazines at that time really encouraged me to build models from scratch, and I learned a lot of techniques from them. I built this in HO using IBM data cards for the siding.
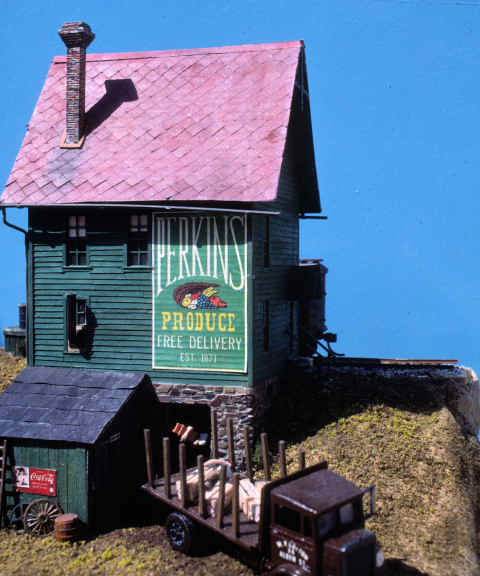
I fondly remember it and once Doug suggested that one of my sidings should be for produce, I resurrected my memories and ordered a copy of the magazine. It was time to build the 1:20 version! The first step is to build the windows. I need 5 of one type, and one of another. I decided I’d scratch build them, so I created forms using some scrap wood.

Next, I used .060 x.060 styrene for the muntins, and .125 x .060 for the frames.

The pieces were glued in place to form window pieces. Then, I glued some .250 x .060 to make the window frame itself.

Soon, I had the inner pieces built up.

When I built Matheson Textiles, the large acrylic pieces were protected during shipping by these plastic pieces - they’re double wall construction, with vertical beams going between the walls. Naturally, I kept them, hoping I could use them in the future. You can cut the material with a sharp knife, but I used my trusty Micro-Lux scroll saw to cut the window and door openings.

I used Weld-On 16 glue to hold the pieces together.

Once the openings were cut, I put the final frame pieces around each window using .060 x .125 styrene.

I used Precision Products aged clapboard siding and glued it in place using Welder - a contact cement. The windows were there glued in place.

The base was some cut stone from Precision Products. It was painted with a wash of alcohol and India ink. (The door still needs a coat of paint.) I created the sign using Paint Shop and then printed it on “papilio” inkjet white waterproof vinyl. I sprayed Krylon Matte Clear on top of it.

I went over to the paint store and got a quart of exterior green latex that I thought might be pretty close to the color I printed.

Next, the roof…

Very nice.

For those that may be interested, the double wall plastic sheeting is known as “fluted polypropylene.” If you cannot find it locally, it will cost you more to have it shipped than to buy it. A 4x8’ sheet is less than $12.00. See:

http://www.modernplastics.com/intepro-fluted-polypropylene-board-p-1132.html

Brian

Excellent Bruce. It looks like you got that vinyl sign to really sink into the board and batten. Any problems there? I really like it.

That’ll help keep your reefers busy…Nice Job!!

Cute building and a great building narrative…

Nice job, Bruce. I have a bunch of coroplast laying around waiting to be built into something (a few planned residential structures). Did you have any problems getting the siding to stick to the polypropylene?
Also, nice job on getting the sign on the clapboard siding. Did you just use a slow and steady hand?
I remember Perkin’s Produce from MR back in the day (when I was 12!). I don’t know about the name change though. I always figured Bart to be more of a hard goods kind of guy ;).

-Brian

Since its election season, you’ll find lots of the signs are made of that kind of plastic. Living near a highway interchange is great, they put up new ones all the time, and magically find their way into my garage.

Great building! I’m curious as to how well the joints and siding remain adhered to the coroplast. I’ve never been able to get any glue to stick to it for very long.

When I visited the POC, Richard told me about Welder - a contact adhesive that you can get at Wal-Mart. I bought some and have been quite impressed with it; so I used it to put the siding to the acrylic. I used to use acrylic cement, which works great but sort of distorts the siding.

The sign is pretty neat. Normally, I don’t think of my old ink-jet ink as being very water proof. But, after you let this dry, you’re supposed to run it under water to test it. I thought that I’d have a sink full of green ink, but nothing ran. The adhesive seems pretty good. I would sure stay away from doing it on a clapboard siding again. I found it difficult to get in all the crevices, while trying to keep it straight. We’ll see how it holds up over time, but right now I plan a few more signs.

I might have to see if I can get that plastic locally. It’s not very expensive. I haven’t played with any of the election signs - but this stuff is very strong, with little flex.

Where do you get the white waterproof vinyl? Do craft stores carry that?

I need to make up signs for some of my buildings and haven’t been able to figger out how to do it and keep them legible over time.

Ken,
I bought it online. Haven’t seen it in stores…

http://www.texascraft.com/hps/product.php?productid=16180&cat=255&page=1

Kevin had used this recently but I’m not sure how long his stuff has been outside.

Thanx, Bruce…I’ll have to order some of that stuff.

Another question…what program do you use to make up the sign?

Microsoft Works?

Ken,
I hope it holds up. All in all, it’s pretty reasonable. I think I’ll put a couple more coats of Krylon over it, just to be sure. :wink:

For this sign, I used Corel Paint Shop Pro XI. But, almost any graphic program should work. I’ve also used Power Point. You want one that will allow you to use the different fonts you have on your computer as well as being able to paste in different graphic types.

I found the cornucopia on the web as a GIF. So, I was able to paste it in and adjust the text around it. I thought about using PowerPoint, but it seemed harder to match the background color. (I scanned a paint sample and then matched it on screen. It’s sort of close. ) PowerPoint has “Word Art” which allows you to have effects for the text.

PaintShop Pro has a pretty good assortment of Fonts…I guess that’ll work. Just ordered some of that vinyl…we’ll see how it goes.

I hipped Kevin to the inkjet vinyl a year or so ago. I have had signs outdoors for two years now with no sign of fading or bleeding. I originally got it (and decal paper) from this eBay store - http://stores.ebay.com/MAMMY-MAGNETS-and-MORE_Craft-and-Printing-Supplies

-Brian

Two years? That’s great! Did you coat them with anything? When I redid my MTH water columns awhile back, I saved the hollow cylinder piece for some reason. Now I found the reason. I cut it diagonally, and then soldered it together at a right angle. A bit of brass strip was soldered in place for the bracing. Makes a nice looking smokestack.

(http://www.jbrr.com/Pics/Structures/SalmonsProduce/IMG_5456.JPG)

I just give them a couple of coats of spray clear coat once they dry. Nice stack! I never throw out any left overs either.

-Brian

Brian Donovan said:
I always figured Bart to be more of a hard goods kind of guy ;).

-Brian


I was expecting a brewery! But I do my share of vegging out…

I always thought you "Produce"d a lot. :smiley:

Bruce Chandler said:
I always thought you "Produce"d a lot. :D
Then it'd be Salmons Gas Company....