Large Scale Central

Rossean Hotel

A while back, Doug Matheson (from Canada) and I discussed some building flats that would be positioned on the side of his shed. I offered to build the Rossean Hotel and I’m hoping to have it complete by ECLSTS.

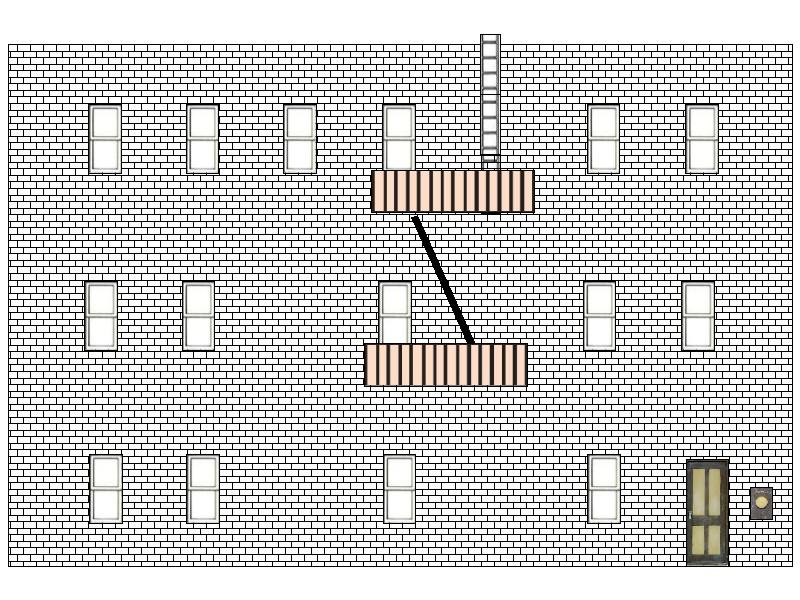
It started as just some ideas my choice of architecture … roof and window, etc … something built after 1900 (the era is set in the 20s) … brick sounds good … a downtown hotel so not too run down :slight_smile:

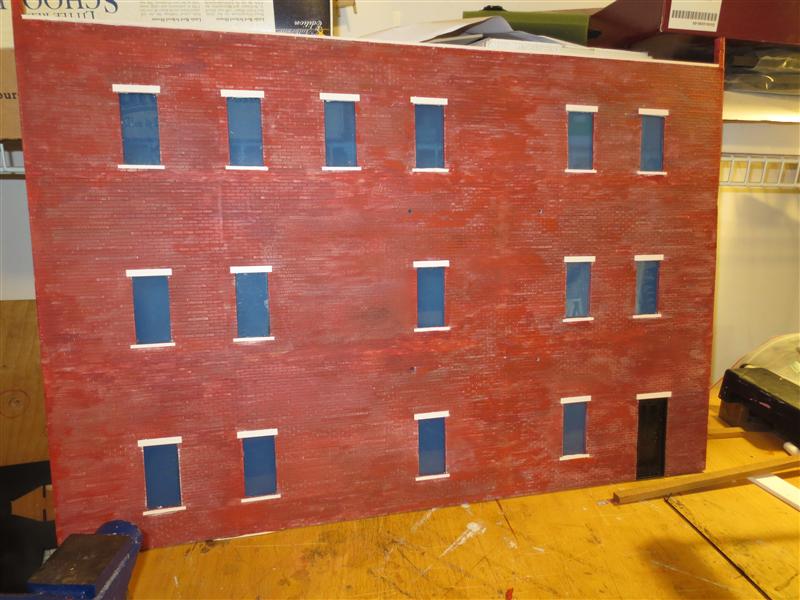
But there were a few “rules”. Doug wanted a 3 story building, and it had to be fairly sizable - he wanted 50’ of width.

So, I got some 1/4" clear plexiglass and 1/8" foam pvc board - 20" x 30".

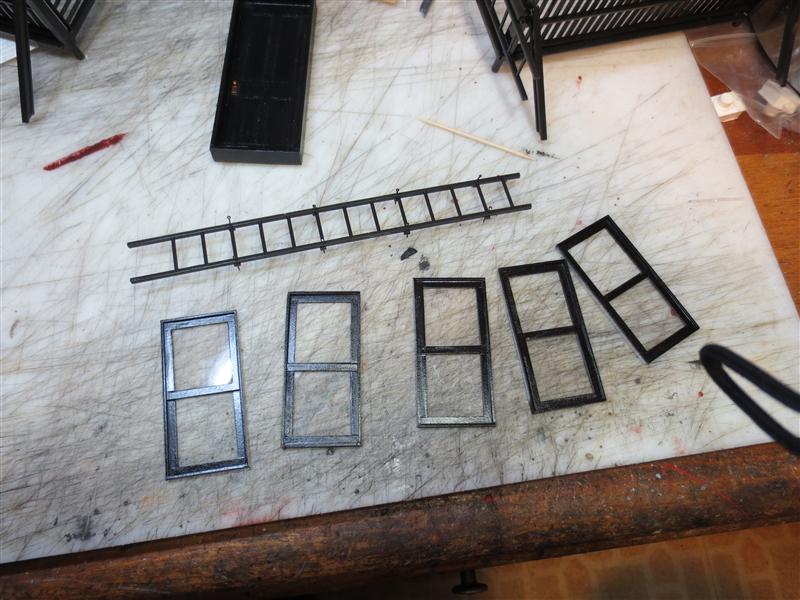
My initial design calls for 15 windows, a door and a fire escape.

I made the windows using styrene strips and a wooden jig

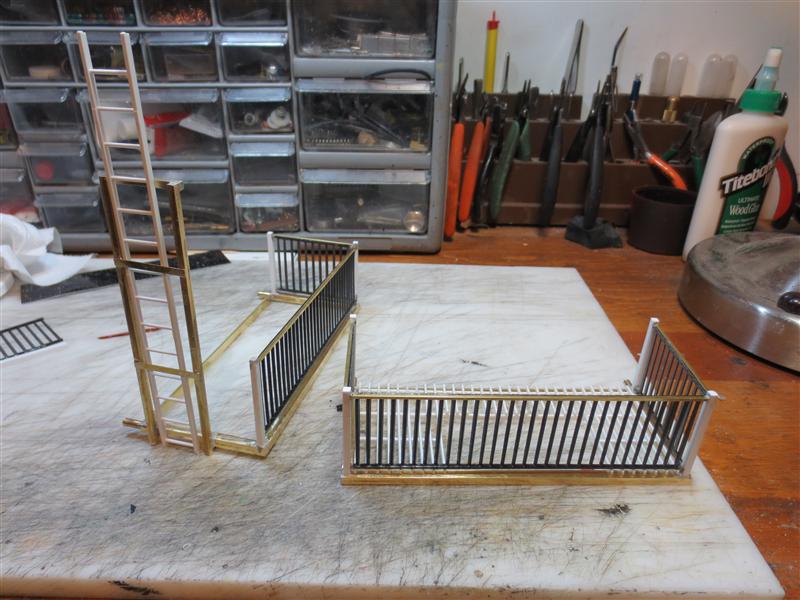
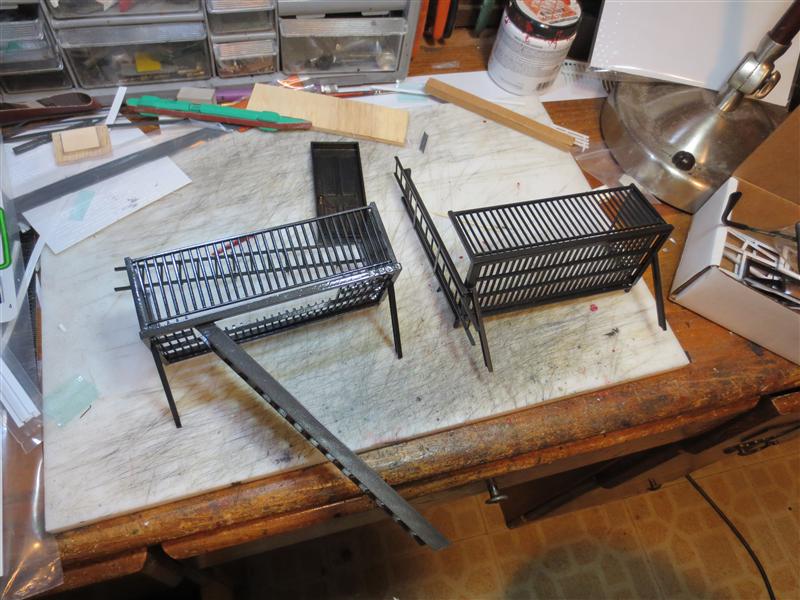
Fire escapes were first framed using some square brass tube.

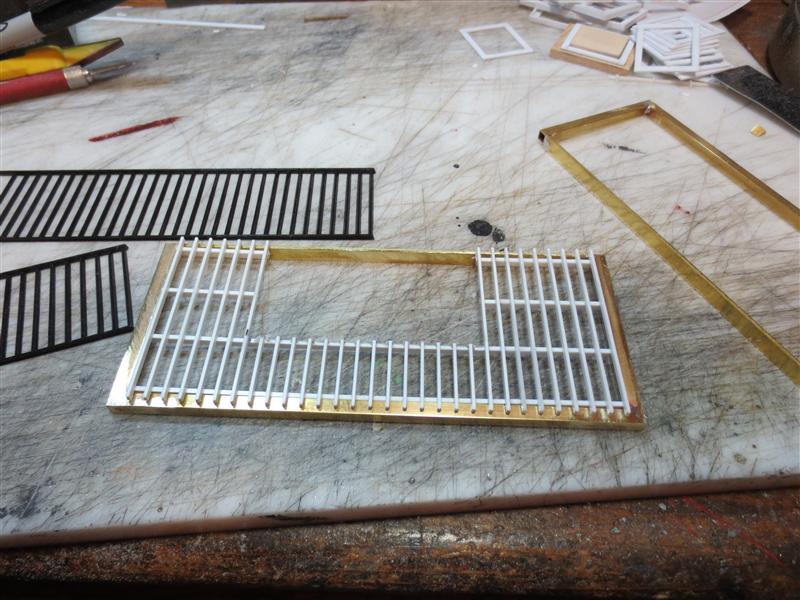
I used some grating I got from Plastruct for the floor and the railing.

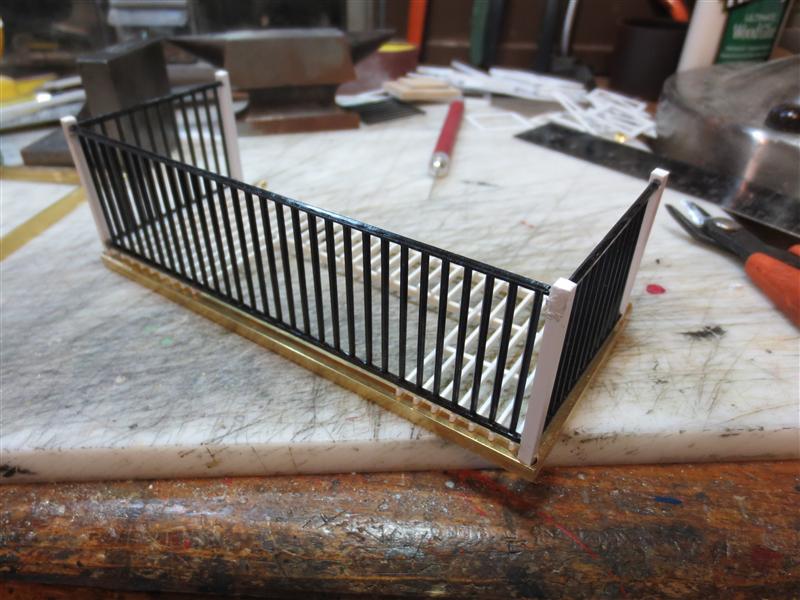
The railings were a bit fragile, so I reinforced them with some brass angle. The platform on the left will be the lower platform and I made the ladder frame out of brass.

I think most of the hard work has been done, so I should be done by the show. I’ll give it to Doug at the Drag and Brag, as he will be traveling back to Ottawa on Saturday.

Wow those are coming out great. I need to learn to make windows. How do you glue the frames together without out sticking to the jig?

Looking nice Bruce. That fire escape will add character. Are you going to add the ladder to the roof ?

Shawn Viggiano said:

Wow those are coming out great. I need to learn to make windows. How do you glue the frames together without out sticking to the jig?

I don’t! :slight_smile:

In the past, I’ve tried various options - I put a clear coat over the plywood. I sprayed it with WD-40.

The net result is that the frames stick to the jig. :wink:

So, how to make windows?

Well, first you need to minimize the glue you apply. The best bet that I’ve found is to use the Tamiya Super Thin cement. It comes with a very tiny brush; but you’ll still end up with sticking frames, but at least the glue won’t be everywhere.

I don’t let them dry on the jig for more than a few minutes. Then I use a knife blade to gently separate the frame from the jig.

I let them dry overnight before I file and sand them to make sure all the joints are smooth.

Then they’re ready to assemble.

Dave Marconi said:

Looking nice Bruce. That fire escape will add character. Are you going to add the ladder to the roof ?

Yep, got the ladders painted and ready to assemble. They are also from Plastruct.

Cool…I love the fire escape!!!

As for sticking in the jig…find your Gulf Wax you used on your sled runners and wax it up.

I’ve had good luck with letting silicon spray dry on the jig every so often…

Nice Ill have to try making some now. Thanks

Yes, the windows are not that hard to make. The beauty is that you can easily make the exact size and type that you want. Very key to this is a tool that cuts to a consistent length.

I use the “Chopper II”. (http://www.micromark.com/RS/SR/Product/82439_R.jpg)

Here are the windows with some paint on them.

(http://www.jbrr.com/Pics/Structures/RosseanHotel/IMG_0707.JPG)

Also the ladder to the roof, and the back door.

The fire escape platforms have been painted and are ready to install.

(http://www.jbrr.com/Pics/Structures/RosseanHotel/IMG_0705.JPG)

Nice work Bruce.

Yeah I had the same problem using Bruce’s article for making windows. I use Testors Model Master cement. It comes with a needle applicator and helps controlling the application of glue.

I also figured out the same thing Bruce did. I glue the pieces then let them set a couple minutes, and then pry them off with a hobby knife. I then have to reset the frame a little because undoubtedly it bends out of place when I remove it, but it is pretty easy.

(http://www.micromark.com/RS/SR/Product/82439_R.jpg)

That’s somethin I’ve been meaning to get for awhile, and never think about till I need it…:wink:

Now, where the heck is my MicroMark catalogue?

Well, I just go online to Micromark and order direct… I never do save the catalog.

The chopper is really made for smaller scales as it won’t cut long strips. In fact, cutting anything much longer than 2" is rather difficult.

I made an extension out of aluminum rod and some scrap acrylic.

(http://www.jbrr.com/Pics/Tools/IMG_0987.jpg)

I have square piece that slides along the rod and a screw holds it in place. This way I can accurately cut the longer pieces.

(http://www.jbrr.com/Pics/Tools/IMG_0994.jpg)

Bruce,

Nice extension to the chopper. I like my chopper II but have found that it does not cut exactly at 90 degrees. The blade as it starts to cut starts to lean to the left or right (it’s not consistent), and the result is that the cut piece is no longer square. When I was looking for a solution to this problem, I found online that the NWSL chopper II has a design flaw… And I found it. For smaller thinner pieces its not as noticeable. Styrene is more susceptible than wood in my experience.

Have you noticed this problem?

I then have to square off the piece, and it adds an extra step. Now I just use my mini table saw as a chopper and I don’t have to worry about square cuts.

Craig

Ken Brunt said:

(http://www.micromark.com/RS/SR/Product/82439_R.jpg)

That’s somethin I’ve been meaning to get for awhile, and never think about till I need it…:wink:

Now, where the heck is my MicroMark catalogue?

Ken,

Be aware that the Mirco-Mark version is a knock off of the NWSL version (chopper, sander, and a few others). I’d order directly from NWSL. I made the mistake of ordering the MM sander thinking it was similar in quality to the NWSL one, but it is vastly in-superior.

Craig

Bruce,

You’re a case. Great illustration!

Thanks.

And working on the building back. I’ve added some lintels above and below the window openings. (The protective plastic is still in place, which is why the windows look blue).

Before I glue the windows in place, I want to put a wash of India Ink over everything to tone it down a bit.

(http://www.jbrr.com/Pics/Structures/RosseanHotel/IMG_0708.JPG)

Craig Townsend said:

Bruce,

Nice extension to the chopper. I like my chopper II but have found that it does not cut exactly at 90 degrees. The blade as it starts to cut starts to lean to the left or right (it’s not consistent), and the result is that the cut piece is no longer square. When I was looking for a solution to this problem, I found online that the NWSL chopper II has a design flaw… And I found it. For smaller thinner pieces its not as noticeable. Styrene is more susceptible than wood in my experience.

Have you noticed this problem?

I then have to square off the piece, and it adds an extra step. Now I just use my mini table saw as a chopper and I don’t have to worry about square cuts.

Craig

Craig— What is the design flaw, and what is the fix. I’ve found that new, sharp blades are essential.

I haven’t really noticed that problem, but I mainly use it to cut thin pieces. The styrene for the windows was .040" x .125"; it seemed square to me.

Craig

“I like my chopper II but have found that it does not cut exactly at 90 degrees. The blade as it starts to cut starts to lean to the left or right (it’s not consistent), and the result is that the cut piece is no longer square.”

How thick a piece are you trying to cut? With styrene, as long as you can cut into the styrene, it can be snapped apart and the break is very easy to clean up. If I have a squar strip say anything over an 1/8" I’ll sometimes just press into the styrene and rotate the strip and do it again on all 4 sides. Then snap apart. Real easy.

Chester Louis SA #64 Hampshire County Narrow Gauge