Large Scale Central

Rehab of the Missile Sponges Part the Second - Christmas Thomas

With Diesel Dan restored and improved (Rehab of the Missile Sponges Part the First - Diesel Dan), the next locomotive is ready to enter the shops! Meet Christmas Thomas, a battery powered variant of an LGB m2075, as “he” backs into the shops for an overhaul:

Per “Opa,” a curious man with a white beard awaiting a northbound flight in the same terminal with my parents in November 2015 asked them to deliver this to the crew. In the years since, the coupler broke. We made one. The remote broke, so we removed it and installed the DPDT switch and speed control. The C batteries became prohibitively expensive. We installed a batter pack. The motor mount wore out. We fixed it. There is a lot of fun and a lot of learning packed into perhaps the worst product to bear the LGB label. We made “him” serve in ways “his” designers never intended, and he “earned” the overhaul. This will, hopefully, be the last fix for a while!

Like Diesel Dan, I hope to use this project to expand our skill base. When we breathed life into another m2075 Komaka Iki (C****hallenge Accepted - Large Scale Fantasy Locomotive), we ultimately repainted it and married it to a STAINZ chassis. These are the target skills:

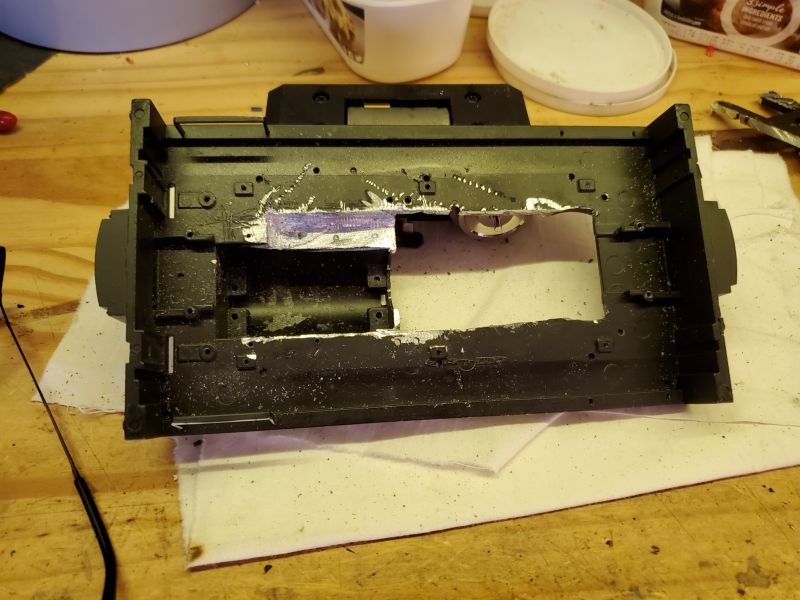
  1. Successfully cut and reuse a chunk of the model. The used chassis has been a source of headaches, so this time we invested in a new motor block (Request Opinion – Smallbrook Studio Motor Block). This will require cutting into the existing chassis. I’ve never cut up a model before, so this will be a new skill and, frankly, my primary motive for undertaking this project in this manner.
  2. Lighting. I didn’t mess with lighting on Komaka iki. Since then, we’ve gotten more comfortable with soldering. The simple battery pack and, preexisting molding for cable conduits begs for an attempt at this.
  3. Wiring. I’d like the end products DPDT switch and throttle, if reinstalled, to be a little more integrated into the finished product. I am also seriously considering another GSscale Graphics Magnetic Critter Controller for this project. All of this is to gain stepwise experience to maybe someday convert my LGB Mogul to R/C.
  4. Interior Details. We spent some time late last year at the Hawaii Historical Railroad photographing cab interiors. A lot will be determined by where the wires run. It may be simply an engineer for this project! As every, durability trumps details in our projects.

There is a unique challenge here. The crew has decided I must preserve the Christmas markings so that Christmas Thomas can continue to serve as the Tree Train. We are going to have to fashion removable doors and saddle tank sides to do that. Magnets and metal sheets? Bolted on styrene?

I’ll get some photos up later to frame the project a bit better.

Eric

Follow-up to frame the project…

Bow and stern shots…

…show we have to clean up some flash, and we have a screw in the middle of the smokebox door to hide. In the stern shot, you can see our homemade coupler. You can also see the ports for the lights.

Port and starboard sides…

…show the extent of those stickers! There is also quite a bit of plastic flash to remove. On the other hand, you can tell that there is plenty of room for wiring based on the stuff we crammed in the cab already! I want to use as much of the chassis as possible to avoid some of the issues I had resurrecting the other m2075 in fitting the boiler-cab part to the chassis. The plan is to cut the walls of lower chassis just fore and aft of the drivers, affix the motor block to the floor, and then brace it internally. Sounds simple…I am sure there is a complication that awaits me!

And, finally, the top shot…

…which reveals the cab roof and boiler will need cleanup work and that there is no “coal” in the coal bunker. Maybe that is where I can put the new DPDT switch?

The first step is to get that new motor block assembled and just test it on the tracks. That’ll let me close that thread and proceed onto fitting it to the chassis.

Have a Great Weekend!

Eric

Eric,

You have never cut a chassis!!!

You have not lived till you have carved up a chassis.

Always remember “Faint heart never won fair maiden”

A Dremel or a clone is a necessity in the train modification armory

Go for it!!! and remember it’s not stuffed till you can’t fix/patch it.

A Dremel or a clone is a necessity in the train modification armory

I would agree, except for big diecast blocks. This is a Bachmann Davenport that I fitted with a USAT block. The description I posted in my “Just another Boxcab” thread was “I got out my Harbor Freight oscillating power tool and a couple of new (decent) metal cutting blades and attacked it. It wasn’t too hard though the tool got a bit hot, and my hands were sore from the vibrations.”

https://www.harborfreight.com/oscillating-multi-tool-62866.html

and only $19.99.

Pete Thornton said:

A Dremel or a clone is a necessity in the train modification armory

I would agree, except for big diecast blocks. This is a Bachmann Davenport that I fitted with a USAT block. The description I posted in my “Just another Boxcab” thread was “I got out my Harbor Freight oscillating power tool and a couple of new (decent) metal cutting blades and attacked it. It wasn’t too hard though the tool got a bit hot, and my hands were sore from the vibrations.”

https://www.harborfreight.com/oscillating-multi-tool-62866.html

and only $19.99.

Now that is something I must add to my wish list!!!

I have seen them down here but never ventured to part with the funds.

With one of them I could cause untold devastation around the house. (https://www.largescalecentral.com/externals/tinymce/plugins/emoticons/img/smiley-wink.gif)(https://www.largescalecentral.com/externals/tinymce/plugins/emoticons/img/smiley-wink.gif)

GAP & Pete, thanks for the encouragement and suggestion.

I have a baseline Dremel, but it’s top speeds only work sometimes. This is the second one that went down after about 2 years, so I am not sure if it is because it is the entry line model or because Dremel is not what it is reputed to be. At any rate, I was worried it might melt the plastic as I cut, so I was thinking about using a small hobby saw.

I’m off to the mainland U.S. later this year, and that oscillating tool may join the armory later…

As it is, the cutting will wait until I can figure out why the new motorblock won’t sit on the rails (addressed separately in "Request Opinion – Smallbrook Studio Motor Block"). It has rained the last two weeks, putting the beach out of the question due to brown water. There is no point in wasting bad beach weather, so the 1:24 gang and I commenced to break down Christmas Thomas:

The cool thing about breaking this down, is that I can see that my soldering HAS gotten better over the last couple years! All of the parts and the battery, by the way, were salvaged from an attempt to use robotics motors to power Komaka Iki. Not shown is the motor, which has a nice, stout worm gear (No, it won’t fit into that (http://largescalecentral.com/externals/tinymce/plugins/emoticons/img/smiley-yell.gif)B’mann railtruck…The incantations will continue.) They were all bagged, labeled and stowed for a future project. The Triple O wastes nothing!

Next, it was time to disassemble the chassis and cab, attack the remnants of adhesives and shims with Goo Gone and various implements, and prepare this for eventual painting. Kid-zilla had joined me by then. He took on the shim glued to the roof for the old DPDT switch…

…before taking to the deep sink to handwash the chassis, cab, and boiler. He took extra care to preserve those stickers. Darn…

We thought it would be interesting to lay out the two m2075 (battery) side by side. Christmas Thomas, acquired in 2015, stripped down and ready for more surface prep and painting, is on the left. “His” chassis and components are the bottom and mostly in red. Komaka Iki, acquired in 1976 and repowered recently with on second-hand STAINZ motorblock, is on the the right. “His” original chassis, bearing the marks of failed efforts to bring “him” back into service on its old chassis, is in black.

The big difference was power. The new one used 3x C-cell batteries. The old one a pair of D-cells. Both rear couplers sheared off, indicating a common - and uncorrected - weakness. What you cannot see is the new one used a poorly made IR controller for speed, direction, and sound that lasted about 6 months (you can see the holes for the IR reciever and an on/off button on the cab roof). The old one had a DPDT switch that lasted until I played out the motor in 1980. The other differences seemed slight, basically pegs and puka to snap the upper and lower half of the chassis together.

With this done, I boxed Christmas Thomas up and shelved the project. I will move forward prepping the boiler for painting and figuring out how to protect those stickers for the 52 days a year (Advent + Christmas) I want to see them, but I am loathe to do more until I can figure out how to make that motorblock sit on the tracks. Since I was considering this motorblock for the next rehab project, Gordon (an ez-Tec Prairie that looks nothing like Gordon of the Railway Series) Gordon’s upgrade goes on hold, too. I have been neglecting MOW work, and that tub-o-trains I got off Craigslist has some old LGB American-style freight cars begging for some repairs. And, of course, I can always cast spells and dance around that railtruck…We have plenty do, while I figure this out.

Have a great week!

Eric

Update:

Having exhausted local capabilities with the chassis, it will be shortly on its way to Pete’s for advanced tinkering (see Request Opinion – Smallbrook Studio Motor Block) to see if he can get it to clear LGB frogs without some of the issues I’ve faced on my worn and not always level track!

I now have room to proceed on the boiler and cab area. After weighing several options, I decided to cut false tank walls from styrene that I can paint black, letter, and weather as I see fit. Small bolts will hold these in place until the Advent / Christmas season, when we can remove them and let Christmas Thomas (CT) cruise about in seasonal trim. The doors will likewise get some styrene cladding. Rather than screws, the cladding will affix the a U-channel bit of styrene and just drape over the door.

My commuter car died this weekend, so replacing it took up all modeling time. I should be able to get cracking this week, hopefully with some help from the crew.

Have a great week!

Eric

Update:

Pete’s tinkering proceeds apace, which prompted me to get off my butt and prep the boiler and cab. Most of this was file, knife, and sandpaper work to remove excess flashing. I really, really don’t know why LGB went so cheap on a set intended to introduce people to large scale…At any rate, it’s gone. After that, styrene sheets feel to form false doors and water tank walls.

The plastic I-beam to the right had two 1" bits cut off. Each bit got sanded into a “U.” These are the hangers for the door pieces:

O.D. wandered out to inspect the work and approved. She suggested we might do something to fix the bottom of the false door. I might glue something to the deck later. I would have used my little bolts to mount the water tank sides, but I couldn’t find them. Luckily, we had to clear the picnic table, and I found them buried under this very project! Oh, well…

As an aside, the local Legion decided it needed rail-mounted catapult car. O.S. asked for the plans for our cane cars and set-to making the chassis:

…so, yes, Rooster, your plastic wheels continue to find uses! O.S. has even considered making the Legion rail-mobile. We’ll see. In the meantime, it was just a joy to see him take up a project on his initiative and to take the time to do it right. With the exception of a bit of help with the drill, he measured, cut, and sanded everything to fit by himslef.

I included this little side story, as it proves the old adage, “If you start building it, they will come!”

Updates as progress dictates!

Eric

Update:

False boiler walls applied! Kid-zilla and I marked off 1/4" around the perimeter…

…then we banded both false walls to the locomotive shell. Using a pin vise, we drilled six holes in each…

Somehow, something shifted, and a couple holes didn’t line up. Nothing a bit of modeling putty won’t fix! Next time, I’ll tape the parts in place.

At about this time, I got called to support a grocery run, but O.D. was on hand to finish bolting in the false walls…

…each little hex not also got a dab of thread lock. This step, by the way, was a pain. I was glad to hand it off to her, especially as she led the “Save the Sticker Movement.” I am also glad these panels will only go on / off once a year!

The 1:24 crew checked out the work…

I think they are as eager as I to see those stickers gone!

My thoughts are turning ahead to how we’ll control the finished project. I am much enamored with our G-Scale Graphics Magnetic Critter Controller. Christmas Thomas may get one, too. The Smallbrook chassis kit came with a mini-DPDT switch, and I would like to be able to run this little engine in reverse. I alos have a little speed controller salvaged from Christmas Thomas’ previous incarnation, too. I was thinking about using pre-existing holes in this model for the latter two components. You can see the holes in the photo below:

In the lower left and just left of center you’ll see what were probably light fixtures in some higher form of m2075 that would fit the DPDT switch, and I did test fit the speed controller in that large rectangular hole. I have, for the moment, discard mounting controllers through the cab’s roof. Cosmetically, I am not thrilled with the idea. Practically, depending upon how I wire this thing up, taking the cab roof off may be the best way to access and change the 3xAAA batteries. The alternative method of accessing batteries is to remove the whole boiler / cab shell from the chassis. In either case, roof mounting seems like it will be bulky or unnecessary, so the plan is to affix a sheet of styrene over the roof, cover it with masking tape to match the texture of exposed regions, and paint the lot flat black. All of this is academic, of course, until I install the new motorblock and see how that impacts available surfaces for other electronics.

Final note…I did want to make a small headlamp for this “fellow,” both to try it and because it’ll look nice when Christmas Thomas performs seasonal tree duties. I’ll ransack my bits box and see what we can come up with. I suspect my LED bulbs are too large for the job. I also suspect I’ll find use for smaller bulbs…

Update as progress dictates! Have a great week!

Eric

Wow …OD cut her hair however she is still involved (taking the reigns) in the hobby while continuing to “find” herself! My kidzilla (21 this June) just came home from college today and continues to “find” himself amongst his laundry and stench.

Light a candle for me Eric!

Good stuff and enjoying the thread !!

Rooster said:

Wow …OD cut her hair however she is still involved (taking the reigns) in the hobby while continuing to “find” herself! My kidzilla (21 this June) just came home from college today and continues to “find” himself amongst his laundry and stench.

Light a candle for me Eric!

I’ll light a plumeria scented candle on your behalf, Rooster!

O.D.'s hair is on its way to “Locks of Love” to help one, maybe two, little girls who lost their own. But, beyond, the haircut, yes, she is still carrying forward the spirit of tinkering and doing that comes with this hobby. It is kind of neat how she and her sister use skills we’ve built together on the Triple O going into their own projects. If the memories are the railroad’s gifts to me, those skills are the Triple O’s gifts to them and - in time - the boys!

Eric

Update:

Christmas Thomas got his fill pipes for the saddle tanks (visible under the steam dome):

These are based on some of the plantation photos I have, and it makes his appearance consistent with Komaka Iki, our first rehabilitated m2075 (battery).

My 1:24 buddy is holding the only LED type in my inventory, a 10mm white light, and standing next to a styrene tube I thought would be big enough to accommodate and thus serve as a headlamp. Nope… I learned from Bill Barnwell a little yellow marker makes these lights go from garish to warm, and I think I have 40+ of these things still, so I am trying to think of how to use it. As of this moment, I am considering using the LED itself to as the body of the lamp and simply wrapping it with something like my copper tape or thin styrene, then bending its leads and fitting them through the hull. Tinkering to follow…

Pete T. continues his generous help getting the Smallbrook chassis to work. There are a lot of things I had not considered before purchasing that thing. It will work in the end, but only because of the experience, deep parts bin, and kind help of Pete! I am pretty sure Gordon, the kids’ eztec 2-4-2, is going to get an LGB chassis when he goes under the knife!

The roof did not get done. I had to help O.S. with his catapult car. He had to pull apart the wheel sets…

…so he could affix the washers that help weight these little cars to the back of the wheels:

CINCHOUSE sounded the dinner bell, so that was it. We’ll get the wheels mounted shortly. He is debating whether we will mount couplers, as they might not look Roman enough. Eius railroad, eius praecepta!

Have a great weekend!

Eric

Update:

Pete T. got the chassis figured out, so I thought it wise to prepare the hull and boiler / cab. The plan is to paint everything first, cut as needed, install the chassis, and then touch out the paint. I also wanted to get the boiler / cab area ready for its trim painting, so it was off to the Spray Palm. O.D. lent to, but she thought it important to document that I do actually work on my own projects:

I forgot my eye protection and mask. Ooops… I used my usual brand of primer, but I found out it has different formulations. This one is for high temperature applications, and, whether as a consequence of that formula, ill-timed wind gusts, or humidity, the paint was grainy and rubbed off some of the raised details. I am going to see if a coat of clear flat spray paint might help things out. Still, Christmas Thomas looks much better (it would be hard for him to look worse):

My 1:24 buddy is standing behind the new headlamp. I took a 10mm LED (all I had ready to hand), painted the back and 2/3 of the side flat black, glued a strip of styrene around the lens side, wrapped the lot in copper tape, mounted it to scrap styrene, and then cut some mounting bans from strips of annealed aluminum, which I have in abundance. A side shot is below:

It’ll be ugly, but it’ll work. I’ll drill two holes just forward of the 'stack, plop the LED leads into the holes, and make the lamp fast wit E6000, the second best glue for everything.

Meanwhile, the local Legion’s catapult transport got is decking:

If you start building, they will come…

Eric

Update:

Christmas Thomas sports the green trim of the M&K Sugar Co.:

You can see where the primer “balled up.” Again, I am not sure what caused this, as it is not everywhere. This leads me to believe it was an issue of technique or conditions. I decided to call it “soot” and move on. By and large, a coat of clear flat fixed it in place. Next up are the various brass fittings. The whole will get touched up after we install the chassis.

I also offer a big “Mahalo!” to the various folks who’ve advocated for masking tape as a roofing material. It matched the texture of the LGB roof perfectly.

Have a great week!

Eric

Update:

The chassis back from Florida. Pete T. kindly raided his part box and applies skills to the problem of getting it to track. The result was set of Accucraft wheels. Further dickering got the kit supplied rods to fit. This is about as close to live steam loco as I am likely to have for a long while… Oldest Son and I turned Dremel, X-acto knife, and sandpaper loose on the original chassis:

The plan was to mount the Smallbrook motor block into the cut. It just didn’t seem to line up, however. Then I noticed the drive gear rubbed against the bottom of the LGB chassis. There is a divot you can see to the left to accommodate the original gear. Had I been able to use the kit-supplied wheels, I think I could have just reversed the Smallbrook chassis and moved on. Not wanting to undo Pete’s work, however, O.S. and I cut a hole in the bottom of the old chassis…

…and after verifying everything ran smoothly, glued and clamped the Smallbrook motor block in place:

(Pete, the retaining clip you made for the rods did not survive contact with the USPS. We will make our own on this side!). This weekend, we will brace the interior then cut into the upper part of the LGB chassis so it will seat. With luck, this will let us move on to testing this all out on the tracks under power. After verifying everything works, we’ll see if we want a Magnetic Critter Controller (I know I do!) and proceed towards finishing.

As it is Memorial Day Weekend, please take a few moments to remember our Sacred Fallen. Our flag will fly at half mast in Their honor come Monday.

Aloha,

Eric

Update:

Kid-zilla joined me for some saw work today as we tried to fit the upper hull of the LGB chassis to the lower hull. Using my calipers, I carefully measured the cut…

…and as a result of my patented Measure-Ninteteen-Times-Cut-Once-and-Still-Screw-It-Up-Method, got this:

Nothing some thin styrene can’t fix if this all starts to work out.

We nonetheless felt confident enough to get this to the track. A brief stint in community theater taught me sometimes you just need to run the show to see how far you’ve really come! We located the battery clip…

…and Kid-zilla and the gang gave the chassis a once over. Kid-zilla took the following picture and asked I include it:

Satisfied, Kid-zilla stripped a little flat car of its load to serve as our battery car, and it was off to the tracks!

Remember that missing retaining clip? We didn’t. The quartering quickly went south, binding this contraption. We used my tin snips, cut a small washer, and fashioned the clip, following Pete T.'s example. Then the blasted motor kept coming up and disengaging from the drive gear. We took the top deck off to poke it back down, and…

Video: Some of Christmas Thomas Underway, Making Weigh

This contraption successfully negotiated all our turnouts and our crossing track! Thanks to all for stepping me through to the solution, and special thanks to Pete T. for taking the time to engineer it!

The motor kept working itself off the mount. Then it dawned on me that E6000 needs 24 hours to cure fully, not 5 minutes. We took the beast back to the lanai, and I clamped the motor in place:

We’ll take it all back to the track tomorrow and test it again. If the motor stays fast, we will proceed with final assembly and fitting out. I have to put in the piston rods, and we have to evaluate whether or not we should get that magnetic Critter Controller. Then comes patching my hacked cut job, plugging a few other holes, touch up painting, and weathering. If the motor doesn’t stay fast…Well, let us be optimistic!

Updates as circumstances merit!

Eric

P.S. O.D. stopped by and exclaimed, “It doesn’t even look like Christmas Thomas anymore!” I shall call that a win!

Nice job so far. You and your kids are gaining a lot of experience while spending quality family time you will treasure when you are older and the kids move away. (https://largescalecentral.com/externals/tinymce/plugins/emoticons/img/smiley-wink.gif)

This was to be the day of victory, when we could move from making it work to making it look good. Nope.

The E6000 did its job. When we applied power, though, nothing happened! I backed off on the nut that holds the worm gear to the motor shaft (visible in the photo below)…

…to verify I didn’t have some electrical weirdness. Once I disengaged the worm gear, the shaft spun freely. I theorized that I’d glued the motor down so tightly that I had actually bound the whole gear assembly. I pried up the motor a bit and, sure enough, got motion. Yay! Sort of…

We took the 1:24 crew out for a spin, and now we found the chassis was binding on our R1 / 2ft radius curves…or at least some of them…which it had not done yesterday. Thinking it might be old batteries, I swapped them out, and I had much the same result after a lap or so. The batteries were also HOT! You can see the casing is actually peeling off in the next shot:

I rate this as “bad” on the “good-bad” scale. To be fair, sometimes my alligator clips sometime bumped against each other causing shorts. A less improvised test rig might prevent this. And, yes, more experimenting will follow, as I don’t understand the binding on the curve. This has the same wheel base as a STAINZ. My STAINZ work beautifully, as do all my little LGB 0-4-0s. Christmas Thomas originally worked (nominally) on 3xC batteries, and “he” did stall on the curves as the batteries died. Likewise, when “he” got his first upgrade, the new battery pack (4x1.2V / 3600mAh NiMh batteries in series), I observed the same thing. I am charging that pack now under the theory that “you can’t break what is already broken” and the battery upgrade will do the trick.

Assuming I resolve this issue, I invite you to go back to that first photo. Notice the brass dust? I hope that issue will go away once things break in, otherwise this will be a short-lived gear train…

Leaving the brass dust aside, if the electrical tinkering fails, frankly, I am going to call myself “stumped” and place this project in the same “running puzzle” category as Oldest Son’s B’mann railtruck. I should have just sunk the cash for a new STAINZ chassis at the outset, it would seem, as between the initial investment, the shipping to and from Pete’s place, and Pete’s kind donation of a wheel set, the cost would have been about the same. The way forward, then, will be to retire this chassis to the “running puzzle shelf,” order the STAINZ chassis so we can proceed with Christmas Thomas, push back Gordon’s rehabilitation to 2022 (ez-Tec 4-4-2 the crew wants to up-scale and upgrade), and move out smartly. We’ve got a few easier projects to get a couple things in the “win column” as we let the dust settle.

Fingers crossed, though, that the above plan need not be activated!

Eric

Notice the brass dust?

Wow, you do have fun. The video shows it actually working quite nicely. The brass dust is probably because, as you discovered, the gears are meshed too tightly, I think. (I did worry when I saw the photo of that huge clamp on the chassis.) Pry the motor up some more until it spins the wheels easily?

You can also take the worm off, by the look of it, so you can test the bare chassis and see if something else is binding? That will also help you ‘feel’ how it is meshng.