Thanks Steve and Joe, the point I was making, and you guys confirmed, is you need a bit of “spring” in the system somewhere, and I did especially concentrate on the Aristo turnouts.
Stan, your theory about drilling a small hole and then enlarging it is good, it does depend on 2 things:
-
That you have more than the needed total throw
-
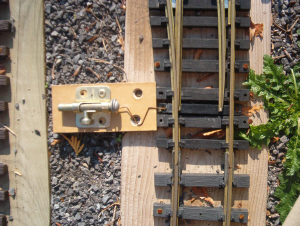
You can drill a small hole in the throwbar and enlarge it one one end or the other to “reduce” the travel.
Great idea, does not work on Aristo. The end of the throwbar already has an ENORMOUS oval hole, and the plastic is very thin and fragile there, and to put the icing on the cake, there is no UV protection on that part.

But the idea is very good, and if someone makes replacement throwbars, with no hole drilled, and I got them and then I spent the time manually drilling the appropriate slot, it could work.
Of course as things wear, you now have an issue that could cause you to re-drill or need another thowbar.
A simpler solution is shown by Joe and Steve, i.e. the “spring” that I have been talking about the entire time.
(My solution is an “infinite spring”, provided by a very long throw pneumatic motor that basically has constant spring tension no matter what the position. So I always have “enough” travel and the “right” pressure.)
So, this is all I was saying, that a throw mechanism with “absolute” position with no “give” means no overtravel, which means the throw has to be exact, and it’s not really reliable and a low maintenance solution, and takes more “tweaking” to install.
Thanks all, I’ve made my point clear to all who will listen, it has been validated by actual installations. I’ve done my best to communicate, and will bow out here, in case people start thinking this is turning into some kind of personal thing.
Regards, Greg

