Large Scale Central

Matheson Textiles - a building adventure

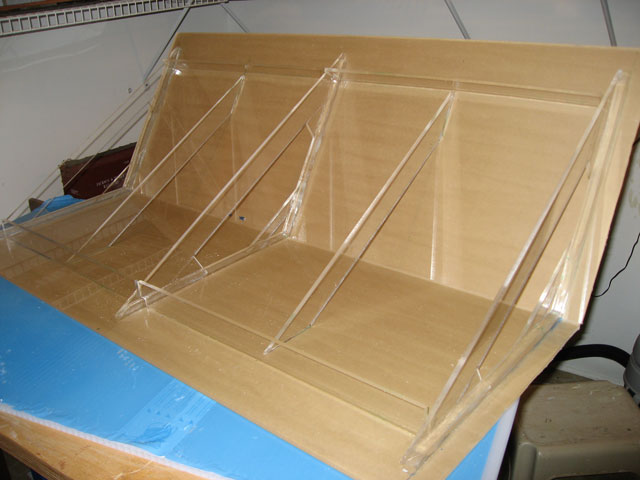
Good question, Ray. The main sheets were ordered from TAP Plastics in specific dimensions - and they seem spot on and very square; much better than I could have done!

The only pieces I’ve had to cut are the trusses for the roof, and I cut them with my MicroLux table saw set to the slowest speed. There’s a LOT of tiny chips that go everywhere, even with the vacuum going.

Thanks. Is TAP Plastics a local dealer or online?

Ray:

TAP Plastics is on-line at http://www.tapplastics.com/. They have about twenty stores in N. California, with two each in Oregon and Washington. None south of the SF Bay / Sacramento Area. TAP is a forum sponsor on MLS. They are an excellent supplier of anything to do with plastics or composites, including custom cutting and fabrication.

Russ Miller is the long-time manager at TAP’s San Leandro (East SF Bay Area) store. He’s a serious LS model railroader (BAGRS & SPCRR Member) with strong knowledge in plastics and resin casting for model RR use. Russ freely provides excellent advice and works hard at getting all of us what we want / need. Give him a call for personal service.

Happy RRing,

Jerry

I’ll echo Jerry on talking to Russ. He has been VERY helpful on this project. I caught him at the right time and we spent quite a bit of time on the phone. I finally glued the front door in place. They’re made from styrene strip and some scribed siding I had left over from my boxcars. Brass escutcheon pins are used for the door knobs.

The truss work and bracing is complete on the roof. After it dries a bit more, I’ll turn it over and remove the protective paper.

The good news is that the roof fits! :smiley:

Now I just have to finish the walls on this side. And build loading platforms; with roofs. Steps to get up to the doors. Finish the roof. Get the paint. Yeah, it might be more than a few hours to completion…

I finally finished the last of the walls. Well, almost - I still have to do the foundation pieces. But, I’m glad there are no more windows to do. So, this is the side away from the tracks. I’ll put a truck loading dock here. I was originally going to make the loading dock from redwood or cedar, but now I’m thinking of making it look like concrete instead. Decisions, decisions.

I also put in 7 boxcars and verified that they’d fit. So, I’ll be able to store 14 cars total. The second 7 will sit on some strips that will rest on the acrylic bracing.

looks great Bruce i really like the doors what color is the building going to be red with white motar lines ?

Yep, some sort of brick red color. I’ll have to see about the mortar lines. That’s a lot of lines. :wink: 
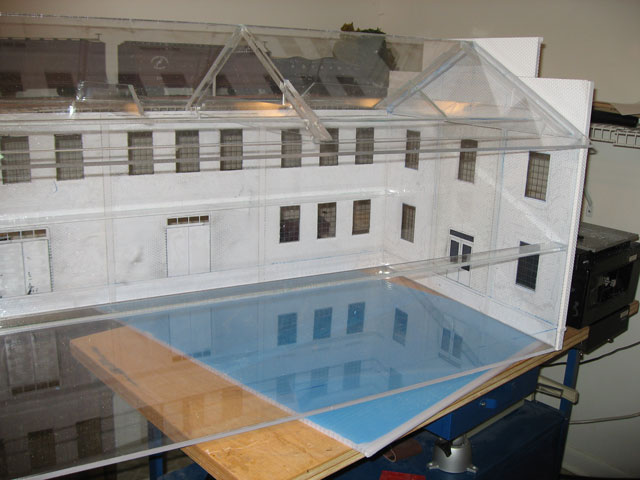
Well, all the curved sections above all of the windows have been painted. And I finished all the trim work on each end, so it presents a more finished look.

I decided to go ahead and spray the paint for the sign background. I won’t be putting it on until the building is all painted, but this lets the black adhere to the brick instead of the paint. I also completed half the roof. I’m using some non-skid stuff that I got from TAP Plastics. It comes in a big roll about a foot wide. I cut it into strips about 2 1/2" wide. This is pretty close to a 4’ x 20’ roll in F scale.

It’s pretty neat stuff, but man does it stick! You better have it aligned perfectly when you put it down.

I used black glue to look like tar.

Great effect!

The entire structure really came out well. Will you be putting track or something to align the cars so they don’t go “bump in the night”?

Regards, Greg

That’s really going to be a beautiful building when it’s done! It looks great already and you haven’t even painted it yet.

Thanks guys. It’s still fun. :wink: Greg, the cars will be placed in the bottom, just like the earlier picture. Too much trouble to arrange them. The second layer will rest on TUF Board strips, 7 of them, that will rest on the plexiglass ledge. I don’t think this thing is going anywhere, even in a strong wind. 63 pounds was the shipping weight, and I’ve pretty much used all the parts shipped. Finished the other side of the roof. I decided to put a hole in the roof, and built a roof vent to allow for a bit of ventilation. The vent still needs to be painted, then I’ll install it with some flashing around it, and more black glue.

Bruce,

That’s coming out great! I like the roofing you used too. I’ll have to check with Russ later to get some.

Now…you’re going to think I’m a trouble maker (I am :D) but…I kind of like the white brick. If it were weathered just a bit…!

Not only a trouble maker, but an inspiring one! Thanks for all of your guidance, Richard.

Nah, probably going to go with some sort of Red Brick color. I’d hate to find out that these things aren’t UV resistant, so I’ll get some half decent outdoor paint. Too bad I can’t buy a pint…I suspect a quart may be the smallest amount.

I do like the roof, but cutting all those strips sure dulled some blades. And even smoothing them in place rubbed my fingers raw. But, it looks nice and seems to stick well.

Sixty-three pounds of material? Wow! What are the dimensions of this building? The roofing looks terrific; the sign on the front does too.

Bruce great idea for the roof that materail looks nice something to put in my note book of ideas if you do’nt mind

Ray, the building is 24" deep, by 42" long by 23" high at the ends. The side walls are 16" tall. Actually, that sign is just a mockup. The real vinyl one is ready to apply as soon as I finish painting. Chimneys are done, so I now have some more vents. It was also a good time to check out my paint. I know Richard won’t like it. :wink:

Started work on the loading dock. It will have the same foundation as the building, and look like concrete, I hope.

Continuing on the architectural details, I’ve completed one of the pair of steps for the entrances. There’s a door on either end.

Not wanting to be a “nit-picker” in all this as I’m impressed as hell with the structure, but where do the chimineys originate and how do they get past the window and door? I didn’t notice a set back from the front or back wall of the building, but it’s hard to tell from the angle of the pix.

Ken Brunt said:
Not wanting to be a "nit-picker" in all this as I'm impressed as hell with the structure, but where do the chimineys originate and how do they get past the window and door? I didn't notice a set back from the front or back wall of the building, but it's hard to tell from the angle of the pix.
Ouch! I hadn't even thought of that! Well, can't change it now...