Large Scale Central

Matheson Textiles - a building adventure

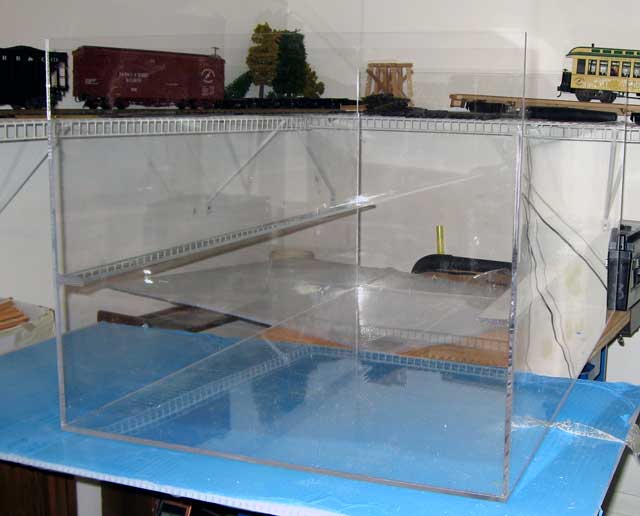
Not only do I need another industry, but I really need a place to store some of my rolling stock. So, the idea was born for a large building. This one is 42" long by 24" wide. It is designed to hold 2 rows of seven cars each, with a lift off roof providing access. I decided it would be a textile mill. Doug Matheson, from Ottawa, Canada, has been a huge source of inspiration and advice, so I decided to name the textile mill in his honor. I used Google SketchUp to come up with a plan of how it might look.

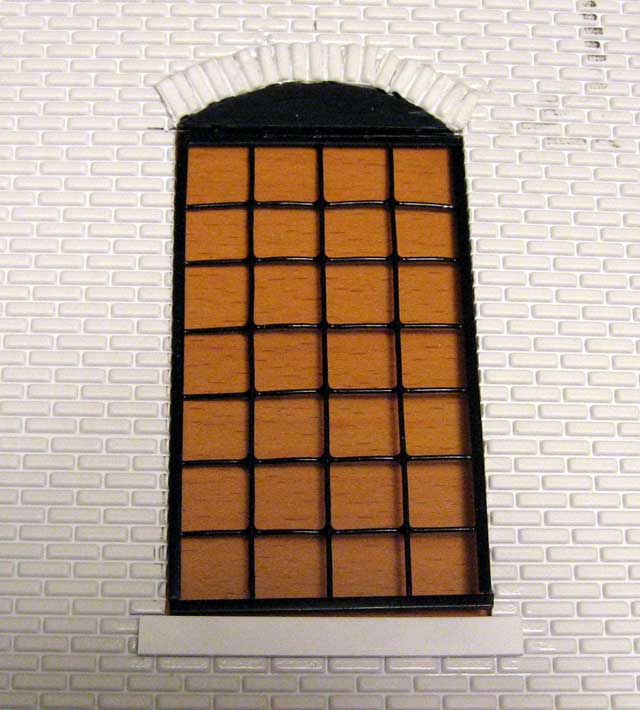
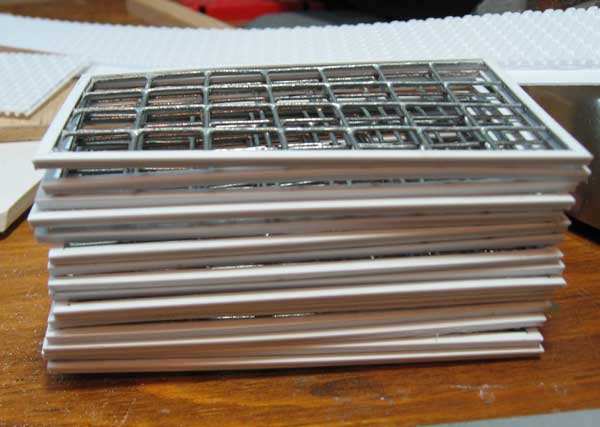
Next, I turned to my mold material. It had been longer than I thought since I last cast anything. It was all separated and about the consistency of jello. Not good. I thought about buying some new mold material, as well as some new resin. Ugh. Even with casting, it would take a LONG time to cast 46 windows. I looked around the shop, and spotted some hardware cloth. Hmm. So, I cut a sample piece and filed the edges smooth. Much easier. I’ve now cut out 46 windows and I’m halfway to filing them smooth.

Am I to assume you are stacking the cars on the inside for storage?? A 42" length definately won’t hold 7 cars end to end on a siding.

Still, in all a very interesting building.

I don’t know if this would help, but I made windows out of the black plastic trays that some nurseries use for flats. Some have square slats while others are more diamond shaped. The squares are about 1/2" and worked out to be 6 pane by 8 pane. If that makes sense.

Dang it Bruce! I want my Mojo back NOW!!!

OK. I’ve misled a few here. The cars will be arranged perpendicular to the length of the building. (Like this: I I I I I I I ) Another layer will be on top of that layer. Unfortunately, I still have to lift them out of the building. But, the windows are starting to look better…or more done…or something. 46 of them cut to size, filed, and more or less straightened…

So, the next step was to see how the windows would look against the brick. The sheets come with a strip of bricks, so I experimented a rounded top. A bit of paint, some more plastic, and everything looks more like a window.

Bruce ,
A bit late at this stage of your building , but if you go into any half decent craft shop , you can buy sticky tape specially done for permanent fixing to glass , tiles , etc , for ornamental purposes . Or to Perspex for simulating window frames . The system also includes glass paint , which being available in several colours is damn useful . People use it to simulate leaded lights .
Maybe next time , huh ?
I like your building .

Mike

Mike,
I looked at Michael’s (a local chain) and couldn’t find anything like that. Thought about pin-striping tape. I think I’ll go with this for now. Just too many windows in my design!

Bruce ,
I shall try to find the stuff in amongst my things somewhere , and let you know for next time you get the building buildings bug . I am pretty sure that it was made in the States . I actually got it for doing windows . Just as fiddly as doing rivets , but worth it . But if it was all easy , we wouldn’t enjoy it , would we ?
Keep up the nice work . Nice to see , you know .

Mike

I changed my tactics a bit. Now, I’m framing the windows with a 3/32" Tee instead of the angle I used earlier. This should help to hold the windows in place a bit better, as well as cover up any gaps. Here’s a stack of 14 or so. The tee has also helped to straighten the hardware cloth a bit more.

The only problem is I’m out of Tee, and so is the hobby shop. It’s very interesting to work with acrylic! First, it’s clear. This picture shows the end, siding and floor all glued together. It’s hard to see all of them!

Second, it’s very quick. I’m going to let this bond for a day before I add the other pieces, but it’s already strong. Third, since the sheets were pre-cut, everything is square - probably a first for any of my buildings! All in all, very enjoyable.

A little more progress, though it’s slow since I’ve also been trying to finish a few more boxcars. All of the walls are in place, and I’ve added horizontal strips along the wall. Not only do they provide some reinforcement, but they will hold the second layer of rolling stock. Of course, it’s hard to see all of this since everything is transparent.

I also built three sets of freight doors. Two will be on the side with the railroad loading dock. I’ll build a short truck dock on the other side. I’ll add some handles and paint them before I put them against the acrylic.

Bruce, are you using the pin method of gluing the acrylic? I just made a sump for my saltwater aquarium and it makes a very strong joint. You place a 2 or more pins in your joint, apply weldon-4, wait 45 sec. and remove the pins. It softens the acrylic more because there is more room to hold the solvent. I had a lot of fun building that sump and plan on making a building with precision “Brick” sheet. Oh and your window look great.

Marc, I’m using a very thin acrylic cement for the acrylic. No pins, just pressure, and this stuff flows between the two pieces. Though your way sounds interesting as well. I am using Weld-On 16 to hold the siding in place. Thanks for the comments! First third of one wall done. The framing of the windows seems to work quite well.

Looks good! How are you planning on painting the siding?

Painting? You don’t like the white?

Hmm…not a bad idea. :wink:

Actually, I was thinking of going down to the local paint store and getting a few quarts of latex color. I’ll need gloss black to touch up the windows and the areas under the arches. Maybe paint the doors the same color? I’m not sure about black doors…but since I already have the black windows what color would look good?,

I am also going to look for a brick color, and a stone color for the foundation. I’m still not sure about the mortar lines…I might thin down the stone color and use it…or get some mortar colored caulk and try that…

But, I’ll be using a brush. I usually use spray, but I don’t think I want to tape up all the windows…

Are the windows sort of sandwiched inbetween the clear and brick? Thats looking exactly how I want my brick building to look. I like the waist high brick detail. I have a few of those sheets around somewhere. Got to get some of this RCS stuff of my bench and construct.

Wow, that’s looking really good so far! I might have to try that technique if I ever find room for a train shed.

1 Like

Marc,
I’m not sure what you mean about sandwiched…but here’s how I did it.

I first cut the hardware cloth to size and then file all the edges even. I cut some 3/32" Tees and glue them to the window edges. I paint the windows with spray paint, but then scrape any stray paint from underneath.

Next, I cut the holes in the brick sheet, and test fit the windows. I glue the brick sheeting to the acrylic with the Weld-On. After that is dry, I put the Weld-On around the windows, press and hold in place. Now, I still have to touch up the black paint, plus add some more. That will come during the final painting…

Well, one wall done.

Since the panels are only about 15" square, I needed a way to disguise the joints. So, based upon some additional inspiration from Richard Smith, I added some columns. Now I need to get some more strips. On this side, there will be a loading dock, probably running the entire length of the building, or pretty close to it. There will be a cover made from corugated material. The design continues to evolve as I build this. You’ll notice its a little bit different than my original idea.

Bruce:

I like your building, looks great.

I noticed you are cutting pieces of brick veneer and not cutting out openings in a sheet for the windows and doors.

How will you hide the cut joints between pieces of the veneer?

Can you go into some detail please.

I want to make some doors just like yours for a Garden Texture building. Can your explain you materials and construction?

Dennis,
Thanks. You’re correct in that I’m using the brick sheets as a veneer. They are from Precision Products. I’m using the new brick sheets in 1:24 scale. BTW, I’ve found them available for a discount at Ridge Road Station.

Now, I am cutting out openings for the doors and windows. The “tee” pieces that I used to frame the windows cover up the opening a bit, so that it looks nice and finished. For the doors, I’m just using some .060" x .250" strips to frame them. All of my strips are from Evergreen Styrene. I get a lot from the hobby shop, some from HobbyLinc and the longer pieces from InternetTrains. The doors are made from .312" wide strips, cut to width. Meanwhile, I had some scribed siding left over from my composite boxcar project, so I cut a couple of pieces to the size I wanted, then framed them with the .312" wide strips. I cut the scribed siding at a 45 degree angle to achieve the look I wanted. Both the siding and the strips are .060" thick, so it ended up flush. Each of the door pieces is made with 7 pieces - 2 of the scribed siding and 5 of the .312 strip. I cut the scribed siding pieces first, then some 3 strips the same width as the siding. I glued these together using a straight edge to keep everything aligned. Then I filed the edges smooth just in case my cutting was off a bit. :wink: Finally, I added the two vertical pieces and then sanded the edges to be nice and square.

Since the veneer is only 15" wide, I covered some .188" x .500" strips with brick to represent columns and glued these between the sheets. In an earlier building, I tried cutting bricks to fit and it just didn’t look all that great.