Bruce could you tell me what scribed siding you use on the doors and on your box car what is the spacing on the scribed siding or where you got the siding thanks hope to meet you in York
John,
I’ve been using the scribed siding from Evergreen. I think it’s .160 spacing, and it’s 12" x 24". The only place I’ve been able to get it is from InternetTrains. I ended up using this for the doors, just because I had some left over. If you were just building doors, you could just get one of the smaller sheets.
I’ll be in York on Friday night for the Drag and Brag. We’ll do the show Saturday, then head home that day.
Thak’s for the info Bruce will meet you sometime on friday thanks John
So, progress is being made, though I did run out of the Weld-On today. I didn’t realize it was empty, as the glue runs out without squeezing, leaving an empty tube! I guess this will give me some time to work on the other parts before the ordered glue shows up. I still have a bunch of windows to frame before they can be installed.
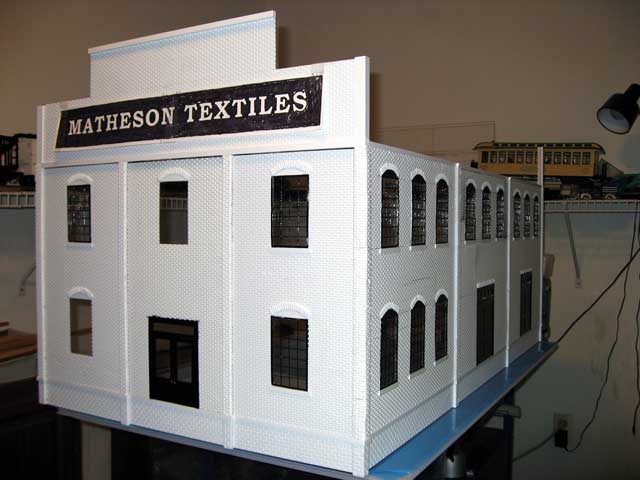
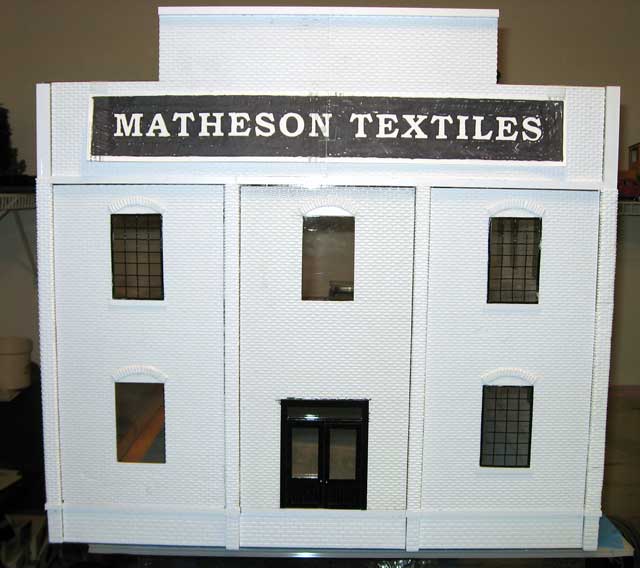
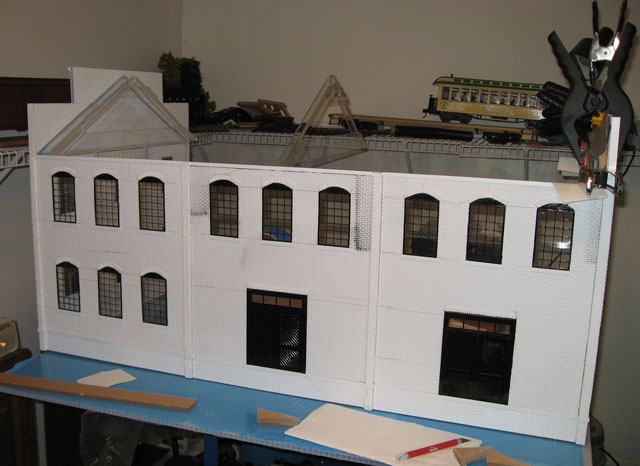
That’s a mock up of the sign there. The real one will be white vinyl on a painted black background. I was able to make a relatively smooth joint of two brick sheets just by cutting straight with a sharp knife. I was surprised by how it is almost invisible. More so with some paint on it, I’m sure. The upper part needs some extra styrene on it, but I’ll probably wait until I get back side covered with brick, which mean I need to get the roof supports in place first.
Oh my, You’ve got a winner there! How much glue and how many sheets to cover that large of a building? It would help me plan mine.
Thanks, Marc.
Well, so far, I’ve emptied one large tube of the Weld-On. The liquid acrylic cement lasts a lot longer, as I haven’t used what I put in the applicator.
As far as sheets go, I used three on the sides and 2 1/2 on the end. That’s the brick. I’ve used almost a sheet of the concrete block - it’s under the lower strip of styrene. I’ve also cut up a sheet of the brick making the pillars, but there’s still some left, I think. The key is you only get about 15" or less from each sheet.
Just a small point about invisible joins on brickwork . I think Bruce has done a damn good job of it . No argument there .
But , no criticism intended here , if you can work it so that your “veneer” joint is in the middle of the wall , (or under buttresses) the odd length bricks at each end will not be so noticeable . Especially if a cornice is fitted over the offending bricks .
Where the two veneers join at the centre(or wherever) there is a trick to joining .
First , make sure you are joing half bricks with half bricks . And whole with whole .
Now put the two pieces side by side perfectly aligned , on a sheet of glass big enough to support at least half of each sheet . (this assumes you have squared off the edges in cross section) .
Get some MEK on a brush and run it into the joint between the two sheets . You need to be fairly liberal with the MEK .
While it is still very wet , gently move the two pieces against each other in a sliding motion , thus building up a tiny bead of plastic between the sheets . Leave alone to harden , making sure you have aligned the brick courses .
When 24 hours have elapsed , you should find that you can slice off the teensy bead of plastic , leaving just a touch to rub down .
You should then find you have produced a near invisible joint before you even paint it . Practise elsewhere first for confidence .
By the way , if any of you saw the carriage repair I did on another site , that is how the damaged sides were invisibly joined together without damaging the paint . (I had dropped an LGB carriage 6 feet onto concrete . It broke )
Mike
Good description, Mike. Actually, that’s basically what I did, but my description fell short.
There are two panels that join right in the middle of the upper wall on the end. A good part of that is covered with the sign, but it is almost invisible, so I have no fear that the paint won’t cover it. That’s a good idea to glue them together before you put them in place; I did one half at a time. I did use some solvent (but not MEK) to blend the line and then some fine sandpaper to make it all one.
Now, my side walls have no joint as I cheated and used the pillars. I’ll have to do the same thing on the other end, of course.
Now, it’s on to the roof…
Bruce, I have used the brick sheets before and have not liked the “hollow half brick”(looks corragated) when I cut out a window. Do you know what I mean? I can’t tell if you fill yours or not and if there is an easy way to do it.
Marc,
I know what you mean. I don’t fill mine, but the “tee” that the window is framed with covers it up. Actually, the thickness of the window, and the doors basically conceals that edge, but the framing helps even more. The door openings are framed with .060 x .250 strip.
I cut pretty straight, but I always cover the raw edges of anything I’m building; it ends up looking much sharper.
Bruce , I should’a knowed you knewed .
By the way , it ain’t cheating to use tricks to finish models .
Very nice work as usual Bruce , I like it .
Mike
Marc , if you are describing what I think you are , it is sometimes better with the plastic brick veneer to cut very slightly oversize and then rub down to size , this avoids the dimpling that the cutter has put into the surface because of pressure stress .
It can also be teased out with fine wet or dry used wet .
Finally , it is possible to get special cutters for plastic sheet , you will see them in military model mags (Tamiya make one ) . It’s a draw tool ,thus easy to keep against a straight edge when cutting .
The tool is vee shaped in x-section , and cuts a little bead of plastic out with each pass , without throwing a furrow up like a plough does . You know , the little lump line each side of the cut . The tool is very thin , and is probably my most used cutter – I have worn out several , but I do a lot of modelling .
Mike
I added the roof supports and thought I’d see how my roof was going to look. Note that this is NOT the final roof appearance - it’s just the acrylic with the protective sheet still on it.
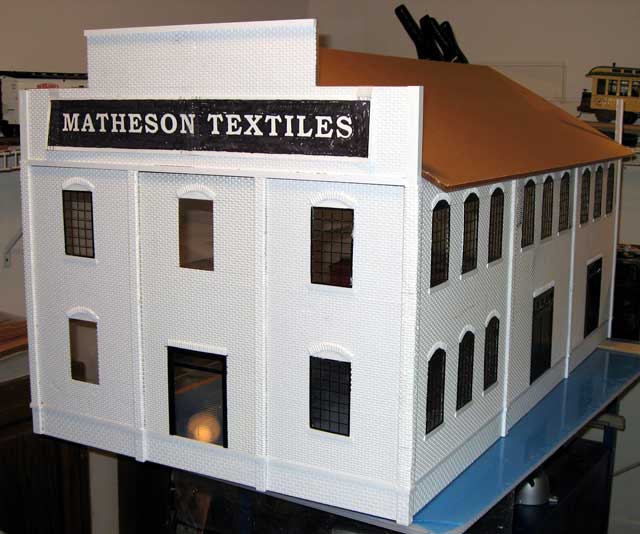
I am going to have to trim the length of the roof just a bit (about .2") to allow for the brick sheeting on the back side of each end. I do wish I had thought about that before I ordered those pieces. [:p]
Looks like a nice colour for the roof though , Bruce .
Mike
EDIT PS your workshop is too tidy . Stoppit .
That’s really going to be an impressive structure when it’s finished!
1 Like
Some progress. I got my glue in, so I did two of the front sections. I also did the back side of each end so I can work on the roof. I had to trim the roof to allow for the thickness of the brick. Next, I’ll be building some roof trusses to help hold the roof together.
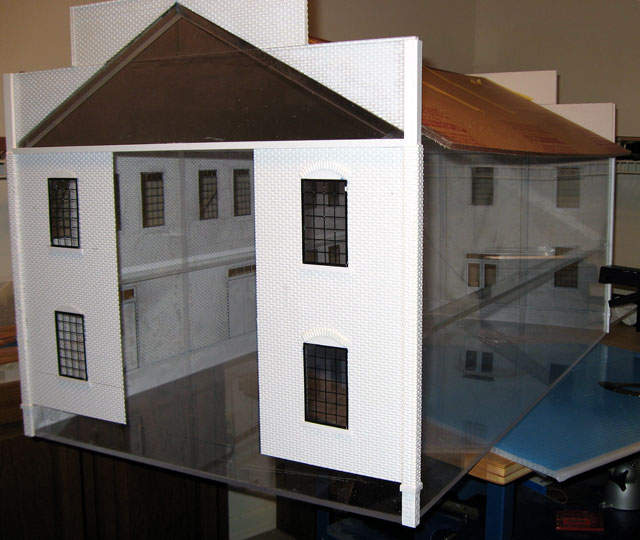
Built three roof trusses today. They’re shown in their appropriate position, but I’ll be gluing them on to the roof directly, as the roof is meant to be removable.
The roof is currently in two pieces, and I’ll glue one half on at a time. Then I’ll add some reinforcing acrylic as well.
I’m really looking forward to seeing this building in it’s final state. It’s going to be just fantastic.
Thanks, Warren. I hope it’s as good as you and I are anticipating. Here’s a shot of the roof trusses being glued into place on the roof. One side of the roof had the protective sheet removed so you’re just seeing the one on the other side.
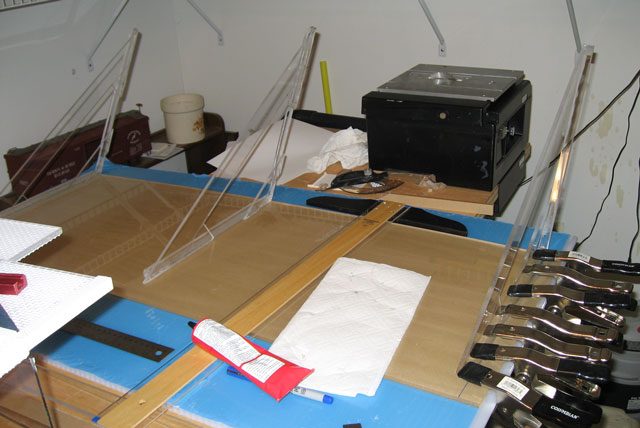
Once these dry, then I’ll glue the other side of the roof and add some more reinforcement pieces.
Sorry if this has already been covered, but how do you cut the acrylic?