OK, I just have to say that if I had the opportunity to tell my younger self that I would one day be sitting at a computer with a cup of coffee looking at a train layout in New Zealand, it would blow my mind!
However, I am easily boggled.
1 Like
Hope you’re enjoying the show Lou. 
Cheers
N
A bit more elephant proof framing went up last weekend. 

Only 2 more posts to get to the end of this section.

And a bit more track line set out. I added a new siding on the fly so my curved turnout idea has morphed into a curved crossover. Just because it’s harder y’ know… 


Need to get some roadbed in next weekend so I can get the crossover design underway. Building that is / was my winter mission. Fingers crossed.
Cheers
N
1 Like
Neil, Good to see the framing notched into the posts, that will save you a lot of grief down the road.
Nice catch Rick !
I totally missed that…great work Neil !!!
Well spotted indeed. Maybe a double elephant rating??
I even checked in my backside. No one has offered to sign it tho. 

Cheers
N
I laid out the next section of mainline last weekend. The aim was to get past the crossover, but I ended up going beyond the trestle.

I got to thinking about how to build roadbed over the trestle. It’s on a compound curve, but a constant 1% grade. After a bit of pondering I decided to start there and work backwards. I used a spline as this needs to stand alone with minimal support till the trestle happens.

The conduit had to stay in place while I build around it. I cut some blocks the same width as the centre spline + 2 spacers, then drilled a hole to fit the conduit then set them out every 600 mm. Trestle length worked out to be about 2.5m between the frame ends


Then it was sorta straightforward to build up 2 runners on each side. The baking paper is supposed to stop the spline gluing itself the the suports, fingers crossed it works…


I made sure the runners were staggered at the ends so there wouldn’t be a bunch of joins in 1 spot. Ultimate test was pulling the conduit out…


Plan is to build the trestle around this structure some time in the future. Apologies to the purists, the curved outer stringer will be seen!
Cheers
N
2 Likes
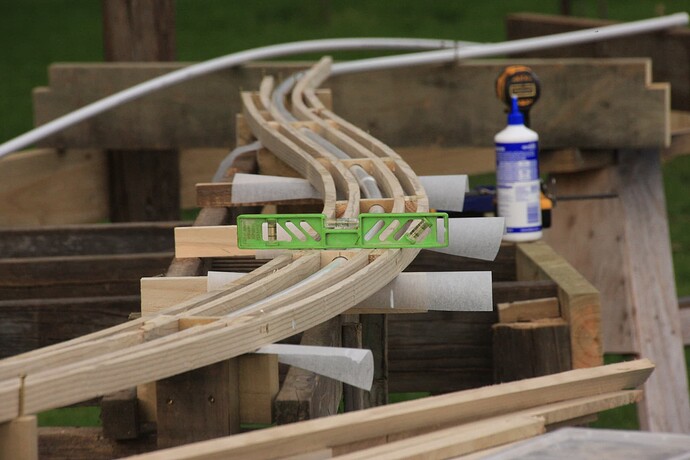
Looking at the bubble on the level and foreseeing that you are working on Amtrak operations in the near future as you have left about 1/32" down on the inside edge of the curve which leads to about a scale 4% super elevation on the outside edge which is all that is needed for Amtrak on the curves.
1 Like
Cool high speed train will be available to keep running at notch 8
You’ve uncovered my plan already! There is another 3 thou available by lowering the inside stringer if I need 4.5%. That will need some careful use of the finishing chainsaw tho.
Always fear the Rooster…
Cheers
N
1 Like
Can you imagine the looks on these guys faces at Notch 8? Suspect more of a terrorised grimace… 

Cheers
N
I managed to make a bit more roadbed, will document that in a bit. My main aim was to start the crossover. I’ve started a separate thread to make it a bit easier to find.
Cheers
N


Well, Bob - where were you in '42?
General update – some winter and spring doings on the railroad.
I moved one of the shade trees mid-winter, it was planted before the railway and was too close to the yard bench.


So far so good, got a spring bud burst, lets see how it goes through the heat of summer.
The wood pile had to move as it was in the way – that led to a tidy up and general dung out. Was good to get rid of a lot of the small offcuts I was hoarding. The stack of free posts seems to have grown a bit

Nice people at a local construction site that let me raid rubbish piles to thank for that. 
As far as the railway goes, not much actual progress but have managed to tidy up some things that were nagging me. I wasn’t happy with the alignment of the trestle roadbed once I started to figure how much room I had behind it for scenery. It needed to be another 6” – 8” closer to the front of the bench.
The spline was unimpressed with my plan and refused to bend. I suppose that’s a good thing?? I cut some centre blocks out and that was enough. I got about 4” movement at the uphill end, and 10” sideways at the downhill end. You can see the original risers in the pic below.

On the subject of roadbed, I’ve had a couple of reality checks.
Sorry to say the ‘solid’ version had a bunch of stress cracks in it at the end of winter. Enough to make me pull it up. I think the knots in the timber is the main cause – it doesn’t bend evenly and the knot free sections take more stress than the harder wood.

Then a discussion at the local train show had me thinking about the screws I used in the spline. As someone pointed out, they are probably good for 10 years maximum outside without any protection. So, for better or worse – I’ve coated the top and sides of the existing splines with several coats of bitumen waterproofing. Fingers crossed!

The replacement section got stainless screws – that’ll be the way from now on.

Almost ready for first track.
Cheers
N
1 Like
maybe you should ask around a little before doing that.
i have read many stories about stainless to work itself out of the wood over the years.
maybe brass screws might do the job?
I think you are referring to issues with Stainless Steel spikes, not screws. The screws will stay put long after the wood has rotted away! Stainless Steel spikes, on the other hand, tend to push out over time. Regular steel spikes rust, and that rust causes friction to hold the spike in place, but it will eventually dissolve, so it’s a trade-off.
Looking good. I think in the long run, black roadbed will be easier to hide in the ballast.
maybe. my memory has seen better days (about half a century ago)
Thanks Jon.
Kinda obvious once I re-looked at the photos… I think I’ve got some black oil stain somewhere. Might chuck that on the new section.
Cheers
N