Large Scale Central

Devon's 2019 MIK build- steam crane

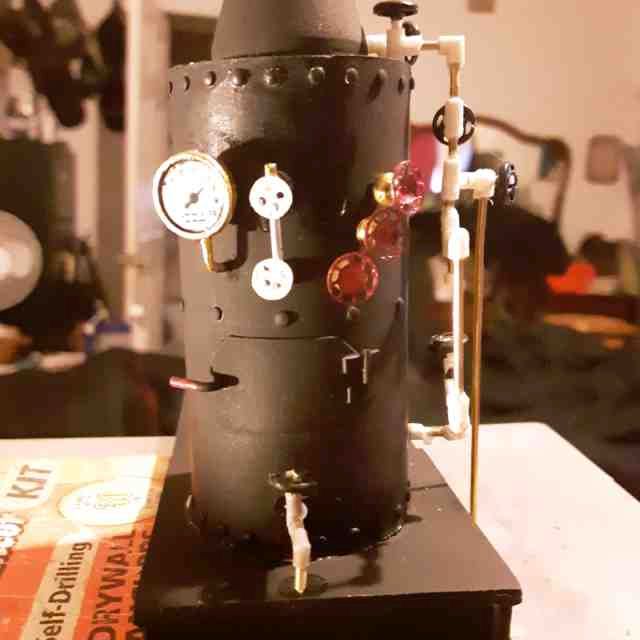
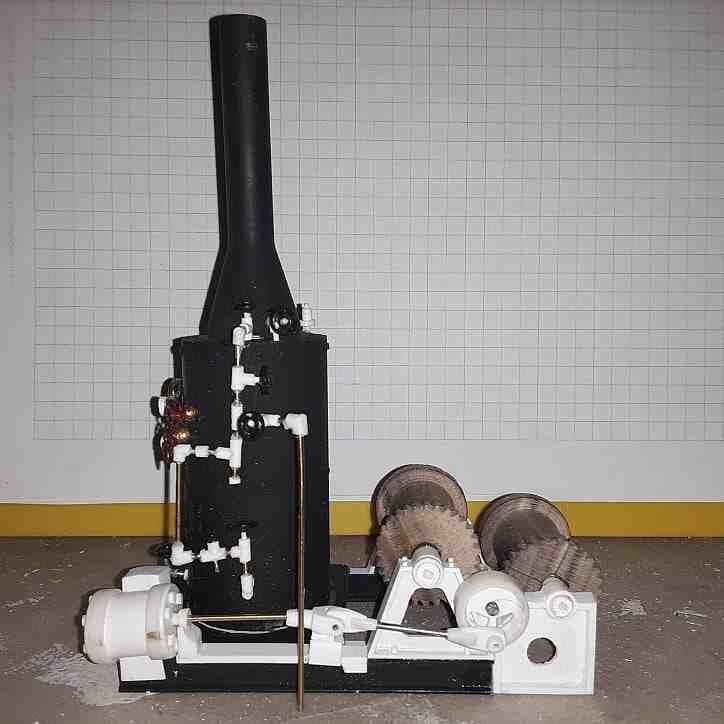
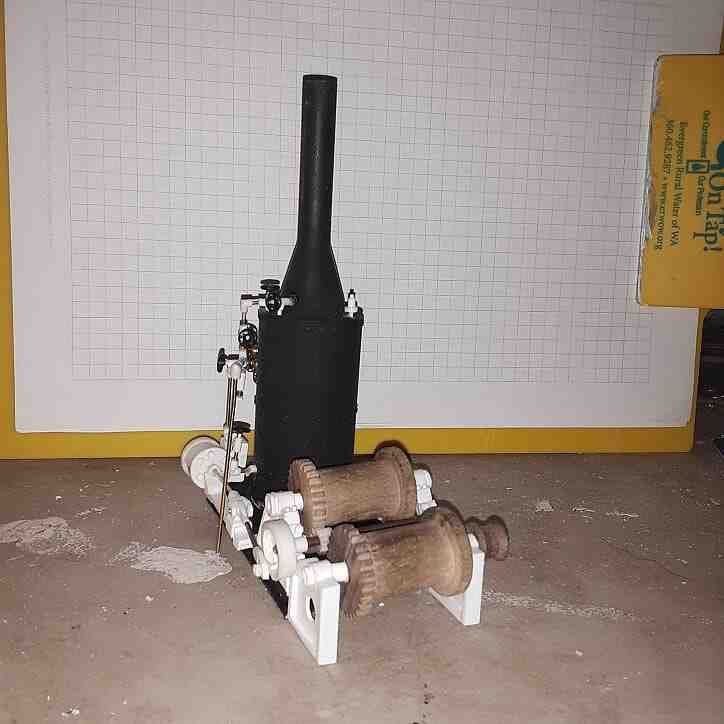
I was just sitting here pondering my ambitions, when I should be working. I really want/wanted to build this crane. But I am having so much fun detailing this engine build all on its own. A compromise might have to/must be made. Do you forgo the detail and get the bigger crane done on time or do you take what comes and do the detail work you are enjoying doing. In order to get the level of detail I am wanting it must be done before it gets installed in the crane. As this will be a mostly open sided crane (precisely so you CAN see the details) details are important to the over all presentation. This whole work train is meant to be more of a show piece than a ten foot rule piece. So with that said:

  1. Rule #1 must apply at all times. Detail work is fun.

  2. The “Spirit of MIK” is to build something from what is in the parts bin during the slow winter months and enjoy doing it.

  3. The “Spirit of Devon” is to not stress out about anything right now.

  4. I will be happier with a detailed model from bits and pieces pulled out of a zip lock bag than I will with a model completed in 30 days.

  5. The “winners” of this challenge are those who are participating, whether or not they are building or spectating, not the one with the best model built on time. I have never cared one hoot about “winning” because I already won as soon as I started sharing my build with others and have joined in others as they build.

So the decision has been made to say “damn the torpedoes (in this case the time constraint)” and build this thing the way I want to build it on my time frame. If it so happens to get done on time, fine. If not I hope you all stay tuned and give me props and continue to make me feel good about myself with all the kind words. And most importantly continue on this journey on the anatomy and inner workings of a steam crane. Seems I am not the only one who is enjoying what I am learning along the way.

Okay I have to laugh at myself; I am a total bag of indecisive hot wind. Here I wrote this nice little post about damning the time and doing the details. Then right after posting it I went back to page one to look over what has taken place and here is a quote from my very first post in this thread: “I have decided that I don’t want to try and build the loco on this time frame with me not feeling good. I want it highly detailed and I just don’t have it in me”. I have vacillated between two schools of thought and we are only two weeks in and only 4 days into actual building. At first I wanted to skip the details and get it done on time and now I am 180 degrees and skipping the time and doing the details. What a dork I am. But I guess you all already knew this.

I’m Glad the real Devon is back Devoning once again…

Man I like this

Sean McGillicuddy said:

I’m Glad the real Devon is back Devoning once again…

Seems not all of me is broken. My paralysis by way of indecision is still quite in tack and working as well as always.

Devon, do what you want to do. I, at least, am enjoying your learning/tutorial pieces. But don’t spend all your time enabling the rest of us!

That being said, an occasional paragraph about how you are building things (like how you are doing the plumbing fixtures) is super helpful to me.

And mostly, enjoy!

Devon, I think the spirit of Mik would tell you to build it the way you want, it’s your model. Like Jim, I am enjoying the detail discussions as much as the build process. Carry on.

Devon Sinsley said:

Okay I have to laugh at myself; I am a total bag of indecisive hot wind. Here I wrote this nice little post about damning the time and doing the details. Then right after posting it I went back to page one to look over what has taken place and here is a quote from my very first post in this thread: “I have decided that I don’t want to try and build the loco on this time frame with me not feeling good. I want it highly detailed and I just don’t have it in me”. I have vacillated between two schools of thought and we are only two weeks in and only 4 days into actual building. At first I wanted to skip the details and get it done on time and now I am 180 degrees and skipping the time and doing the details. What a dork I am. But I guess you all already knew this.

But a favorite windbag! You be in my Tribe.

My brain often forces me into several starts at once as thoughts rarely happen during it’s construction, but rather when I’m doing a different bit. I go where inspiration leads, my dream last night is to ditch the flat car and build a rusty junker under the tanks and bin. I’m already eliminating the plastic as I can…

Reality says I’m no Devon!

Up next cylinders and steam chests. I have a few plumbing bits to complete on the boiler proper like tying in the injector at the top and to put a drain cock at the bottom. But the rest of the plumbing connects to the cylinders so will need to build them and mount them before finishing the plumbing.

Not sure how much explanation needs to be mentioned here. If steam is the fuel for our engine, this is the actual motor that turns steam into motion. Steam is piped in on either side of a sliding valve. The valve is connected to the valve rod which is connected to the eccentric rods. Go to the general forum and general discussion where I asked about how they work. It was a great conversation that has no need to be repeated it here. As it slides back and forth steam is forced onto one side of the piston pushing it one way at the same time the opposite side of the piston is opening to a pipe that goes to the exhaust and out the stack. Steam in one side as it is ejected out the other then the valve switches and fills the now empty side and exhausts the now full side. This moves the piston back and forth which drives the side rods. Easy peasy.

Yup, steam is a proven technology, with centuries of refinement and improvement. Unlike the newfangled, unproven, cantankerous, diesel-lectric stuff out there.

Here is an interesting linl that maybe of interest to modeling steam engines https://joeltobman.com/hell-on-wheels-s5

I have a four day weekend. So after taking two evenings off (I haven’t been feeling so hot) I am hoping to get a big jump. I got a lot done already today.

Basically just some more pipe work and the cylinder. I have decided to only do a single cylinder. To save time and I just don’t want to do any more.

Looking good there Devon! Single cylinder seems perfectly reasonable to me…

Oh,

And I found a new way of doing my plumbing. Just a modification to the same technique but a much more rigid way of doing it. I will post a tutorial on it soon. I need to get some N scale hand wheels. With the new technique, size will not be an issue. I can get much smaller.

Devon, the steam engine is looking great. I’m most assuredly saving this as a tutorial for when I get around to building one. Great work.

Looking good Devon.

In your search for parts and pieces here are a couple things I have tried and used.

1- Small nails make good “solid” valve handles for things like site glass, tri-cocks, and in pipes.

2 - I often use 12 or 14 gauge Romex wire for piping and fittings, just cut and slide the insulation where needed for fittings.

If you do this one be sure to remove the clear wrapper on the insulation, as it won’t take paint.

3 - Heat shrink tubing also works well for building up “fittings” just apply a piece, heat it and apply some more

everything can be trimmed to shape after the tubing is shrunk on the rod or wire.

4 - By using these methods a smooth radius can be produced on the elbows.

5 - If you can “blacken” the brass/copper it will take paint much better.

Looking forward to your long weekends results.

Rick

Rick,

There are some great tips there. I really like the nail idea for valve handles. Just about any size you might need are readily available. I am always looking at the small bits and piece as the hardware store for make.shift parts. I will use the nail idea for sure.

Romex is another brilliant idea. In fact any insulated solid core wire would work giving you many different size pipes. And with my upgraded technique would work brilliantly. I played with building the fittings on a single piece of wire. For 90s bend the wire at a sharp 90 and then glue the halves of the 90 together over the wire. Then on to the next fitting. That way all of the strain is on the wire and not the fitting. I have some romex both 14 and 12 on hand. And it might be perfect for the larger pipes going to and from the steam chest. I will be using that I think.

Thanks for the tips.

Some paint and a few levers and a few other little details and I am about to put a fork in the engine. I started cutting the lumber for the cab floor.

I’ve used evergreen hollow tubing and inserted stuff wife like paper clips and then bend and it keeps the plastic from kinking

Great job, Devon. If I didn’t know better, I might believe you could put some water in that thing and fire her up(https://www.largescalecentral.com/externals/tinymce/plugins/emoticons/img/smiley-surprised.gif) You did a superb job on the details. Really makes it come to life.