Large Scale Central

Crane Car for the Triple O

The B’mann railtruck is approaching “done,” so it was time to turn to the next project. Kid-zilla has been asking for a crane car for about a year, and I need to up the complexity of our projects (to include mastering the straight saw cut!). I really enjoyed the custom look of our [cane cars], so Kid-zilla’s crane seemed like a logical progression. Even better, last year’s “Garden Trains Annual” had plans for a flat car, and I had plans for a very simple crane in my Garden Railway’s compendium CD. The plan is to build to the exacting standards of 1:24-ish PLAYMOBIL scale in hopes of getting something that looks like a crane car, is consistent with the world in which the Triple O operates, adds to the fun, and builds on our skills.

The first thing we did was to take measurements off an LGB low-side gondola and what I think is a LIONEL low-side gondola…


…with the logic being since these cars fit our tunnels and navigate our curves, the future crane car will as well. It also means that the finished product will be consistent with other rolling stock in terms of length and width.

The plans call for 9"x4" stringers, which are close enough to the sampl cars in above.


The wood on hand is 1/2" thick pine. This has worked for some of the kids’ freelanced cars over the last years as well as X Legio’s siege machinery. I am hoping it will scale up to a 12" long car! Assuming it does, I am dubious of my ability to rip it to about 1/4" thick to make the six stringers. Following our cane cars’ example, I may leave these as scale 12"x12" and reduce the stringers to four in total vice six per the plans. If not prototypical, it will be consistent.

Our next step was to insert wheels into the trucks I bought last year for the purpose.


The wheels are donors. They are gifts that keep on rolling!

We then got out a LIONEL gondoloa to see if these truck and wheels would be too big for these slightly smaller cars (I got three of these things for a couple bucks at swap meet last summer. All but two of the trucks shattered in my suitcase :frowning: .).


A quick test run on the tracks showed that the wheels would rub under the deck on our curves and cause derailments. There would need to be a considerable bolster. An LGB size car would need that, too, but it might not look like a “monster truck” on a bigger frame. No clue. I guess we’ll know when this is done.

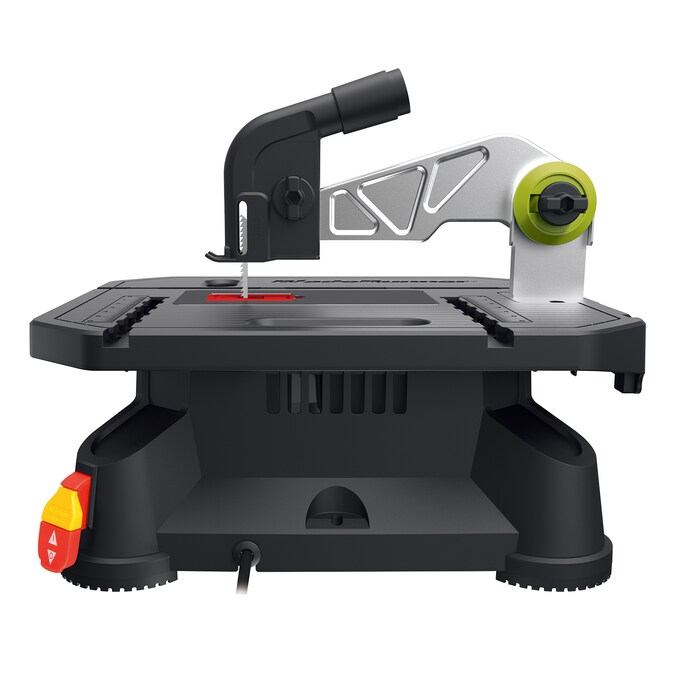
Table Saw has been mocking me from its lair for over a year, staring malevolently at me as it idles away on the shelf. Time permitting, my nemesis and I will do battle next week…

Eric

2 Likes

This will be fun to watch. After seeing Kid-zilla take the lead on parts of the coaling tower, it will be neat to see what he comes up with for a crane.

Maybe a couple of small washers between the trucks and the car will cure the rubbing without drastic measures

I seem to remember doing something like that with a Lionel gondola I had…something about different wheel sizes as compared to Bachmann…

Yes, @Tim1 , these have much smaller wheels. In the end, I’ll end up getting some LGB trucks and call it a day. That is down the road.

As for this project, one of three going on simultaneously today, Kid-zill and I made a start. He began by installing a hook onto the truck with only a loop…


I had to help. Somebody still needs my help!

He then prepped the Triple O for operations as I prepped my nemesis, Table Saw, for battle.


There is a reason I’ve left this thing in its lair for over a year. With it, I can take a perfectly fine board and rip it into not-so-fine 1/2"x?" strips of non-Euclidean straightness.

I was in no mood to make the endbeams after this, so I unplugged Table Saw and called it a day. I think I can salvage these with some (lots of?) sanding, and between all of them, I should have enough reasonable parts to make four stringers, 2 end beams, and replacement bits for X Legio’s canine-damaged siege equipment. At least I have set a low bar to climb over in future battles in pursuit of the fabled Straight Cut of Kailua.

Have a Great Week All!

Eric

not sure, but judging from the raggedness of the cut, you either have the wrong blade in the saw, or the old one is dull. Was there a ‘kick-back’ as you were feeding it the wood? If so, probably time to head to Home Depot…

now that I think about it, I thought ‘jig-saw’ was your enemy…or did you finally tighten up that allen screw?

Oh, Jig Saw is another long-time foe. Batman didn’t just have the Joker! Jig Saw is awaiting another project to return to torment me.

As for the saw, the first blade had teeth that were pointed outwards a bit from each other. The second blade had all the teeth in a line. If I’ve used either blade more than 12 times, I’d be shocked.

When I fed the wood into the blade, it would do fine for about 12"-16" then stall. After than I had to really push to keep moving the blade forward. I did get some kickback in the last 4"-8" or so. This was true of both blades. I think in part trying to run a 36" board through this saw is more than it is designed for. Maybe I should have cut the board into 12" lengths then ripped those in into 1/2" strips.

I’ll see what I can salvage with a sanding block and elbow grease. I also bought four 36" long 3/8"x3/8" “timbers” from the hardware store as back-ups. They were about $1.50 each. Had I known about these things, I would have foregone bringing Table Saw home many years ago…

Eric

Eric , looking at that saw, it an Jigsaw are close cousins. When you have to force it into the blade it causes the blade to deflect or bend , causing the wider on bottom or top cuts. If the wood is pinching after the cut, after shutting off the saw, a small wedge can be placed in the cut to keep it from pinching. Slow down your feed rate will help the saw make more precise cuts and less frustration

Hadn’t run a table saw on a regular basis in most of thirty years. Still, with the larger pieces being cut, it was a two-person job - one person pushing the wood in, keeping it against the guide, the other holding the pieces as they came out, keeping them level and the gap even. Otherwise, the outgoing wood would fall and twist, putting the saw into a bind, maybe bending the blade. That might be what’s going on here…

1 Like

I would think that would help. A zero-gap throat plate is also useful for thin wood.

Updated:

First and foremost, thanks for all the tips! Many of them went into application today.

Second, after hitting the timbers with a sanding block last night, I decided to proceed with the bits I cut. I find it helpful to pose my 1:24 crew, as it forces me to slow down and think. The picture below shows the (rotten) fruits of last week’s labor:

I sorted them for relative uniformity. The bottom timbers only needed to be evened out. The middle set were alternatively straight, but, as the inspector on the right shows, that end can serve as end beams. The last beam, which was wrong in every way, was sold to X Legio.

Kid-zilla tottered out to help align our beams…


…before deciding to leave me to do battle with Table Saw alone with the 1:24 gang.

While the results won’t get me an apprenticeship as a fine cabinet maker anytime soon, they were good enough to proceed.

As the Triple O wastes nothing, I decided to see what I could salvage from these timbers. There was enough to make at least the chassis for another cane car chassis (I have an idea for a water car for the field workers). There were also enough useful bits to make a second car of this design,

As Table Saw was out enjoying all of this, I decided to engage in the ancient art of “practice” on the remains of a once proud pine plank. A butchered plank is of no value. A plank rendered into 12" long 1/2"x1/2" (ish) strips might at least inspire an idea. I did apply some of the tips above, cutting the plank into 12’ lengths first and using a wedge to hold the cuts open. The results, while still not a step towards fine cabinetry, are below in all their inglorious “beauty.”

Someone will need these…For what, I’ve no idea. Hopefully, nothing that requires clean cuts and equal-length timbers!

At this point, I invited Kid-zilla to help me actually start building his crane car. He applied the Titebond III…


…and we clamped the whole center bit together. Tomorrow, time permitting, we’ll clue on the end beams and stringers. I bought an electric pin nailer last year to rebuild my father-in-law’s buildings, then ended up not needing it. It’s time to try it out. Let’s see if this becomes another powered nemesis!

Updates as the situation merits!

Eric

Eric,
What you have is more of a jig saw vs a table saw. A table saw has a circular blade, what you’ve got is a thin blade that moves up and down. It’s the same thing as you jig saw but just mounted upside down and not hand held. I’m thinking that a jig to hold pieces as they get cut might help your issue of a straight line.

Well, I’ll be… I honestly had no idea! I had honestly assumed a table with a saw in it must be a table saw.

Let me do a thought exercise on a jig. A big issue I have is that the support for the guard is so thick, I have to set the rail off by abut 1/8" to get the wood to pass on either side. One solution, of course, is to make nothing longer than about 8". Of course, I may have misdiagnosed the issue. What I tried to do was:

  1. Set the rail to the appropriate width.
  2. Start feeding in the board, using my hands to hold it down against the table and up against the rail.
  3. As the board got shorter, use the compass to push the board the rest of the way to the guard. I stuck a wedge in the cut to help guide it around the guard arm support.
  4. Use a pusher to ease the remaining inch or so of the blade.

I had considered making / buying a featherboard before this project. Didn’t trust my ability to make something using a saw I can’t use, and didn’t find a featherboard at the hardware store.

The next big cuts won’t come until we make the bolsters for the trucks. There is time to work this through!

Yes, I was puzzling about that, until Craig posted the side view of your saw. I’ve never seen an upside-down jig saw (also called a saber saw around here.)

Though Craig mentions the “thin” blade, it doesn’t look that thin to me. A finer-tooth blade may make finer cuts? A sharp blade will always work better than a dull one.

I have a Micromark mini table saw, with a 3.5" blade. I have several different blades for different purposes, and it comes with a lexan zero-clearance throat plate for cutting thin strips. Pics on my recent thread:
https://largescalecentral.com/t/cutting-brass-on-my-mini-table-saw/82189

For finishing timber with cut debris (like the bits hanging off your planks,) I use a small finish sander. Like this one (but cheaper):

https://cdn.makitatools.com/apps/cms/img/bo4/8266dc3a-a932-4813-819c-f6913d8d4b54_bo4556_a_1500px.jpg

What’s happening to Eric I think is the blade is “thin” and it causes it to wander. Same issues on a band saw when you try and feed too fast.

Thanks, guys. I do note that the blade tends to lean away from the rail when I cut. Maybe I do need a thicker blade? I can take a look to see what they have the next time I go to the hardware store, which, incidentally, will also be when I will also look at finish sanders! Our disc sander gave up its ghost last year, so a finish sander would be a useful purchase, anyway,

Eric

Update:

Kid-zilla and I grabbed the new sander and had at this project this afternoon.


I had thought the stringers were equal length. Nope. They were just enough off, so we tried to square the ends and use the sander to get them into shape. The plan was to glue everything together and use the pin nailer to help reinforce the joint before calling it a day and focusing on running trains.

Did I mention I had never used the pin nailer before? It took us about 15 minutes to successfully nail something to our cutting board. After that, we did succeed in actually getting nails into the frame only to find that they are too short to make much of a difference. I also found that centering the pin nailer does not put the pin nail in the center. Maybe the fact the nails go on the left side of the feed tray should have tipped me to that point…Normally, I am happy to show my failures. This time, though, I think I’ll hide my shame behind sanding filler and paint.

After all this, we lined things up to the square again…


Ugggh… :rage:

We’ll try and sand things to shape tomorrow. Or maybe I’ll Dremel-it. Or get out Sabre Saw! Regardless, our 12" car is already about 11". If we sand it enough, it’ll ride on a single archbar truck and enter service on the M&K Sugar Co.

In all seriousness, I am beginning to wonder if it is time to consign these timbers to the “Gemuckabucket” (Coffee cans sorted by material to hold scraps available to all hands for any project) and use the “off-the-shelf” strips I found. I am surrounded by little projects made from the same material cut to the same dimensions by the same saw in the hands of the same non-carpenter, making this all the more confounding.

Eric

Eric in this picture your blade is lined up on the inside of the line, which is going to make the cut short to begin with. Try to always go to the offcut side of the line leaving the line and then sand to the line.
After marking the wood to be cut, maybe even though you are using clamps it is moving a bit on the middle boards you should try cutting them one at a time.
Consult with the White hard hat guy in the picture, he is the foreman and should be held accountable for the overall precision of this operation! :grinning_face_with_smiling_eyes:

Thanks for the tip! These 1:24 guys are good, but sometimes they get lazy!

Update:

Kid-zilla and I spent about 30minutes today sanding and testing…My computer is being wonky, but, in short, there is something drying on the lanai that should, with some sanding and patching, work. Still, I bought some 1/2"x1/2" strips at the hardware store today as a backup.

Pictures to follow.

In the meantime, have a great week!

Eric