Large Scale Central

Building my Deadwood, Black Hills & Western

Chas,

You might not feel comfortable now with what you are doing, but a year from now you will know the results for your area and you will probably have corrected them, if you don’t give up out of frustration. You seem to have started with a generic plan that has a pretty good track record in many climates, hang with it and you’ll end up satisfied.

PS - Get a train running. Even if it is just back and forth. You’ll be amazed how it boosts your ego and confidence level.

Ric,
Wife let me have the SUV today to take garbage to the transfer station and to get a load of limestone crusher fines on the utility trailer. With a buig camping trip looming I won’t get the ballast down until next week though. We go to the campsite Saturday and return on Sunday for landgrab and set up. Friends will be watching our tent and stuff for the week we are home wishing we were there. Then we return for a full week of camping. Friday to Friday. I’m hoping that next week while wishing to be on vacation I can get the track down and get a train running.
I ahve a LOT of year invested in colelcting trains and armchair / keyboard railroading to give up now. I have it in the back of my mind to do a live steam portable too at some point. Probably either this fall or over the winter/spring.

Chas

Hey Chas;
Looks good so far. Have good camping trip.
I use to camp when the kids were young.
Don’t do it any more, too olt.
Too hot to.
Great job so far.
If you have time maybe you can post more pics when you are done. :slight_smile:
David

I will get a thread going at some point on my “ssslllooowww” progress.

Chas

(Instead of hijacking other folks threads)

Doesn’t bother me Chas, hijak on. I’ll keep posting my thoughts as appropriate.

Jake Smith said:
Well, i cant say that my method is the best. Going every 9" for a support would seem better, but I got lazy and figured 18" was fine. We shall see after the first winter if my lazy streek was a good idea.

You will be fine…their are 2 tracks there and have been since 2007

(http://i45.photobucket.com/albums/f72/Shortybear/Railroad%202011/Jan11001.jpg)

Here is what I’ve been working on lately. I’ve been concentrating on getting my water feature in and finishing up the dirt work on the lower loop. Here are some pics.

(http://i1128.photobucket.com/albums/m489/jake3404/8-7-11009.jpg)

This is a shot of the finished dirt work on the lower end. I got a few plants started, but I dont plan on getting too much out of them this year. Hopefully they take off next spring.

(http://i1128.photobucket.com/albums/m489/jake3404/8-7-11010.jpg)

This shot is of the other side of the dirt work on the lower end. I got the rock work mostly done and am starting to mark out where the wood trestle will go (Thats what the chunk of RR Tie is for)

(http://i1128.photobucket.com/albums/m489/jake3404/8-7-11011.jpg)

This is my small pond. The water is murky because I got an 1" of rain on Friday and some of the dirt and water washed into the pond. The small device in the lower left is a biofilter and it will sift out the silt. This morning the clarity of the water was greatly improved.

(http://i1128.photobucket.com/albums/m489/jake3404/8-7-11012.jpg)

This pic looks up the stream towards the top loop. I put EPDM liner down for the stream. I’ll line the sides with rock and then trim the liner when I get down to this point.

(http://i1128.photobucket.com/albums/m489/jake3404/8-7-1120013.jpg)

This the top of the loop. The town will be on the left. I started working on some of the rockwork here.

(http://i1128.photobucket.com/albums/m489/jake3404/8-7-1120014.jpg)

This is a closeup of my waterfall. I am going to put some more rock over the top of the weir so you cant see it.

(http://i1128.photobucket.com/albums/m489/jake3404/8-7-11008.jpg)

This is a picture of damage from some hail I got a couple of weeks ago. From the depressions in the dirt it had to be ping pong sized (I was at work and so I dont know for sure). I put a pen down to gauge the size of the hole. I’ve got lots to do, but I think my goal of having pretty much everything done by the end of summer will be close. It might go into Fall, but thats ok. This is a hobby afterall. I’ll build the trestle this winter, so that wont be done.

Nice progress Jake. I’ve been hiding in the air conditioning for the last few days. Lots of outdoor projects on the list, but when the humidity goes over 70% my ambition goes to about 30%.

Jake, I’ve found that the composite stuff like Trex and Trimwhatever have good stability on a curve, but start to droop on a tangent. I’m not sure why this is, but that is what I’ve observed. Of course, the only layout using that composite stuff that I’ve observed is a small layout that the club built for outdoor displays and then abandoned, giving it to a garden shop. Perhaps our problem was that the longerons(sp?) were only 3/4 by about and inch. I can’t remember as it was 5 years ago or so. I use redwood, cut about 3/8" thick X 1.5 inches. I haven’t noticed any problems yet. Here’s a photo of a site in construction. Under the weed cloth is 2 X 6 supports on 2 ft centers, covered with 1/2 inch hardware cloth. If you look at that stub siding sort of in the center, you can see the 3/8 redwood separated by a block of wood about 1.5 inch cubed.

(http://sites.google.com/a/wildblue.net/wiandmryco/_/rsrc/1304448221558/home/Img_0003a.jpg)

I’m not trying to say my way is better, it’s just the way I chose to do it. I stole the idea fair and square from Richard Smith. I like your approach, and look forward to more photos as your RR develops.

(http://www.largescalecentral.com/chat/emoticons/good.gif)

Very cool and excellent progress Jake!
…:)…

Steve,
The stuff I’m using isnt composite at all. I can understand what your talking about when it comes to composite. If I’m not mistaken, composite still has wood in it. I would say thats why it drooped.

The stuff I’m using is all PVC. The dimensions of the runners is a standard 1" x 2" x 12’. Stand those on end and they are pretty rigid. I wish I could use redwood, but I was concerned about burying the wood in the ground and it rotting. The PVC stuff is plastic and I doubt I have a problem there. I’ll try to find a picture of the stuff up close.

Here is a close up picture of my roadbed.

(http://i1128.photobucket.com/albums/m489/jake3404/ladder1.jpg)

It is all PVC. The narrow pieces are 1 x 2 dimension and the spacer blocks are 2 x 2.

That looks like trimplank too me…either way RR is looking great

Yesterday Sunday Aug 28th was a big step in getting my RR going. I finished laying the track to complete the mainline and was able to run a train around the entire loop.

Its significant because now I have trains running. I had a little celebration because my mother and grandparents were there visiting. But, I do plan on having a golden spike ceremony early next spring. Then I hope to have the RR more complete. Sorry, I didnt think about taking photos. I’ll take some and show the progress, soon.

Congratulations Jake!

Significant milestone reached. If I can ever get the major terra-forming complete (read retaining walls) I might be able to start. Thought I would be past this point already, but cash flow shortages interfered. OOOHHHHH WWWEEEELLLL!

Bob C.

Jake Smith said:
Yesterday Sunday Aug 28th was a big step in getting my RR going. I finished laying the track to complete the mainline and was able to run a train around the entire loop.

Its significant because now I have trains running. I had a little celebration because my mother and grandparents were there visiting. But, I do plan on having a golden spike ceremony early next spring. Then I hope to have the RR more complete. Sorry, I didnt think about taking photos. I’ll take some and show the progress, soon.


…:)…

I used the pvc 1x2 plastic house trim from M,HD,L. been out there for four years, no problems. Even had a USA bigboy on it.

(http://www.trainboard.com/railimages/data/500/Tie_in1_Medium_Web_view.jpg)

This is at the beginning.The line at the bottom goes to the basement. This is later in the build,

(http://www.trainboard.com/railimages/data/500/Looking_East1_Medium_Web_view.jpg)

Couldn’t do it with out the track foreman. Don

Looks great Don. Thanks for sharing. Its good to know that as my roadbed ages I should not expect too many problems.

Well here is an update on my progress. I’m happy to say I’ve reached my goals for this year. The railroad is done when it comes to grading, dirtwork, mainline and the major landscaping. I have to add buildings and the last major project is building my wood trestle. So without further delay here is the railroad.

(http://i1128.photobucket.com/albums/m489/jake3404/92011010.jpg)

We will start with the town. Like I said I havent put any buildings down. I plan to work on those over the winter. I did get some boxwoods planted. Couldn’t pass up the great deal at Walmart, I got them at 60% off. As you can see I have finshed more of the my “mountain” and waterfall. I have covered up the weir, but I still need to add a few more rocks to make it look better.

(http://i1128.photobucket.com/albums/m489/jake3404/92011018-1.jpg)

This is just a closeup view of the waterfall.

(http://i1128.photobucket.com/albums/m489/jake3404/92011012.jpg)

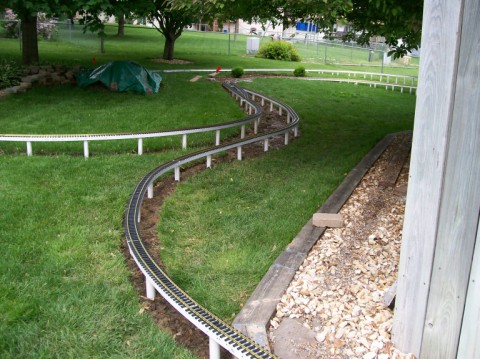
The track leaves the town and loops around under the deck. Hopefully I will get my storage yard put in, which will located under the deck, so I dont have to keep hauling trains in and out. As the loop comes out from under the deck we come to the gold mine. I have just added the spur in this picture. Obviously I need to lay the track but you get the drift. The mine will be placed on the hillside to the left. This will most likely be a scratchbuild project.

(http://i1128.photobucket.com/albums/m489/jake3404/92011011.jpg)

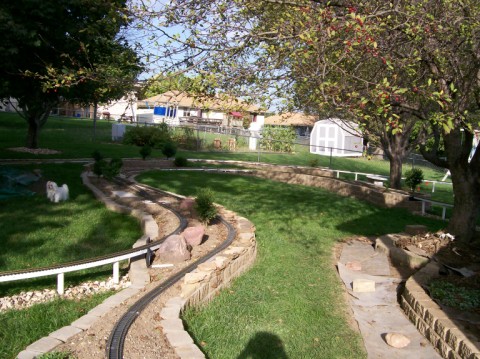
Here we have gone a little further down the line and look back up towards the mine. I planted anthoer boxwood here and you can see my stream to the left. I still need to add a few more details to hide the liner, but I think it turned out good.

(http://i1128.photobucket.com/albums/m489/jake3404/92011017.jpg)

Still a little further down the line, looking back. You can see my town area on the left and the track leading into it.

(http://i1128.photobucket.com/albums/m489/jake3404/92011013.jpg)

This looking the other way heading down toward the lower loop. I dont know if you can see it real well, but I tried to add a forced perspective in the narrow canyon between the two tracks. I used a lot smaller rocks in that area than I did in the other parts of the stream. I was hoping the smaller rocks would make the canyon to appear much deeper than it is.

(http://i1128.photobucket.com/albums/m489/jake3404/92011016.jpg)

This image might show it a little better.

(http://i1128.photobucket.com/albums/m489/jake3404/92011014.jpg)

This is a shot of the line before it enters the lower loop. I planted a blue rug juniper next to the track in the background. You can also see my rockwork along the stream to the right.

(http://i1128.photobucket.com/albums/m489/jake3404/92011001.jpg)

Here is a shot of the lower loop. Obviously the trestle has not been installed, like I said a winter project. I’ll get the concrete footings in before the snow flys but I’m not sure about the trestle itself. You can also see my little pond here

(http://i1128.photobucket.com/albums/m489/jake3404/92011002.jpg)

Here is a closeup of the pond. I have to figure out a better way to hide my pipes that go up to the waterfall. And I will also find some nice flat rock to disguise the edge of my pond.

(http://i1128.photobucket.com/albums/m489/jake3404/92011003.jpg)

As we progress around the lower loop this is the end of the eventual trestle and another rock wall and I also built a RR tie retaining wall here. I planted some blue rug juniper to help with erosion on this wall and put down some cedar chips to cover the exposed ground.

(http://i1128.photobucket.com/albums/m489/jake3404/92011004.jpg)

Just a little further around the loop from the previous picture. I planted some thyme along the track on the left. You can also see my steel deck bridge in the background.

(http://i1128.photobucket.com/albums/m489/jake3404/92011005.jpg)

This is my steel deck bridge. I still have to make the steel supports, but I put a 2 x 4 in as a standin. I do have the concrete footing in here so the only thing missing is the supports. I hope to eventually take the flextrack out and handlay some bridge track, but that will have to wait.

(http://i1128.photobucket.com/albums/m489/jake3404/92011006.jpg)

This on the other end of the bridge. I planted some Grisbatchii ( I think that is how its called) Sedum. Apparently this plant is pretty invasive. I hope by planting it next to my brickwall and the rock cliff, it will contain it.

(http://i1128.photobucket.com/albums/m489/jake3404/92011007.jpg)

This the curve heading into town. Maybe here you can get a better idea of what I was trying to do with the forced perspective in the canyon. After looking at this photo I noticed I got a sort of “kink” in the track heading into the curved switch. I havent had any problems with my stuff derailing here, but I’m a stickler for track so I’ll have to fix this. I planted some thyme on the left along the track, hopefully next year it will fill the whole area.

(http://i1128.photobucket.com/albums/m489/jake3404/92011008.jpg)

This is a little different angle of the curve heading into town. I planted another boxwood on the left.

(http://i1128.photobucket.com/albums/m489/jake3404/92011009.jpg)

Finally the last picture as we head back into town. So there it is. Obviously I have some bare ground to cover, but growing season is pretty much over so I’ll plant some more stuff next spring. I’ll put some cedar chips on the ground to cover most of the bare areas for now. I already have plans for a future expansion, but I’m not sure when I will start it. Thanks for looking and I’ll keep updating as I start to add the little details.