I have researched past postings and still have a question on the width of ladder track. Is there an optimum width, (relationship to track width) of the ladder track? Or does it matter so long as the stringers are not exposed beyond the end of the ties?
Bill
I have yet to see two people do ladder track support the same way. Everyone seems to put their own spin on it. I use Tufboard stringers, 2"x2" PT wood spacers and 1" pvc pipe supports currently. That works out to a total width of ~3" ( 1 1/2 + 3/4 + 3/4 ).
-Brian
Bill,
I used 1x2x12 plastic trim. I cut the spacers about 1 7/8". That’s the same as 1 1/2" plastic pipe. The ties
over hang the ladder about 1/8" on each side.
I used 1x2" TrimPlank with a 1" spacer. The rail part of the track rests on top of the Trim.
I like the total width to be wide enough to extend to within 1/8" of the ends of the ties to protect them from damage. I use 1-1/2" x 5/16" cedar laths I cut myself joined to cedar or PT blocks approx. every 8". I don’t have any sharp curves on my point to point RR but should you need to curve the roadbed sharply you can use laths 1/8" thick or so for maximum flexibility and attach two or more on each side to increase total width and strengthen the sides. Be sure and overlap the joints.
Thanks for all the replies. In keeping with Brian’s comment, I’ll put my own spin on it trying to keep the width a little less than the track width. The only TufBoard that HD carries here in Chico is ~ ¾’’ by 2 ½’’ x 8’. So I will rip them in half and after the band saw kerf, I’ll have a stringer ~3/8 by 2 ½ . Then I’ll cut some PT blocks to space the stringers out to 3- ¼’ putting the ties over the edge by a ¼’’ or less. Earlier I was trying to match the blocking to some surplus Schedule 40 PVC pipe w/ a 1 - 21/32 OD. Getting too technical for garden railroad. This way I will have some wiggle room for adjustments and leveling.
Bill
Personally, I’d keep at the 3/4 width mark for a bit more stability. (Unless the cost of the Tufboard is a factor)
Ken Brunt said:
Personally, I’d keep at the 3/4 width mark for a bit more stability. (Unless the cost of the Tufboard is a factor)
With what little playing around with it I’ve done, I’d agree Ken. I’d think that 3/8 material would bend way too easily. I like the fact that I need to convince the ladder to bend. Makes for nice gentle curves with a natural transition…
Hmm. . . I cut it thinner because of past posts that advocated a ¼’’ stringer. And they also used a 1 – ½’’ width where mine will be 2 – ½’’ I will play with it some more and see what the strengths and weakness’ are. Sigh, more technicalities.
Bill
Bill -
It probably depends on the material you use. The Tuff Board 2 1/2" x 3/4" width is very flexible on the narrow side, and not too saggy on the wide side if supported well. I can’t remember exactly how close Bruce and Ken put their supports.
It really depends. On the ground, you really only need to hold it in place or in shape. For elevated sections, I think I went with about 18". You do not want any sagging. All of mine is 3/4" wide…
Mine’s mostly on the ground, so the spacings about 2’. If it was elevated I’d close the distance to 12-18".
Ken Brunt said:Good advice. Went back to HD for more TufBoard, found 3/4 x 1 1/2, that and PT 2x4 and $80. later everything coming together. It takes a littler longer for some of us to get it together. Comes with having the attention span of a 6 year old.
Personally, I'd keep at the 3/4 width mark for a bit more stability. (Unless the cost of the Tufboard is a factor)
Bill,
I have had great luck with the 3/4 x 1 1/2 Tuf Board. My spacers are from a 1 1/2 x 1 1/2 railing baulister. It is a composite product I found at Lowes. I just cut them in 1 1/2 to 2 inch lengths and screw them together at 8 inch intervals. This puts the Tuf Board right under the rails, so the ties don’t have to hold up the weight of the train. My supports are spaced at 16 inch centers. Works for me. Come on down and see for yourself.
Don’t forget to bring your favorite loco or two!
Two months later I’m starting to get it together. Like Brian mentioned above, no two ladder tracks are the same. But I think each new effort benefits from these postings, I know I did. And I’m confident that whoever reads this will improve on what I have done.
(http://i376.photobucket.com/albums/oo203/BillGebhardt/railroad/DSC_1729.jpg)
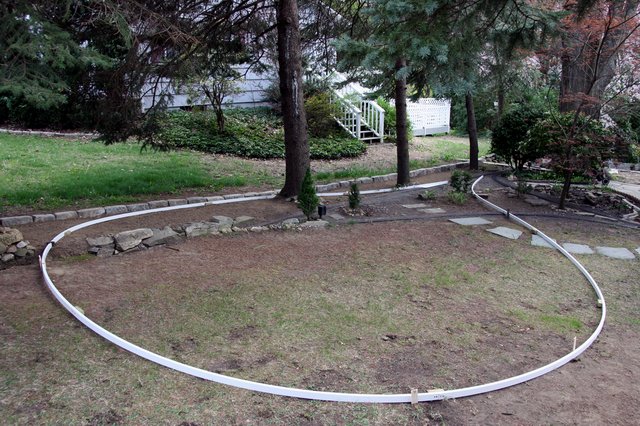
Drawing on all the above comments, I replaced a concrete 4’ radius with a 6’ radius ladder track. You can see the smaller one next to the tree. I also discovered using 24’’ foundation stakes for lay out made assembly and painting much easier. Do all that work as high off the ground as the stake will permit. Saves the back and these old knees. After painting, almost all of it goes down on the ground
(http://i376.photobucket.com/albums/oo203/BillGebhardt/railroad/DSC_1731.jpg)
Thanks to Mario “Width of Ladder track”, that started this dialog, came down to keeping the TB rails directly under the RR rails. Using 3/ 4’’ x 1-1/2’’ TufBoard for the rails, the space between them ended up about 1-3/16’’. This also gave some wiggle room for the 3/4’’ Schedule 40 PVC pipe stakes with an OD of 1-1/16’’. I couldn’t find the baluster material Mario used and was not excited about cutting up a lot of PT blocking only to split it later with a screw. So I cut up a length of TufBoard in to 2 footers, ganged them together and ran them through my band saw with the fence set back 1-3/16’’ Since they were all the same height this made it easy to keep the rails and blocking flush. Allowing for a 4’’ splice block on each end I divided the remaining 88 inches by 10, (gotta stick to even numbers), and allowing for 3/ 4 ‘’ block cut a 7-1/4’’ spacer and attached them with 2 screws to prevent twisting.
(http://i376.photobucket.com/albums/oo203/BillGebhardt/railroad/DSC_1728.jpg)
For splicing the 8 footers I cut some 8’’ blocks, sistered two together to get the 1-1/ 2’’ height, rolled it over and ran it through the band saw to get the 1-3/16’’ width. Four screws and they held up with all the bending.
(http://i376.photobucket.com/albums/oo203/BillGebhardt/railroad/DSC_1727.jpg)
We wood workers never have enough clamps but I did have ten, one for each space and it paid off trying to keep all material flush. Bill
Hi Bill,
Wondered where you fell in. We ahve missed you at the club meetings.
That roadbed is looking really good, and knowing your craftsmanship I am
positive that every joint, connection, screw hole, and angle are absolutly perfect.
That is a compliment not a criticism.
So when do we get to come down and run some trains?
Also, if you need any more leaves I can bring down a truck load
Rick Marty
Quote:The do make PT wood baluster. 1"x1" square. I found the composite ones more apt to split than the wooden ones. The composite ones had a hollow space in the middle.
I couldn’t find the baluster material Mario used and was not excited about cutting up a lot of PT blocking only to split it later with a screw.
I never got my expansion roadbed planted this year, too many other fun things to do.
While I was cleaning the garage I found a whole bunch of reflector stakes the previous owner had made up to keep the snow plow off the front yard. He was a master of over-engineering - they are made from 1" thick wall aluminum conduit. I stripped off the reflectors and put the conduit aside for use as uprights on the ladder roadbed. They are strong enough to hammered into the ground and will probably outlast PT wood.
My only concern is that being round, and quite a bit smaller than the space between the ladder, they might bet too sloppy. Perhaps Bill’s Tuff Board splice block idea could be used with a round hole sized for the conduit. That would allow up/down adjustment without side-to-side slop. Sounds like a good winter workbench experiment.
I think this whole idea just keeps improving as more people experiment with new ideas. Glad to see your variation Bill 
John, you might want to oversize the hole just a bit. I found the wiggle room handy for keeping both sides of the roadbed level. But any gap greater than 1/8th could be unmanageable.
Bill
Bill, Rather than put the joints of both longerons at the same location as you did here:
(http://i376.photobucket.com/albums/oo203/BillGebhardt/railroad/DSC_1728.jpg)
You might consider spacing the joints a couple of feet apart. This will be especially effective on a curve, giving you a smooth, fair curve. Looks good! I have some leaves to spare, too. When shall I deliver them? 