Large Scale Central

Waverly Southern's BDT&L Ry Track Plan

I agree with Ken as well on using the perimeter. Like I said last night Dan I do roundy round as my focus in this hobby is more on building models and railfanning them with photography. One thing you might consider is the photographic background of the RR. You might be disappointed if you have folks coming over and they get great pictures of the sawmill operating but have the modern house and swimming pool in the background. I still think the mill should be down by the lake.

You are very fortunate to have something most do not which appears to be some beautiful natural scenery all around and a freakin real lake to boot for a backdrop. I personally would Take FULL advantage of this if it were me. I have built several large bridges for my RR however they kinda look stupid in my yard as I have no natural background scenery. Perhaps if you don’t mind, maybe you could post a few on the ground panoramic pictures so we could see the area a bit better.

Just my thoughts.

Well, my 2 cents worth would be to build small, and add on later. So I have to go with Ken’s latest suggestion.

Ken, access is crucial to me both for construction and maintenance. That is the primary reason I moved the engine facilities. I want to make sure I have access from both sides and I can reach anywhere on the benchwork. My plan is to keep most of the benchwork 3-4 feet wide or less, with a maximum of 5 feet in a couple of places (yards, large industries, etc.) I like the perimeter suggestion, but due to the change in grades, I really need the green section of track with the loop to gain enogh elevation so I can maintain the 3 ft minimum height on the benchwork at the top of the slope. With the current configuration with the loop, I have just enough length to get to the top with a 5% grade. Also, the loop is/was going to be a tall trestle on very short concrete block benchwork. Not sure if this really helps, but below is a photo giving you a very basic idea of how the grades change. I can develop a topo of the area fairly easy if you think that would help you or anybody else. Also, changing the grades is not completely out of the question. I can flatten the entire site in a weekend. I was just trying to work with the given terrain like the 1:1 guys and not make a muddy mess in the back yard.

Now, with all that said, Fred and I had a good conversation last night on chat and he got me to looking around on the net some more and I am developing yet another version. I think I can include your suggested route, Ken and still get my elevation and still have my trestle. I just got to see if I can get it on 5 ft worth of bench work or I may have to split it and create a U shape.

Again, THANKS for all the help. That is what is so great about this site, everyone is willing to provide feedback to help make each of us better railroaders. I apologize for being long winded, but I will have a large sum invested in the benchwork, so I need to get it right the first time. The trackplan can change once the benchwork is in place, but it has to fit within the defined area on the benchwork. Did I say benchwork enough? I said benchwork 4 … no… 5 times in one short paragraph.

Rooster, my future plans include the lake, but I have got to figure out how to get down to that elevation. I do not want track on the ground, but I do want to include some water operations to include a car float and RC barge. But that is well into the future. I also have to be concerned about the utilities that are in that area. I have a several water lines and the field lines for the onsite waste disposal system, hence why it is flat and there is nothing over there.I understand about the photography, but that is not my cup of tea, currently. That may change once I get the layout started (it’ll never be finished). As long as folks don’t take pictures to the south, they will be ok.

Darn it Rooster, not only do I have to deal with your crap all over the floor everytime I go in the chat room to have a cold one and friendly conversation, now your making my life difficult with the layout. You have now got me to thinking about other areas and how to include the water to begin with. ARRRRRGH!! Now I know why Devon does so much Devoning. Hey Rooster, I am just yanking your chain. Unfortunately, I believe you are correct about the water. I’m just not sure I am ready to tackle that right now. We’ll see.

David, my plan is to build in phases, hence the different colors on the track plan. My initial goal is to get the engine facilities and the sawmill up and have a little yard for some switching just to be able to run trains. So building small is the goal with expansions as time and funding allow. But I do want to have a general trackplan for each area so I have an idea of where and how big the benchwork needs to be.

Once again, I know you guys will tire of me saying this, but many thanks. All comments and criticisms are welcome and taken in a constructive manner. There will be a few things I am not willing to give up or do but for the most part I am flexible.

What we don’t want to see is 37 pages of build log and nothing built…(http://largescalecentral.com/externals/tinymce/plugins/emoticons/img/smiley-wink.gif)

I hear you Ken. I will document the construction in another thread/article but it will probably be well after construction starts unless I run into a snag and need the expertise here. BTW: Be on the lookout for a PM from me. I am going to send you one about visiting your layout this summer.

Sounds good, Dan.

Ken Brunt said:

What we don’t want to see is 37 pages of build log and nothing built…(http://largescalecentral.com/externals/tinymce/plugins/emoticons/img/smiley-wink.gif)

Naw, that has never happened. (http://largescalecentral.com/externals/tinymce/plugins/emoticons/img/smiley-surprised.gif)(http://largescalecentral.com/externals/tinymce/plugins/emoticons/img/smiley-undecided.gif)(http://largescalecentral.com/externals/tinymce/plugins/emoticons/img/smiley-wink.gif)

Hey Dan, great looking area for your new layout. I really like the idea of building it on “Bench Work” like Kens, makes the maintenance and weed pulling a lot less. The only thing I would caution you on is the statement I saw about a 5% grade. If you plan on running long trains with heavy loads on that grade you are going to start burning up motors and destroying gears. We have a person in our club that has a very large layout with over 2000 feet of track and some steep grades. He has burned out several LGB locomotives that have needed repair.

Looking forward to seeing your progress.

Chuck, This portion will be primarily a logging layout with all geared locos and relatively short trains. I hope that the 5% will only come into play for a few short distances. Trying to design this to fit on benchwork is becoming a pain. I know many others have done it with much success, I am having a hard time getting the trackwork I want, some scenery and structures and still be able to maintain it. But, I digress. More on that later.

Shawn …we know you are watching and Dan needs the hat!

I think I have it, but I ain’t givin’ it up until the basement is completely done.

I spent a good part of yesterday playing with layout designs and finally came to the conclusion that building a large scale layout on elevated benchwork drastically limits your options when it comes to having track, scenery and structures. Now that was blatantly obvious wasn’t it!! I did some research on the internet for typical logging trackwork and came up with a design. Well, it looked good in my head, but once I got it drawn on 5 foot benchwork, it was just a sea of track. I may post it just for fun. I’ll see. Anyway, I also did some work on the proposed benchwork design. Here is the first iteration.

All wood is treated. The posts are 6x6’s, the cross beams are 2x8, the stringers are 2x8 and the floor joists are 2x4 on 16" centers. Each segment is 7 feet long, 5 feet wide and the posts will be 3 feet in the ground with concrete. This particular section is 36" off the ground. Obviously, the height and width can be adjusted as necessary. not sure what I am going to do for flooring at this juncture. It will probably be some form of hardware cloth with landscape fabric and 3-4 inches of good topsoil. Based on my rudimentary calculations, 4" of local soil, saturated with water, weighs about 125 pounds per cubic foot. That would put the weight of the soil on each segment (7x5 segment) at about 1450 lbs. That does not include the hardware cloth, track or structures. Here in the next few weeks, I am going to build a few segments and place the soil and build a switching puzzle (timesaver, inglenook, etc.) and just see how it holds up during our wet spring. What you see here is estimated to cost about $10.00 per foot based on all new lumber. I may be able to get some 8x6 steel tubing to use for the posts for free. That would save a few dollars per foot. Here is more of a top view.

Let me know what you think.

I’m NOT at all impressed with the single post design, and would never put posts in the ground…ever…been there and done that. Deck blocks or even just PT 4x4 legs on patio stones over undisturbed soil seems to work best. Look at Ken’s method…treat any cut ends with preservative. Put the patio stones off level to let moisture drain off.

Some times what appeals to your eye is very deceiving, when it comes to durability. Think it over…please.

Fred Mills

Hi Dan,

I would make every other support post double posts, moved to the sides of the bench work and work with 4x4 to stabilize the bench work. I was told lumber may go up by 30% by summer.

One other point why not make your sections 8feet long instead of seven as most lumber comes in 8, 10, 12 foot pieces, save the 1foot wast you will have with the seven foot section’s. Just a few suggestions otherwise bench work looks good. I also agree with Fred on not going into the ground with your posts.

Chuck

The neighbor put up a privacy fence (wall) made out of painted ceder. I am not sure if it was treated in anyway or not. In a short (4 or 5 years) period of time, the post that was set in the ground, in concrete, rotted to the point where I had to add diagonal bracing to keep the thing from falling over and possibly hurting someone. Concrete is porous, and as such will let ground water seep through and contact the wood, eventually rotting it.

As much as I hate to admit it, I’d have to agree with Fred. Then again, I don’t know what problems you have with the frost line in Alabama, which us northerners have to contend with.

I also didn’t want to get into the hassle of digging holes, then lining up posts and keeping them vertically straight.

The 4x4’s and deck blocks worked out a lot better and easier, since any changes I came up with were easily fixed.

This way nothing is on the ground except the concrete block. Again, don’t make it overly complicated.

And if you change your mind (that never happens), its a lot easier to reset the layout.

Daktah John was kind enough to host Richard Smith’s **Port Orford Railroad **on his website. You can get some really great ideas about an elevated layout here. I’ve used a lot of them.

If you must pour concrete, use Simpson Ties to keep your post well above the dirt. Wood swells when it is wet and shrinks when the crete sets. Rain and irrigation water gets inside and rots the post.

I used similar to these when I rebuilt a deck in a flood plain. Passed inspection.

John

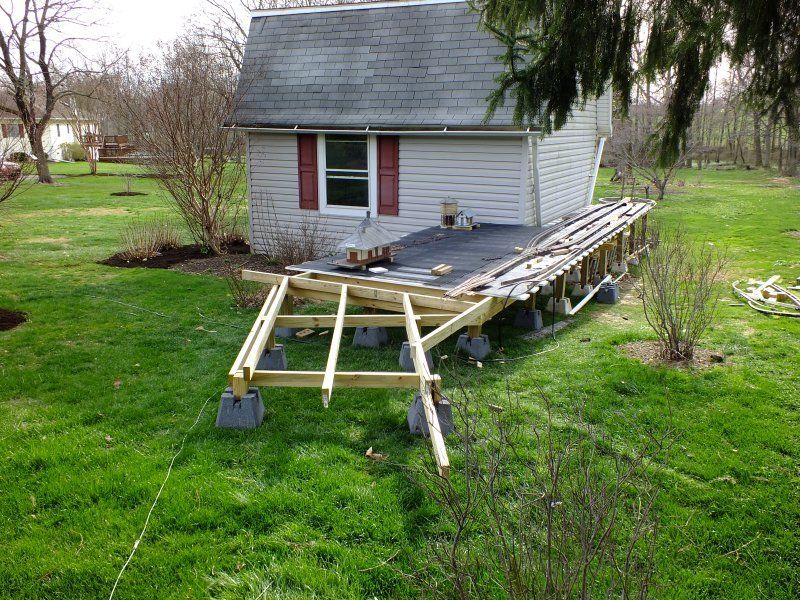
Chuck, the reason I chose a 7-foot span was to reduce the overall span and resultant weight on the 2x8 stringers. The cut off piece will be utilized as blocking to strengthen the cross member at each post. Also, I have found too many times that by the time you square both ends of an 8-foot board, you end up with something less than 8 feet. This way, I control the length and use all the cut pieces too.

Now for the single, ground penetrating post. Guys, thanks for the heads up on the issues with putting wood, treated or not in contact with the ground. I know it’s never a good idea, but sometimes it becomes necessary if not preferred. In my experience here in our locale, I have a lot more problems with treated wood above the ground than the wood that is in the ground. I have a 1300 square foot deck built upon treated 6x6’s encased in concrete that have been there for 20+ years with no signs of deterioration and in the same period of time, I have had to replace 30-40 percent of the treated 2x6 deck boards and several of the joists. But I do understand the risks. As far as frost heave, we do not experience that to any significant degree except in very rare instances. Maybe once or twice in my lifetime but never to 3 feet. As far as the digging goes, well I have two things going in my favor. First, I have a strapping 17-year-old that always needs a good workout, but more importantly I also have a derrick truck that can dig 9”-36” holes quickly.

Now with all that said, I am still considering putting in steel 8x6 posts and I am also contemplating just pouring concrete. Me likes concrete. It costs a little more and involves more work on the front end, but once its poured, you can essentially forget about it. However, should I ultimately choose to use wood, I will treat it with a high end preservative first and then cover that with some water resistant coating. I am looking at several that I have used at work with good success.

Fred & Ken, I really do appreciate the words of wisdom and caution please don’t take anything I mentioned above to the contrary. Although I hope not, one day you both can take great pleasure in saying “I told the young whipper snapper not to do that and he wouldn’t listen, he deserves everything he gets.” LOL.