Large Scale Central

V&T Derrick 50

I asked my dentist for some of his old tools. He replaced his probes every year. I got a nice variety of glue applicators. CA is highly flammable, a Bic makes clean up easy, but don’t breathe the fumes.(https://www.largescalecentral.com/externals/tinymce/plugins/emoticons/img/smiley-wink.gif)

I also would spray a blast of Accelerator into a cap, a different pic applied that for instant bonds.

When I was doing figures I used gel and accelerator to scuplt.

Cliff,

Don’t forget to put your CA in the fridge or the freezer. Seriously, best tip ever for CA. I had a bottle that lasted over 10 years because I kept it in the fridge. Then I left it on the workbench for a few days, and it was a solid chunk. So now I always put it back in the fridge.

Thanks guys for all the nice comments!!

Colin Criswell said:

Cliff, that is a real piece of art. Is this going to be a display piece only? I for one would be afraid to run it on my RR for fear I would break something.

Colin, thanks very much. I’ll put it on its narrow gauge trucks and run it on the layout at least once. Or try to, it’s really wide… But I suppose it’s destined to mainly be a shelf queen, with the standard gauge trucks.

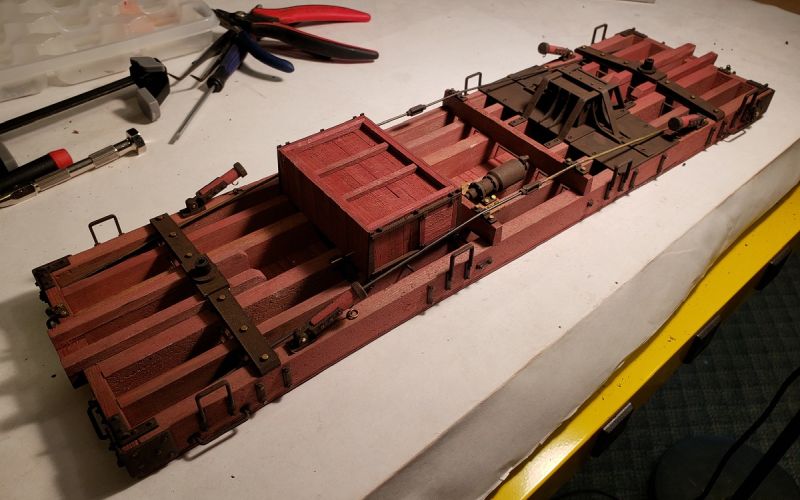
Been working more on the underside today, lots more to do so this is just a progress shot.

Main new things are stabilizer legs, toolbox and the single brake rod (which plows through the toolbox). The mast base is there for trial fitup, but I’ll probably wait to fasten it down until the brake plumbing is in.

Thanks for viewing,

Cliff

That looks fantastic Cliff.

Nice work.

Shane

Man the details really shout out on this. Nice going Cliff(https://www.largescalecentral.com/externals/tinymce/plugins/emoticons/img/smiley-cool.gif)

yea, what he said…

Looking great Cliffy!

Thanks guys!!

AND the details just keep coming (https://www.largescalecentral.com/externals/tinymce/plugins/emoticons/img/smiley-laughing.gif)Great work, Cliff. I want more detail … on how you built the stabilizer legs.

Thanks Dan, very much.

You know, I laid out all the pieces that went into that, before assembling them, to take a pic. And then I forgot to take the pic…

To help me explain, here’s some pics from the design model.

(http://www.largescalecentral.com/FileSharing/user_2480/V&T%20Derrick%2050/stabilizer%201.JPG)

The assembly consists of the following, from top down:

  • Main outer clevis, mounted to the main sill (3DP)
  • Brass 1/16 dia pin
  • Leg inner clevis, wrapped around and bolted to the wooden leg (3DP)
  • Wooden leg (1/4" dowel)
  • Leg cap (3DP)
  • Brass eyelets in leg and main sill
  • Brass loop

Well, that’s about it.

And now that you asked about it…

There has been a little debate among the V&T gurus on whether the legs had a screw jacking thing at their lower tip. From the photos, there’s no evidence of that. However, the main guy promoting that point was one of the few who’ve visited the remains of the derrick (in Tucson). This is one of the many reasons I want to do the same, and investigate the wreck for myself. I even have arranged the necessary permissions from Old Tucson Studios. But I cant get out there soon, at least before I have to give my derrick talk in Carson City in October.

OK, you asked, haha!

CJ
Wow, thanks for that detailed explanation, Cliff. I had figured the leg was wood, but wondered if the other parts were 3D printed. One would think that having a screw jack on the foot of the stabilizer would make sense, but that just may be “modern” thinking. I suppose several blocks of wood, a few wedges and a hammer would work too.

Dan Hilyer said:

I suppose several blocks of wood, a few wedges and a hammer would work too.

You’ve just perfectly described the alternate viewpoint, which I’ve adopted due to photo examination. Also, it makes sense in view of the geometry of the situation: the terrain varies, including the state of ballast. But cribbing is cheap and flexible; and with the iron end cap, the legs could be hammered into position over quite a variety of substrates. A jacking screw might help, but only within a few inches. And its addition could well degrade the leg’s structural viability.

Which is what I’d argue in my talk, if no other evidence existed. But I wouldn’t be fully confident until I examined the bits and pieces on the ground.

Cliff,

You probably do not want to go to Tucson this time of the year. It was 112 degrees is Phoenix today and Tucson is usually not much cooler this time of the year. Stepping on the pavement can sometimes melt the soles of your shoes when it is this hot. And do not think about bare feet on the pavement, it will only cause blisters.

Oh Heck, we are a lot cooler than the Valley of the Singed.

Better hurry, I heard rumblings of the owners wanting to sell out.

John Caughey said:

Oh Heck, we are a lot cooler than the Valley of the Singed.

Better hurry, I heard rumblings of the owners wanting to sell out.

Thanks John, I didn’t know that. If you hear of any specifics, could you let me know? I’m planning on going there in early December, fwiw.

Is that a “valley” described by Dante? Or does it reside somewhere in this mortal realm?

Cliff Jennings said:

Been working more on the underside today, lots more to do so this is just a progress shot.

Main new things are stabilizer legs, toolbox and the single brake rod (which plows through the toolbox). The mast base is there for trial fitup, but I’ll probably wait to fasten it down until the brake plumbing is in.

Thanks for viewing,

Cliff

I’m not quite sure how you are gonna have room for the HVAC unit and HEP gen set on that belly.

Phoenix sits in a Valley and is lower in elevation than Tucson, by that it runs hotter.

I get an extra degree of coolness by the location…

No specifics, just heard a news report that the studios might be up for sale.

Rooster " said:

I’m not quite sure how you are gonna have room for the HVAC unit and HEP gen set on that belly.

Yeah, it isn’t looking good for those or the hobo hammocks…

Well you still have room for the MU ports and cabling (just a thought)