
I thought so.
Somethin’ about when train guys go wrong…
“just the facts boys”
“you can’t handle the truth!!”
“da, ya talkin to me? mad who’s mad. so sad. another one crashes and burns.”
“Geez, ya seem oful defensive”
tick tick tick…
“whah whah whah. I want this closed!!”
and my all time favorite… “we will if he will”
Nick S. said:
Don’t get mad get Heart healthy, Last thing we need is more older people getting
upset and there health suffers. I just read a post on another forum that the promoter of the up coming york show was side lined due to health problems. I sincerely hope he feels better a is able
to carry on this years event.
Less emotion and more Hobby is my motto. Thanks USA for making a product that works and is
still available unlike another few company’s that are gone from G gauge…
Like Ive always said
Buy Ro watch them go buy pulk sit and sulk .ooo yaa there out of business as well…
MTH well ??? were are ya after all the hype??? Nope still not here…
Nicky still luv you fella’s ")
I think Nicky has forgotten that this thread is about a defective gear problem that plaqued USA trains for years without the availbility of a replacement for postage only, ya know like Aristo would have done when they had bad parts…
Keep the blinders on there Nicky Poo, ya just might realize that USA trains can do something wrong some day…
I understand you Mark as your company has gone by the way side and you need to feel
that your posts are relevant about them.
I thought 14 days off would have made you think a bit, I still some times read your posts.
Joe and Mark about 10 years ago when the usa gear crack started and we had to find a fix Aristo had a gear that would work hard to get but you could get just the gear.
Dick413
Richard Beverly said:
Joe and Mark about 10 years ago when the usa gear crack started and we had to find a fix Aristo had a gear that would work hard to get but you could get just the gear.
I can’t understand why USA wouldn’t sell just the upgraded gear? Maybe they’re afraid of someone breaking it during installation of the axles? You don’t need new wheels every time the gear goes south?
Mark, sometimes when children act up, it’s best to ignore them. But hey, I don’t know. Welcome back.
Falcon 223
Joe Paonessa said:
Richard Beverly said:
Joe and Mark about 10 years ago when the usa gear crack started and we had to find a fix Aristo had a gear that would work hard to get but you could get just the gear.
I can’t understand why USA wouldn’t sell just the upgraded gear? Maybe they’re afraid of someone breaking it during installation of the axles? You don’t need new wheels every time the gear goes south?
As the knurling on the end of the steel wheel shafts was the cause of gear splitting in the first place, the problem would simply happen again with a new gear. Once the knurling had been changed on the steel shaft the splitting problem largely went away in future models.
I had to do an NW2 recently and used the K & S tubing fix. An NWS roller cutter is just short enough to get the correct length tube and just big enough to handle the diameter. It takes about about 6 increments to cut right through the brass. The cut tubes need to be dressed with a small round file. I chamfered the ends of the plastic gear to help get the brass tube started over it when pressing the tube on.
I just used a bench drill as a press. Be very careful pressing the wheel sets back in. Start each one and then press them both at the same time. Be careful not to break the thin plastic insulator inside the gear holes.
Ahh. Thanks Tony. I was told they upgraded them to a better plastic and it was weak plastic that caused it. The knurls on the new look like the ones I’ve got.
I had purchased new NWSL wheels anyways. Their gears are $25 a piece! they are better as they are made of delrin which should hold up better against splitting? $100 to $150 per loco plus shipping just for the axle gears which still leaves the idlers stock plastic.
Can’t use the old ones 'cause they’re split! Ah well.
oh yeah, I already had to change out the idler gears too.
I think MTH gears are much better. Last longer. way tougher. But hey!
I’ve forgot my blinders…
Yes, I still buy USA products. I can afford a few gears now and then. I lubed the heck out of them and won’t let them pull alone. I removed the traction tired wheels too. You can see the knurls on the two bare axles pointing upwards. They are no different.(http://www.largescalecentral.com/public/album_photo/02/bf/01/1bc44_327a.jpg?c=2fcd)
Paul Norton said:
The K&S stock number for the brass is 9828 and for aluminum 9809.
http://ksmetals.com/resources/1005+m.pdf
The McMaster-Carr stock number is 88605K29 and their price for a 300mm length (approximately 12 inches) is $3.38.
http://www.mcmaster.com/#metric-brass-tubing/=ot8vv7
Great Hobbies in Canada will bring it in if they do not have it in stock.
Paul, this was one of the best posts here. I tried to find this tube locally and could not. McMaster-Carr
delivered them to me the next day!! Very helpful post so thank you again!
If your USA Trains diesel is running lumpy at slow speed or frequently derailing, the axle sleeves on the drive gear in the motor block may be split. You should not be able to turn any of the wheels with your fingers. If you can, the wheel will slip under load and may not stay properly gauged.
Although axle assemblies are available from USA Trains, the damaged drive gear axle sleeves can be repaired with a collar of brass tube.
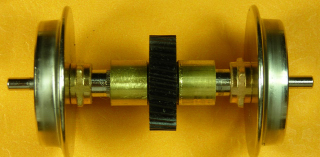
The tube required has a 10mm outside diameter and a 0.45mm thick wall. Great Hobbies here in Ottawa has a metric display of hobby brass and can order the correct tube if they are out of stock.
The K&S Engineering stock numbers are 9809 for an aluminum tube and 9828 for a brass tube. In the U.S.A. the McMaster-Carr stock number for the brass tube is 88605K29. Unfortunately they do not ship to Canada unless you are a registered business customer.
The tools required to complete the repair are: a tube cutter, chamfering tool, drill press, small bench vice, sanding board, and flat metal file.

Remove the motor blocks from the diesel, and remove the bottom covers. Lift the axle assembles out, and set the motor blocks aside for now.
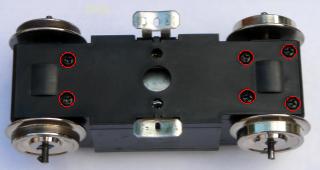
Pull the half axles out of the sleeves on the drive gear. Clean the gear with vegetable oil and an old toothbrush to remove any grease. Wash the gear with Dawn dish washing detergent and hot water. Set the gears aside to dry.
Place a pencil mark 5/16ths of an inch from each end of the 10mm brass tube.
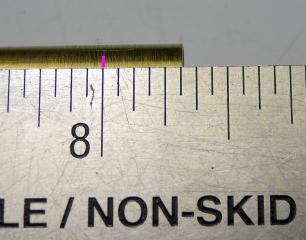
Place the tube in the cutter with the blade on the mark. Snug the cutter down, but not too tightly. Holding the tube firmly, make one turn around the tube with the cutter. Snug the cutter down, and make another turn around the tube. After the third time, inspect the tube to ensure the blade has made a groove on the mark and not a spiral thread. Continue the process until the brass collar drops free of the tube.

Repeat the process until eight collars have been cut.
Sand the edges of the collars smooth on a piece of fine emery paper. A sanding block works well for this purpose. A sanding block is simply a 8 1/2 inch by 10 1/2 inch piece of 3/4 inch thick MDF with a piece of fine emery cloth fastened to it with spray glue. Once the glue has dried the edges of the emery cloth are trimmed flush against the edges of the MDF, and non-slip feet are added.

Mount the chamfering tool in a drill press. Use it to bevel the inside edges of the brass collars to remove any flash.
Use the same tool to bevel the inside edges of the axles sleeves on the plastic drive gears to make the axles easier to install.
Remove the chamfering tool, and place an axle sleeve of a drive gear in the drill press chuck. Use a flat metal file to bevel the outside edges of the exposed drive gear axle sleeve to make the brass collars easier to install. Repeat the process for the other seven axle sleeves. Use an old toothbrush to clean any plastic filings from the axle sleeves.
Turn a brass collar onto each of the drive gear axle sleeves. Place the drive gear into a small bench vice, and close the vice until the brass collars are flush with the ends of the plastic axle sleeves.
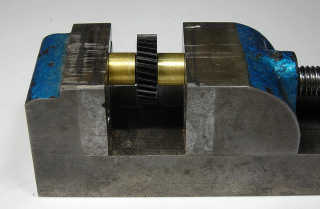
Remove the gear and place it in the vice with one of the axle sleeves and brass collars facing up. Close the vice until the jaws just touch the bottom brass collar. Place the vice on the drill press platform.
Fasten one of the wheels in the drill press with the inside axle facing down. Use the drill press to push the axle into the repaired plastic drive gear sleeve in the vice until just 1/32nd of an inch of the splines on the axle are showing.
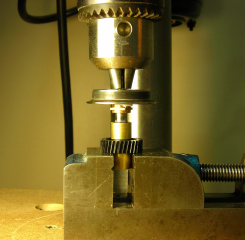
Turn the axle assembly over in the vice. Place the other wheel in the drill press with the inside axle facing down. Use the drill press to push the axle into the other plastic drive gear sleeve until just 1/32nd of an inch of the splines on the axle are showing.

CAUTION: Do not push the wheels beyond the NMRA standard for back-to-back clearance of 1.575 inches. Attempting to draw the wheels back out to widen the back-to-back clearance may break the axle sleeve off the drive gear.
Carefully use the drill press to adjust the back-to-back clearance. The minimum measurement on an Aristo-Craft track and wheel gauge or a caliper can be used to take the measurement.
LSC rules…![]()
David Russell said:
LSC rules…
Sweet…
![]()
There are two types of knurling, the original and the new type. I have not seen any great reduction in “splitting” with the new type.
Joe Paonessa said:
snip
You can see the knurls on the two bare axles pointing upwards. They are no different.
snip
Paul
thanks for posting nice write up with great pics.
Richard
I finally tried the fix. I got one axle done for now. I’m also upgrading to NWSL larger wheels. They have much smaller knurls on them. I noticed that the metric tube was slightly loose on my gears for some reason. The NWSL wheels might slip inside. So I made ribs in the tubing using the tubing cutter. I put the tubing in the cutter and tightened it up while turning. I did not cut it just indented it enough to tighten the cut pieces on the gears when installed.
(http://freightsheds.largescalecentral.com/users/enginear/DSC_0170%20(800x530).jpg)
Joe
You can try the 3/8 od it has a smaller id and it will be tighter.
Richard
Yeap. Too bad I’m always taking the scraps back to the scrap yard. Now I’ve got to go find some 3/8"!