Looks good, Jon…specially the paint job.
Jon, boxcar looks great, nice job… 
Ken Brunt said:
Looks good, Jon…specially the paint job.
Thanks all. Do you think I should paint the hardware “tourist era” black?
Jon Radder said:I think so, as you are running a "tourist" RR ;) Ralph
Thanks all. Do you think I should paint the hardware "tourist era" black?
That was my thinking too, except I left the roof walks natural"weathered" wood. Perhaps a combination of eras is appropriate since I already made the decision that if this car had survived it would have received metal roof panels during it’s life. In any case, it won’t get that detail paint before York. I’m pushing hard to get it lettered and the electronics installed by the middle of next week.
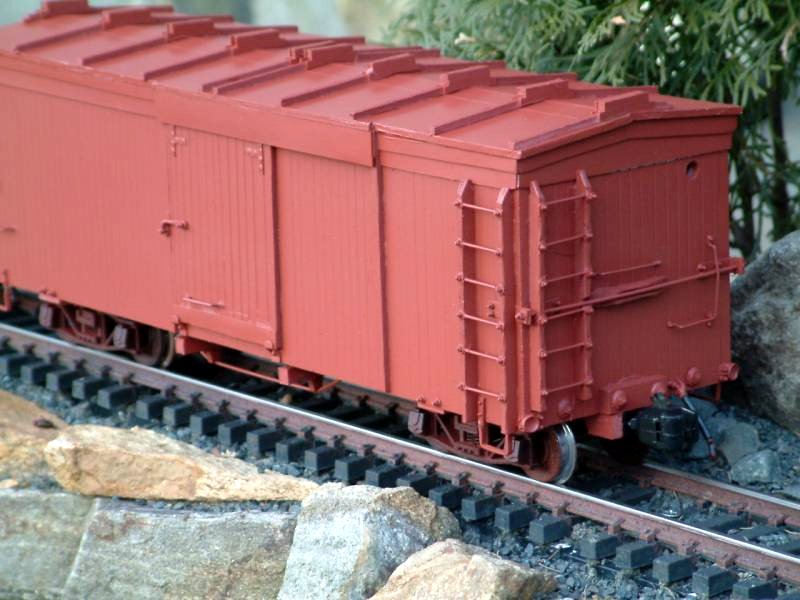
Progress pictures: Roof walks and some of the lettering is done. And I put the Brake wheel on for Hollywood. Still needs data and a car number. Hopefully I can get that cut at work early next week…
Roof walks are wood, weathered with an India Ink & Alcohol bath…
Up close & personal…
Electronics will go in tomorrow.
Very nice 
Looks like you’ll be ready to travel 
Ralph
Still rushing around trying to finish up the battery - R/C & Sound component wiring in time for York. The exterior is done, but final photos will have to wait until after the weekend. I will be bringing it for a guest run on Ric’s Timesaver and wll be at the Drag 'N Brag at the Holidome on Friday evening. It may even operate on Ken’s railroad on Sunday  I’ve lettered up one of my 45 tonners for the occasion as well.
Looking forward to seeing it !
nice work Jon. Glad you’re bringing it
It lives! Finished the wiring and did a test run this evening. Now I just need to pack!

That was close 
Ralph
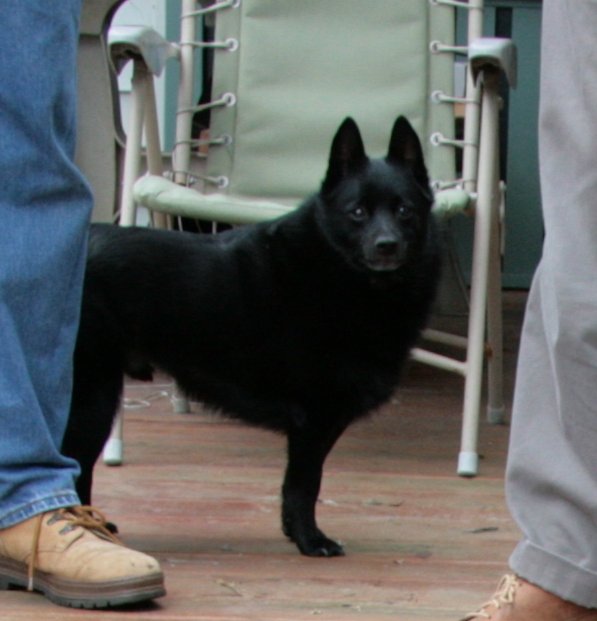
Project Completion photos! I needed to wait until after ECLSTS to show these. Because the car is a bit shorter than the prototype that inspired it, I decided to name it Shorty after Rooster’s Schipperke that passed recently. I was hoping someone had a better photo than the one I had, but my “call for photos” didn’t turn up anything I could use. I had to settle for a picture where Shorty Bear’s butt was obscured by a leg…
Using Photoshop I created a silhouette by tracing what I had and filling in the missing part. Once I had a good outline I had one of my guys at work create a white outline vinyl decal that was then applied to the car. This tribute to Shorty Bear was revealed on Friday at ECLSTS…
Any dog who pees on Ken’'s stuff can’t be all bad  Now that the name has been revealed I can show the car in the state I consider finished (for now)…
This shot compares the width with an Accuraft AMS FN3 car…
This one is for Bruce. My coupler height is dead-on with most of my AMS and Bachman FN3 cars…
And finally, Shorty’s first official run on the C.V.S.Ry. as an operating Head End Power car…
Thanks to everyone who has provided encouragement, ideas, inspiration and comments along the way. It feels good to have finished a project 
Looks Great - like the tribute to Shorty.
That was a real surprise and the car is very neat! You should talk about the LEDS and your trials and finds…I had a love/ hate relationship with that dog cause he was too smart for his own good and had a mind of his own at times… but I LOVED the tribute and he is truly missed!
Thanks!!

(http://i45.photobucket.com/albums/f72/Shortybear/ECLSTS/Sept2010034.jpg)
(http://i45.photobucket.com/albums/f72/Shortybear/ECLSTS/Pics738.jpg)
(http://i45.photobucket.com/albums/f72/Shortybear/ECLSTS/002.jpg)
(http://i45.photobucket.com/albums/f72/Shortybear/The%20Railroad/July09082.jpg)
Thanks Jon 
It is a great looking car and a fitting tribute to a true “Barge Dog”. I put one of my 1:22.5 boxcars next to “Shorty” at York and “Shorty” was a dramatic and visible improvement over the plastic box car. As usual, the only photos taken are in my head. I get so wrapped up in what is going on the camera never seems to make it out of the case. I really have to work on that.
David Russell said:OK, LEDS. The reason the car has LEDs in the first place is for positive indication of direction of travel when the throttle on the R/C is raised. Normally, when putting R/C in a locomotive, the constant headlight gives you this indication. But when using trail-car power the headlight doesn't come on until just before you begin to move - just like track power with PWC. With the R/C gear encased in a car it's hard to hear the relay click so I wanted a means to indicate direction.
[i][/i]You should talk about the LEDS and your trials and finds....
I use Del Taparo’s Rail Boss system. He provides on-board drivers for LED head and reverse lights. In Cheesy Sound Ver 2 (or was it 2.5 I forget) I wanted to install bi-color LEDS to indicate direction. All of the Bi-Colors that I could source easily (Radio Shack) were two leg packages with polarity determining color. Since Del’s circuit provides a common positive current source and switched grounds for front and rear lights, wiring up a dual polarity LED was a challenge. I dug out my digital logic books and was about to try and design a circuit when Del answered my email query suggesting a simple 12V DPDT relay. Driven by the reverse lamp output on his board, the relay was wired to change the polarity of the power feeding the LEDs. Since I had relays in my junk box I went ahead and wired up a circuit. It did exactly what Dell suggested it would. But, my junk box relay decided to be intermittent. Unfortunately, it worked less often than it didn’t.
Somewhere along the line I noticed 3 lead bi-color LEDS. Perfect, no need to change polarity. But no. Everything I looked at had a common negative (cathode) where Del’s board was a common positive (anode). After a bit more searching I found a US source of common Positive (anode) LEDs that I could buy in small quantities. They were actually Red Green Blue LEDs with 4 leads, but I easily ignored the blue to get what I was looking for.
Hooking one LED up directly to Del’s board worked perfectly. Green in Forward, Red in Reverse. When I hooked up two so I could have an indicator lit at both ends at the same time, things didn’t work so well. The red would move from back to front, but no green. After checking my wiring I looked at the LED spec sheet. AHA! The Red and Green have different forward voltage ratings. When wired together the Red was stealing all of the current. I added a resistor to both red leads and the system came to life doing what was expected.
So now, whenever the power is on both front and rear LEDs are lit. Green indicates which direction the train will will move toward. When in forward, the LED at the front end of the car is green and the rear is red. Switch the R/C to reverse and the LEDs change color, the front going red and the rear going green.
So Dave, that is the long and detailed sagq of Direction Indicator LED’s on Chesey Sound and Shorty 
Jon,
I have to commend you for your tenacity 
If I thought it would stick…I’d start calling you “Pit Bull” 
Great job !
Ralph
You lost me in the first paragraph…

