Large Scale Central

Turnout linkage

Many of the manufacturers of turnouts include a control box or set of linkage to control the turnout. Almost all of them allow some form of spring linkage to allow run throughs automatically or the ability to prevent a derailment if accidently or if on purpose a unit over run the points.

On the overhead indoor portion of the KVRwy, these controls work well. And electrical power is even used to assist in some areas with limited access. These are also used on the Timesaver and can be thrown quickly when you are working against the clock. However, under most circumstances, I like the idea of the slow process of throwing the points before you can continue the switching manuever. Having had the chance to run on many different railroads. I have been looking for a turnout control that will work outside and not corrode or rust. Some people have offered great solutions of how to make ground throws or even old upright switch stands that myself or one of the animals would certinaly have bent flat to the ground shortly after the install. On the IPP&WRR, Friar Fred has used a modified turnbarrel bolt with a piece of spring wire for linkage. These work remarkably well and with being up on his bench work and limited ballast, hold up year after year with minimal maintenance. You can see one at the front wheels of the Climax.

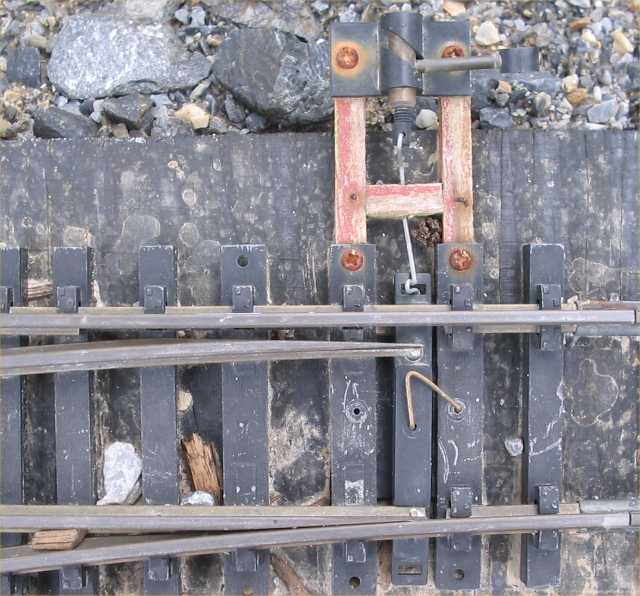
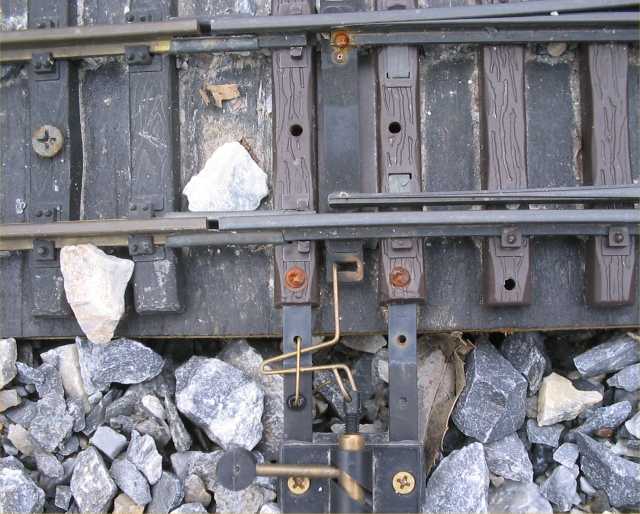
But the KVRwy is on the ground, in ballast and has rocks and twigs constantly fouling the points. They need to be cleaned or swept often to prevent derailments and for positive throwing. For years, I have operated without any type of mechanism, allowing the ballast to hold the points over. It actually works pretty good and unless you are trying to go through the turnout at mach speeds, few derailments are ever a problem. Marty Cozad uses either turnouts he has built himself or Aristo large radius turnouts. He uses a Tenmille ground throw, with no spring and a positive hard through. You try to go through one of Marty’s turnouts without making certain the points are set in the right position and you can put a whole train down in a canyon.

I took some extensive pictures of his linkage and setup, when we were up there this Fall, and have begun the process of adopting this on some of the KVRwy turnouts. This will be a long slow process, I actually had to count the number of turnouts I have and lets just say there are quite a few. The KvRwy uses all LGB 1600 turnouts and part of the challenge will be a fixture that will extend the ties out far enough on one side to clear even 1:20.3 equipment and look like it is part of the turnout. I’ll post more as this project continues and supplies arrive.

I’ve never had any luck running through “closed” arist turnouts without derailing. Except those without aristo switch machines.

Ric, All:

Interesting topic.

I started with the stock LGB “Drive Mechanisms”. Although they were pretty good on a short term basis, they wound up being a haven for dirt, bugs & corrosion. Too short a service life in the great outdoors.

I then went to the DelAir pneumatics. I use a small piece of pressure treated 2x4 (or similar) as a giant tie under the TO and mount both the TO and pneumatic cylinder to it. This arrangement has been virtually 100% reliable after more than 10 years ‘on the ground’. I just make certain there is no gravel in the points or flangeways and they run. Some folks have reported rust on the DelAir push rods, along with UV effects on the tubing, but I haven’t had any such problems.

I’m now using C&OCRwy’s EZ-Air controls on new installations. Their units are better designed and engineered, including 100% non-ferrous materials, UV proof (colored) tubing, a mounting adapter that connects directly to the LGB ties with a couple of included screws, and more choices of pneumatic ‘logic’ controls. I bought a kit of 4 of these at the National Garden Railway Convention and they are now installed on the TOs, waiting for the track crew to lay the branch to the Boonville Light & Power Plant #1. I don’t think I will put wood under them, but not certain.

I have some Tenmille ground throws, but they don’t have enough throw to directly operate an LGB TO. They appear to require either replacing the tie bar, or a bell crank to lengthen the throw. How do others deal with this?

I also have one location at a junction that uses an operating cast brass Pettibone-Mulliken high level switch stand. It also does not have enough throw and I have substituted and new tie bar for the LGB one. Since I don’t use track power, I just fabricated this from a piece of brass strip and used copper (model airplane) eyelets to rivet to the points at a wider spacing.

I’m interested in other folks solutions, but am really happy with what I am using.

BTW, all train crews are responsible for seeing and ‘calling’ the TO’s alignment. Put a train on the ground and it is ‘down the hill’!!

Happy RRing,

Jerry Bowers

I’ve been using the Tenmille ground throws on mine. The Aristo turnout points can be adjusted under the throwbar. The connecting linkage is a piece of stiff piano wire with a V bent in the middle of it to act as a spring. On LGB turnouts, I use an L-shaped spring between the tie and the throwbar to help throw the points all the way over.

On the LGB turnouts you can mount the Tenmille the same way Marty did by using the existing plastic extensions. On the Aristos I use pieces if cedar sawn down to fit under the ties where the old switch machine was held in place.

One problem a buddy of mine has with the Tenmille throws is squirrels eating the plastic barrel housing. He’s had to replace most of them with barrel bolts.

Jerry,

Thanks for the reply. I’m really into the manual operations and certainly want to do the hand throw at the turnout.

Ken,

You said - “On LGB turnouts, I use an L-shaped spring between the tie and the throwbar to help throw the points all the way over.”

How about a picture? I am having trouble with understanding the difference between an “L” and a “V”. The “V” I understand, the “L” isn’t as clear.

You also said - “On the LGB turnouts you can mount the Tenmille the same way Marty did by using the existing plastic extensions.”

??? What existing plastic extensions?

What I am thinking of doing is cutting a couple of LGB ties to a proper length to put the ground throw 2.5 inches away, which is outisde of the 1:20.3 footprint and hooking it to the current turnout ties with plastic underneath, in the hollow of the ties. So all of the plastic exposed would be UV protected.

My original thought was to use Marty’s copper tubing linkage, but I’ll relook that. I thought, on first measurement, the Tenmille throw was long enough to work with the LGB 1600 turnout.

Went out and took a few pix to better show you what I did. This first pic is an Aristo wide radius tirnout. It shows what I meant by the L-shaped spring between the tie and throw bar. For some reason I could never get the points on this one to close all the way, hence the spring.

This second shot shows the throw mounted on the extensions. I’m assuming they’re LGB cause it’s been so long ago that I mounted the new ground throws on them, I can’t remember if they were LGB or Aristo’s.

Ken,

Thanks for the pictures, they explained everything. I knew what the “V” looked like. And though I’ve seen the “L”, I was relating to what you were saying. I think the extensions are from an Aristo turnout. I only think that because Marty had those on his and he said they were under the Aristo turnout machines and you just extended them out further. Soon as I carry my project to the next step, I’ll shoot some pictures of what I’m talking about with the ties. I’m working on the prototype now.

As Ric shared With any large Aristo switch you can loosen the screws and slid the bars out.

Hand laid switchs you’ll have to use longer ties. This makes for a strong throw. I don’t want spring-switches. the engineers are suppose to keep awake.

Marty Cozad said:
As Ric shared With any large Aristo switch you can loosen the screws and slid the bars out.

Hand laid switchs you’ll have to use longer ties. This makes for a strong throw. I don’t want spring-switches. the engineers are suppose to keep awake.

Sheesh Marty, You mean no “falling a-sleep at the switch” on your RR??

Ken,

Ken Brunt said:
Went out and took a few pix to better show you what I did. This first pic is an Aristo wide radius tirnout. It shows what I meant by the L-shaped spring between the tie and throw bar. For some reason I could never get the points on this one to close all the way, hence the spring.

This second shot shows the throw mounted on the extensions. I’m assuming they’re LGB cause it’s been so long ago that I mounted the new ground throws on them, I can’t remember if they were LGB or Aristo’s.

Your second picture has a very revealing point. Look at the upper movable point of the LGB turnout. See the small hole and the rusty screw where the rail has been moved on its connection wtih the linkage? Andy C. and I fiddled with one of these for practice tonight and found that that is key to getting this to work well. We compared it with an Aristo turnout and there is a difference in this width between the movable points. Certainly looks it can be done. Once again, thanks for the pictures.

Now that you mention it Ric, I think that’s exactly what I did. It’s been a few years since I mounted some of them. I had forgotten all about that.

It took a bit of fiddlin to find the correct adjustment.

One of the most interesting points is that for years I’ve been saving all these little screws I take out of the bottom of Aristo track, before I bend it. I found a use for them. Don’t know if I have enough for all the turnouts, but I’ve got a good start.

Ric,
Back in the start of this thread you mentioned your Timesaver. Without getting into a long discussion of why, I want to build one with code 332 LGB track and switches. Did you ever post photos of yours? Because I’m lazy, I would be happy to follow your layout if it is reasonably close to the original. Any guidance would be greatly appreciated.

Chuck Allen

Chuck, I went back through old pictures looking for a good picture of the “Timesaver”. I guess, because of time and space, to many of us this is old info. I pulled this photo, which is an end shot of the “Timesaver” setup in our basement. I’ll get you some better pictures, and a list of trackage used, if you are truly interested.

It is portable and opens to dimensions of 13 feet by 31 inches. It is made of all LGB track and turnouts. I plan to raise its height this winter to improve grade. So I’ll get you some better pictures as that project progresses.

Ric,

How does the Timesave work for you as a “yard,” where you build and breakdown trains, sort cars, and so on? Or do you just use the Timesaver as it was designed, a puzzle?

SteveF

When it stands alone, like at a train show, I use it as the puzzle that is designed to be. As part of the KVRwy, I use it as an Industrial Area, with service for my rail busses on the far end of the picture and an Industrial Warehouse on the closer end of the trackage.

When its operated as a puzzle, I do 3 cars on location being exchanged with 3 other cars just delivered. Like car for like car. You can make it a little more difficult by adding a couple of additional cars that occupy a siding and must be moved to get to the car you want. If you want to make it a lot more difficult make it 4 like cars exchanged with 4 like cars.

When operated as part of the KVRwy, “RailOps” software takes care of assigning cars. It will sometimes overload the sidings and we get the “UP Syndrome” going. Makes it real interesting. :wink:

Ric,
Thanks for the quick reply. Yes, I’d like a list of the track pieces. I built a HO one back when the game was popular and ran it for several years. Gave it to a budding HO enthusiast in the eighties and my son says he still has it. I got to run on the original when John Allen was at a NMRA Lone Star Region meet in Ft. Worth in the early 70’s. Spent several hours learning that I didn’t know what I was doing. I have had to pull up my outdoor RR due to a move and will probably be stuck in an apt. for a few months while the new house is built so thought a “timesaver” might let me still run a little. Email me if you don’t want to post the list. Thanks!

Chuck Allen

GEee Ric…how bout an ARTICLE on building the TIMESAVER???

Let me think about that. I don’t know if I even know how to write an article for this site, but I’m sure you or Bob would tell me if I ask. :wink:

Hehehe e-Editing Services avalible upon request! hehehehehe