OK, I admit it, the weather was so good I went diving rather than advancing this project. Now, I am on a backshift, so it again sits idle. Still, the last of the electronic parts are on order, which is progress of sorts!
Eric
OK, I admit it, the weather was so good I went diving rather than advancing this project. Now, I am on a backshift, so it again sits idle. Still, the last of the electronic parts are on order, which is progress of sorts!
Eric
Update:
We had a weekend of a million errands, which was perfect for incremental progress across a swath of projects. For this one, it was time to close up the gap where the old light switches used to be. The 1:24 gang (the unions decided both Triple O crew and “Digger Men” had rights to the project) set to work turning tongue depressors into planks…
…and mounting those planks over the gap using construction adhesive.
I forgot these wider craft sticks can bend in contact with some glues, so despite some clamping, there is some warp.
I’ll brace this wall on the backside, then I’ll bore a hole for the electrical “cabling.” After that, I will attach the posts for the tower platform before priming the whole thing. I found some plywood which will probably make a better roof than the spare boards previously identified, but I will have to us Sabre Saw (shudder
).
Meanwhile, the companion project, the Roman legion logistics cart to poling car transformation, lurched forward, with an attempt to punch bearing caps from styrene. First, the 1:24 gang and I learned that:
Then, we found the process failed, anyway…
…so we fell back on a template and sharp scissors.
A bit of black paint, and that’ll do! Next up will be some lettering and lots of weathering.
Updates as progress merits!
Eric
here an alternative way:

using handles from BIC razors plus plastic caps
Korm,
That’s no good, the BIC plastic plugs resemble a journal bearing. That flat car needs to ride on highs peed roller bearings as represented. Paint them caps dark blue and add 3 black dots with a sharpie in a triangular pattern and call it done. Besides if the boy is shaving already he’s gonna look like a gorilla by the time he is 20!
Update:
Slow progress. I’ll blame odd work schedules…and the call of the ocean…and the end of the summer dive season…and some rocketry…In all honesty, I had lots of packets of time, but not to do the steps that need to happen next. The exception being working with Kid-zilla and the 1:24 gang to cut the timbers for the observation tower.
I located a piece of plywood to hack into a roof.
I cannot wait to again attempt the vaunted straight line cut! The roof has to be durable enough to support the switches that will control the track power and removable to facilitate maintenance of the wiring. There is plenty of this plywood busy not being used, so I might as well see if it’ll fit my purpose!
In actual work, I did seal all gaps with various outdoor grade caulking glue. Those areas that trapped water had the worst rot. Now, those pockets are filled with outdoor grade caulking glue! This means I am set to prime the core building as well as the tower supports. As this next weekend will have larger time packets, I hope to get that done, and Kid-zilla and I hope to rig the wiring.
One other item got done. I debated replacing the oversized window frames. This was our first MIK (2018!), so I opted to preserve the frames that I could and replace the parts that were too far gone with similar goofy sizes. As with other rebuilds, I have opted to make preserving the builders’ intent as part of the desired outcome of this project.
Updates as progress merits!
Eric
Update:
I conscripted to Kid-zilla to prime the core and the main support beams over the course of the weekend. After masking the windows, he set-to with some left over oil-based primer and disposable brushes.
This proved to be an outrageous mess over two days, and he found that brush painting was neither as fun nor as “easy” as spray painting! I did step in here and there to help him, and it was sort of funny that what took me moments took him frustratingly long (to him) minutes.
The net result was a nicely primed core that will give it a bit of extra protection when it returns to Pu’uoma’o! Next, we’ll attach the platform supports using wood screws. These supports proved weak points over the years, succumbing to falling palm fronds, Acts of Dog, and rot. So, after much hemming and hawing, I decided on screws to make them easier to replace. Hopefully.
Oh, and if you might be wondering, while all this action was occurring, I was clearing the picnic table of at least a half dozen other projects. One is mine, a rocket from a friend’s surplus stock looked like an easy project between projects…in the box…
This rocket has been a real space and time eater this summer, and I admit it has impacted progress on the tower!
Updates as progress merits!
Eric
Update:
I hate using saws, so I’ve been blowing this project off. In addition, there are multiple rockets and a locomotive under construction on the lanai table, so there was no room to work. Then the 1:24 gang from the Triple O shops reminded me I could work on the floor…
I had previously marked where I’d drill tap holes for the tower supports. The 1:24 gang wisely checked my measurements.
Again, I elected to screw these in place rather than glue them for both durability and replaceability. The originals snapped multiple times over the years.
Despite my far-from-vertical tap holes (I need to get one of those Dremel stands!), the crew got the beams in place.
One did split…
…but it was nothing some TiteBond III and clamps couldn’t fix.
In short order, all four were in place.
At that point, the afternoon sun, which had driven us ever deeper into the lanai, found us, and it was time to knock off work.
Next, I will have to convert that plywood into a roof. Sabre Saw is already giving me an evil grin…
Eric
Update:
The 1:24 “digger men” and I had the lanai to ourselves. It was time to address the roof.
There were, of course, careful measurements…
…followed by a check to make sure the chosen timber was square-ish.
Afterwards, I elected to challenge Jig Saw to battle, so the 1:24 lads clamped the board to the table and prepped Jig Saw
We did position the building on the board before cutting, and, after adjusting the cut lines a bit, set to. BEHOLD! A not awful cut!
I offset this nominal success by absolutely tubing some measurement or another.
Enlarging the notches to clear the beams left some pretty big gaps.
So at that point, I cut the crew loose to have a think. First, I remembered my design elements:
A trip to the hardware store later that day may have provided a solution. I found this in the moulding section.
There is a solid plastic lip I could secure to the roof with screws. The lattice would hide the rough edges of the plywood and be sort of decorative. Some crafstick decking could at least minimize and regularize the gap near the beams, while leaving enough space to wiggle the roof off if need be.
Hmmmm…Open to suggestions, but I think this may be my way forward. It should work, and it will land this project back where it started, functional yet whimsical.
Eric
Update:
That plastic molding thing worked pretty well! It cut easily, and it hides mistakes from 7 years ago and mistakes from 7 days ago equally well.
Next up is some craft stick decking, a few more external “braces,” and the wiring! I am in my happy place again in terms of tools, materials, and techniques! Yay!
Opal, of course, was not impressed…
Updates as progress merits!
Eric
Update:
In between a myriad of other activities last weekend, the 1:24 gang and I began to turn the plywood into a roof. I am in my “happy place” of craftsticks, TiteBond III, and various cutters. The crew and I quickly measured and cut the “timber.”
Then we made it fast with TiteBond III. I have tried to eyeball this sort of thing before, only to have alternative perpendicular angles, so this time I drew a bunch of guidelines before commencing Operation CUT’N STICK.
I have what I need to plank the roof over the week when and as I get time. The goal is to stain his weekend so it can dry it while I dig out the electrical stuff that I bought. I am going more slowly than usual to make sure that I don’t do something that will preclude access to the wiring later if repairs are necessary. The plan is to fix this a Hardiebacker base to facilitate moving it on and off the railroad, so that roof doe have to slide open.
This has to be done before Thanksgiving, as there is a moratorium on projects during the Thanksgiving-Advent-Christmas seasons. Too many family dinners coupled with the Christmas tree make projects an unsafe bet! I think that I am on track to have this up and functional if not fully painted and fitted out. We’ll see…I have one last rocket to get out of spacedock and a few Kid-zilla projects to monitor, too.
Updates as Progress Merits.
Eric
Update:
The roof is planked and stained. It is enough to give it a finished look from afar, and it is enough to be consistent with the core’s chunky character. I am not spending too much time on this as its main point of the roof is to hold the switches that will send power to the tracks. The emphasis on functionality, accessibility, and portability are driving my thoughts on how to move forward.
Eric
Update:
The 1:24 lads and I had a go at this today. Frist, we mounted this doo-hicky to the underside of the roof to
accommodate the wires.
For now, I used Shoo Goo to hold in place. I found appropriate wood screws later, which will go in tomorrow.
Next, we had to figure out how to mount the power switches. You’ll note from the photo below they are just too short to allow me to bore a hole in the roof.
I thought about carving out a puka for each switch, but I am sure I could neither make them square, flat, nor of even depth.
The final solution had to be repairable yet durable, so we rejected just gluing switches to the deck. Instead, we embarked upon an effort to build “tubs” for each switch so that they could bear the forward and aft stress of use yet be easily removed for replacement.
We carefully measure the timbers…
…and used carefully executed guard to ensure even cuts…
Only to find that my natural talent for woodwork left the gang with some trim work to do!
Oh, well. I’ve learned to err on the side of “leave a little extra and sand to size.” All is well, the glue is drying, and tomorrow I should be able to set the switches with double sided tape, tap holes in the roof, and wire them to the doo-hicky. If I can get that far, I am not far from being able to wire this back to the railroad, brining the mill’s loading dock and our coaling tower back into operation. As the new version of this will be removeable, it will allow me to work on this between operating sessions (operating = trains chasing their “cabeese”).
Getting there!
Eric
I’m not throwing the switch you throw the switch. I’m not throwing the switch you throw the switch. I’m not throwing the switch you throw the switch. I’m not throwing the switch you throw the switch.
Ummm the switch isn’t even hooked up guys? It’s a trick I tell ya’ so if it’s not hooked up then you throw the switch!
I’m not throwing the switch you throw the switch. I’m not throwing the switch you throw the switch.
just for your information: it is 20 letters minimum, not 20 repetitions.
Horse puckey… it has nothing to do with 20 letters or repetitions. It is purely a discussion between the characters!
Now quit jacking up the kids thread!

Update:
This project lurched forward over the last two weeks. The events below happened simultaneously but, to make it easier to describe, are broken into two key lines of effort: 1.) wiring, and 2.) the observation deck.
Key to Line of Effort #1 this was getting the cables in and wired to the wire-connector-thingy.
There is just enough room to get in there and do the connecting, but the wires are too close to the building core to close the roof!
At Kid-zilla’s suggestion, I cut up some “lumber,…”
…glued it to the core. The roof sits “level-ish,”
but the 1:24 guys figured a bit of shimming on the bottom when we affix this to its base should do the trick.
As long as it passes the all-important can-a-PLAYMOBIL-dude-stay-standing-upright test, it’ll work. Oh, the black paint is preparatory to the upcoming “rock” foundation, the original one made from expanding foam having long rotted away
The observation deck began simply enough with some cutting, sanding, gluing, and clamping.
At some point, I remembered to get the wiring installed before preceding. I was, however, glad for this one cross-piece, as it allowed me to “prove” I could get at and fix any loose wires without deconstructing the tower. Yay!
The lads and Kid-zilla joined me in slowly building the frame.
Sunday, the lanai went quiet with all cross-pieces in place.
Two observations:
We will forge on.
Bracing, decking, paint, safety rails, canopy, and ladders to go! Should get some wires from the hardware store this weekend so that we can at least plug this in and restore some passing sidings to service as those other things go from imagination to creation.
Updates as Progress Merits,
Eric
Update:
Last week was spent trimming, gluing, and clamping the decking in place. By Saturday, I had time to mount the building to some Hardiebacker after leveling it with foam scraps while waiting for glue to dry on the deck. It came out level.
Moving on…
I though that the construction cement alone might not endure over time, so I did put some deck screws into the core through the base.
This still meets my criteria of removable, though I would have to chip through the glue. I decided that since the finished product will come inside between runs, durability might obviate the need for disassembly requiring repairs.
By the end of Sunday, it looked like this:
Tonight, I began glueing foam scraps around the base to replace the long-rotted “stone foundation.”
The plan, once the “stone” encompasses the base is to rough it up with a wire brush, then paint and drybrush as we’ve done before. Normally, we would cut fitted strips of foam and carve individual “stones” into the face, but I wanted to try and make use of all the irregular scraps we’ve collected.
I plan to get the wires laid this weekend, running them under the tracks and zip-tying them to the ties. This will, as mentioned, restore two passing sidings to service and enable us to run STAINZ and larger cars on our inner “plantation” loop. Currently, all locomotives and rolling stock must pass through the mill. The wires are also the last part of the project that needs a dedicated work session. Most of the rest I can probably do in 20-30 minute intervals as (if?) they present themselves over the course of the week.
Updates as Progress Merits!
Eric
This project is moving along nicely. The playmobile guys seem to be putting in a bit of overtime. Eric, how much time do you recon you and Kidzilla manage to spend on the railroad each week? I’m assuming the rest if the week is school, work and maybe sleep?
Update:
First, Bill ( @Hines ), thank you for your encouragement! Yes, the 1:24 crew earned their pay! Funny, I actually use them to slow me down. Posing them, in addition to helping me maintain our nominal scale, forces me to slow down and think about the project. Those little dudes have stopped me from making countless errors! Second, as far as time on projects, Kid-zilla and I probably spend six hours together puttering over the course of the week. He likes to build in parallel, but he is slowly starting to move onto the lanai on his own (if someone gives him a tablet or cell phone, I shall be most vociferously displeased…). Normally, I have to help him, but he does help me paint, glue, find tools, etc. We both help each other find dropped parts, and he has learned gravity works sideways in the modeling world! I do our blogging, almost exclusively here, to get help, show off, have fun, build community, remember how to do stuff, etc. Trains run most weekends, usually late afternoon through sundown, and we use setup time to address MOW and electrical issues. We both take great pleasure in flawless operations during dinner or during a garden party! As for inconveniences, yes, he has school, and I have a job. Bummer…We also have other hobbies, as diverse interests, in my opinion, keeps any one from becoming boring or stale. If Kid-zilla has an advantage over me, he has neither wife nor children of his own. These other folks in my life also demand and DESERVE my attention, and my puttering with Kid-zilla at the exclusion of others has gotten a few stern “Ha-RUMPH-s!” from CINCHOUSE!
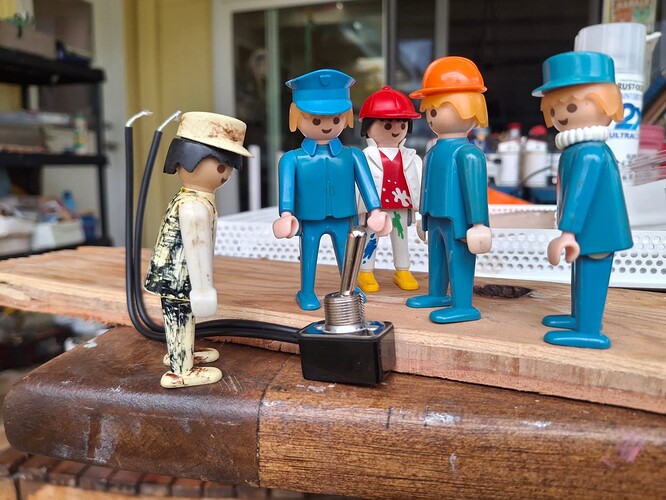
This project has lumbered forward, all the same, with the Thanksgiving weekend offering a chance to work in fits and starts. One spasm of activity resulted in a pair of ladders. The 1:24 crew and a PLAYMOBIL ladder helped with the spacing:
The material is a kebab skewer, glued in place with TiteBond III, then lashed with a bit of twine. I lathered the lashing in more TiteBond III to reinforce the lot. The picture below shows the lashings without the glue.
The goal is to maintain some of the original structure’s “jungle theme” while avoiding poor choices of material. The next picture is the original roof lattice, built in the same manner, that survived 7 years outside and at least one falling coconut frond:
The other big effort was to finish the “stone” work. I ripped, jammed, and glued irregular bits of foam from our scrap bag around the base. Kid-zilla and I tried to texture it using flat matte, but found it harder to control, no quicker, and less visually appealing. The first picture shows the flat matte spray, and the second shows the same wall undergoing our traditional wire brush shaping.
![2
That behind us, we gave the base a heavy wash with black acrylics. We have found the easiest way to make this “stone” is to texture it, paint it a dark base color, then highlight it via drybrushing. This will need one more basecoat as some pink foam remains visible, but it is almost there. Here are a couple shots:
Oh, and, yes, it still fits in the Pu’uom’a’o yards!’
Various touch up, painting, wiring and some sort of roof - probably “canvas” - over the observation deck are still left! Getting there!
Eric