Large Scale Central

Triple Dome Narrow Gauge Framed Tank Car

One of my favorite types of rolling stock is the multi-dome tank cars that were commonly used from the 1920s until post WWII when truck traffic knocked the less than car load business off the railroads tally sheet.

Some pictures for inspiration and reference.


triple 1

Rivet detail.


Vents

My main take a ways are the double rivet lines separating the internal tanks, the full length walkway and the handrail on the Texaco car.

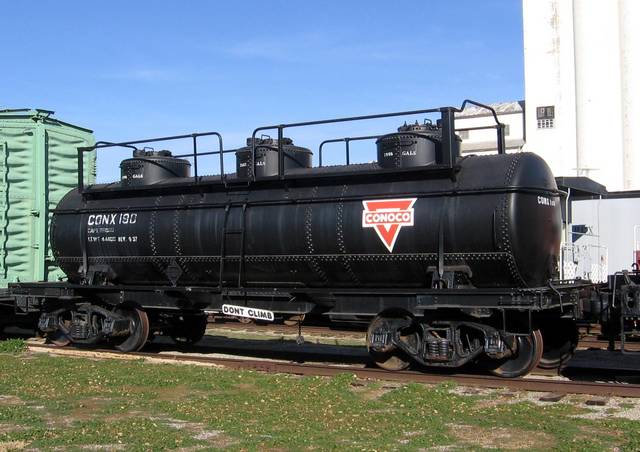
Prototype in narrow gauge for multi-domes are rare. I have been told by a White Pass modeler that two triple domes were owned by that line and used for MOW service. I have not been able to verify this with either records or photos. An example for which there is evidence is this two dome owned and operated by the D&RGW.

Tank cars date back to the earliest days of railroading. They were originally open top vertical tanks made of wood and were used to haul crude oil. These washtubs on wheels shared the rail with barrel carriers until the advent of the horizontal riveted tank car in 1869. This is the car most commonly modeled on pre-WWII layouts. The tank mounted flat car could be found on railroads well into the 1940s but its progeny was introduced in 1901 as John Van Dyke’s riveted frameless tank car. Using a V shaped saddle at each end of a riveted steel tank the new cars eliminated the wooden flatcar and let the tank itself supply structural stability. They were not well received by the railroads and less than 100 of the new-fangled things were built.

Van Dyke followed up his V car design with a throwback framed version called the X frame. It differed from the V cars in that it had a center sill steel frame running the length of the car under the tank. In 1924 the D&RGW converted 30 of the standard gauge cars for narrow gauge use. Some used the Van Dyke saddle design and became narrow gauge frameless cars while others had the frame split to allow the tank to sit lower giving the car better stability. The latter group became known as framed tank cars. Both types remained in use until the demise of the D&RGW narrow gauge lines. Bachmann has made excellent models of both of these cars as part of their 1/20.3 Spectrum line.

I run a great number of tank cars as part of my interchange traffic with the D&RGW as well as the RGS. The triple dome represents a private car owned by the Oso Grande Oil Company (my made-up regional oil producer) used to supply petroleum products to its gas stations and various bulk customers across Northern New Mexico. The three compartments will be Ethyl, Regular and Diesel.

For this build I will be starting with a Bachmann Spectrum framed tank car in oxide red. Not that it matters as it will need a full repaint at the end.

triple-3

I began by removing the dome and vent and making a mold for both out of RTV. Not very economical of me but I was not going to scratch build three domes. I then cast three new domes and vents. I thought of using the original but I already had it set up as a master for molding and decided to leave it in the archives for future use. Here is what the car looks like before the real work began.

The car is now disassembled and ready for conversion. Let me point out now that these cars are much sturdier in design and material thickness than the Big Hauler line. It made what came next much more difficult than I was expecting.

I measured and marked where the additional domes would sit. There is a lip on the bottom of the domes so the hole had to be slightly smaller than the main body. This lets them all rest at the same height supported from the base.

To make the holes I first drilled a 1/8″ pilot hole to keep the next bit from walking down the curved side of the tank. The enlargement was done with a 1/2″ bit. This allowed me to cut the lines with a piece of hacksaw blade out to the full diameter. I made sideways cuts to help break out the sections of plastic and then sanded it into the final shape.

To make the reinforcing ring at the base of the domes I drew a pattern on 1/6″ polystyrene and cut them out with scissors. These were glued on with acetone. I counted the rivets on the center dome and then made index marks on the new rings. This helped with spacing and placement of the holes for the rivets. I drilled each hole with a 1/64th bit in a pin vise and then enlarged each hole with a cut off track nail. The holes were now large enough to allow the rivets to slide in with a snug fit without splitting the plastic.

Using the pin vise was tedious and took me several sessions to drill all of the holes. I considered using the drill press but was afraid it would break the bits.

For rivets I am using Atlas HO round head track spikes. They are almost identical in size and shape to the molded on rivet heads. The project requires almost 650 of them.

In addition to the dome rings I added a row of rivets all the way around the tank in four places. This made every row double to represent the practice of the 1920s. Once finished I glued the rivets in place by running a line of super glue on the inside.

With the rivets done I was ready to glue the domes in place. Starting to look pretty good.

I started this car many years ago. Seemed simple at the time. Add two domes to an RTR model and BIF, BANG, POW; I would have a cool kit-bash. It has not gone that way. The domes did not mold all the detail well so they will need rework. The walkway is proving to be a bear since they attach only on the thin metal supports and the connections under the car are interfering with the trucks. Painting is also a serious effort. Because of the handrails, ladders, and open frame I will have to paint the entire car in pieces and then reassemble it before doing any weathering. No wonder this has become a shelf sitting dread knot monster.

Here it is spread out on the paint table daring me to work on it.

The walk way supports are attached with track nails and glued from the back.

The closure bolts seem to basic. I may redo them as locking dogs with handles.

The domes only have one line of rivets on the side. Since the last dome faces the other way to keep the vent from sticking out I feel like I should add a second line of rivets for aesthetics.

Okay I have done the easy part, I’ve spread it across the bench, griped about it and posted it on line. I guess tomorrow I will start working on it. :angry:

3 Likes

Boomer,
If you didn’t want to do all that work, Aristocraft did it for you. :grinning: :stuck_out_tongue:

Excallent craftsmanship Boomer, and I love the rivet work.

Didn’t know “track nails” existed without the off-center spike head, great tip.

Only a couple of new curse words added for today.

All of the domes got the second rivet line added. Looks more better in my opinion. Also got the vents on.

Next was the grab irons. The originals really hug the tank dome close so I decided to replace them all with more standoff. I am using floral wire as it is cheaper and stiffer than brass. After drilling the holes I stuck one end in the dome and bent it over using the dome to set the curvature. A piece of bass wood was inserted to make sure the standoff was uniform. A little dot of superglue on the inside finished it.

Looks good.

Next is the locking bolts. Above is how they should look. Since I don’t have a vacuum / pressure pot here is how most of them came out.

I can’t just fix the missing ones so I will have to replace them all. I cut off the existing posts and sanded the area smooth. I will use these watch repair screws with nuts, inverted as the replacements.

Once they are screwed together a recess was drilled and the head was glued in leaving the threaded end sticking up. Not to bad.

If I ever do anything like this again I will take the time to make sure the mold is properly filled.
Next job on this project is the walkways.

1 Like

A one of a kind!
Looks great!

Walkways! :dizzy_face:

The originals which were plastic and very short were mounted on brass risers with little plastic nubs and the ladder holding them in place. The new ones are bass wood and run the length of the car.
I made additional risers to support the ends.

In this first version they were superglued in place using HO spikes. Same thing for the walkway. Not a great plan as there is insufficient surface area for a good bond plus the risers are metal. Any bump or rough handling knocks them loose.

I have tried bending the HO spikes over from underneath but they are to hard and won’t bend sharp enough to pull tight.

My other ideas for attaching the risers are;

  1. Replace the spikes with some kind of screw. I found brass .30 wood screws but they are all flush mount which I cannot use on the thin brass riser. Also found pan heads but they look like Frankenstein neck bolts.

  2. Use the watch repair screws run through from underneath with the nut on top. Also pretty clunky.

  3. Use RC chassis bolts which I can get in small size but are all interior hex drive. Not even close to anything prototypical.

I have no idea on the walkways themselves. Eyeglass bolts will be huge and look ridiculous. They are also flush mounts.

Oh and to keep it fun, I need to paint the walkways before I attach them.

:confounded:

Rivet 376 was not in line with 375 and 377!:joy: awesome work and always can learn some new places to get supplies. Thanks for the ideas!, and the good work!

Perhaps it’s just the adhesive.

Loctite HY 4070 is a hybrid structural repair adhesive that bonds nearly anything. It works extremely well on metal to metal, or metal to other substrates (rough up metal surfaces for a good bite).

The drawbacks are price ($25+ for an 11g tube), working time (fast set), shelf life (stated 1 year but I just used some 2 year old stuff and it worked) and appearance. They say it is clear, and it goes on that way, but will have white crazing when cured.

It uses a mixing tube. 4 come in the package, but buy extras because small jobs will burn through them quick!

I used it extensively when I was building signs and for many railroad projects. It has rarely failed me :slight_smile:

Tip: Waste 2-3" when first attaching a tube to get a proper mix.

Jon that is a good idea. I have used two part epoxy glues before but had not thought of it for this project.
Thanks for the idea. It reminds me of another glue I had also not thought of. Zap a Gap the gap filling superglue.I got a plan now.

I have removed the risers and cleaned the dry glue and loose bits off of them. I also found these #2 x 0.32 screws. They are not as coarse of a thread as I would like but they they tighten pretty good into the bass wood. I am putting them in from the bottom along with one glued in track spike. From the top they look like counter sunk carriage bolts.

The ladders are attached with two of these screws as well. Everything gets a drop of superglue to hold it in place with the gap filling glue on the spikes. Tightened the assembly up nicely.

Next I need to finish the bottom of the tank and then I can prep for paint. Unless I decide to do those really nifty handrails.

Your walks & brackets are looking great, Boomer.

I’ll weigh in with Jon, about cements, in that there are industrial sorts which can achieve superior results. My go-to is methacrylate, which a number of manufacturers (including Loctite / Hysol) offer. The down-side (other than cost) is that a lot of material is lost in the mixing tube; and it sets very quickly. So for tiny work involving very small amounts of cement, I’d go with a more industrial cyanoacrylate (as Jon suggested).

For screws, Microfasteners.com used to have hex head brass lag screws, #0 size to #2 IIRC. I was about to post a link, and now see that they’re under new management, and no longer list these. Which is a real concern for me, because I’ve relied on them a lot!

Hmm, I guess I’m not helping you at all, so carry on…

Thanks for the info Cliff. I marked that site for future resources.

Having settled on a plan for the walkways I now need to decide on the handrail.

I like these examples and could easily make them from brass rod. With the supports and multiple attachment points they would plenty strong. The big boxy mess in the last pic is my first pick.

example 14


600x346_tcx1728
triple 1

I am also looking at the rivet pattern. A lot of the cars have double rivet lines separating the tanks.Lots of examples both with and without. It would mean a lot more drilling.


GRRRR! Will work on the bottom of the tank while I debate these options.

1 Like

Just a few details to add. This part should be painless.

Cleaned up the flash and attached with super glue.

Fits nicely with all the running gear and trucks.

As much as I hate the idea of drilling more holes I am going to add the rivets.

Inside look at all the rivets. About 800 of them in this project.

If you hadn’t pointed it out, not many would have caught the double rivet line in the prototype. If your OCD will allow it, you can get away with not doing it.

Sure, but now that he’s pointed it out…

Jon you have hit the track spike on the head. I am not completely obsessive but I find it hard to ignore some design details. Since the double rows are core to the era of the model they will have to be done.

Here is the lower tank section done. At 112 rivets it is about 1/5 of the rivets needed. Got a couple of alibis to fix and it will be ready for paint.

I will be drilling the holes on the upper section for several days. :slightly_frowning_face:

As for the handrail, as much as I want that big box railing I have come to the conclusion that I would have to remove the grab irons which I have already installed and then fill the holes, which makes it impracticable. Not wiling to go backwards on this project. I know I will incur Hollywood’s disapproval. He would scrap the entire thing and start over if just one rivet was out of place. But then he is far more disciplined than I am. He trims the edges off of his bologna sandwiches so they are perfectly round. :grinning_face_with_smiling_eyes:

Not true!

He didn’t like bologna.

I don’t know anyone who does Rooster, but peanut butter isn’t round. I did get him to eat Soul Food style BBQ in Georgia without complaint.

Here is an example of Hollywood’s rivets on BL-2. Perfect as previously discussed.

Me touching BL-2 seconds after Hollywood told me not to. “Don’t touch it you’ll break it”.

From the Atlanta NGRC. Hollywood, me and BobCo. All looking like we were fixing to be forced to eat bologna.

Hollywood’s secret for perfect rivets? He melted them into light styrene from behind with a soldering iron. Pretty smart fella. I sure miss him.

2 Likes

I have no idea why, but the caption “Fourth of July office party at the BATF” comes to mind.

image

Maybe because of some altercation in a past life, dunno… :thinking:

Thanks for those photos and memories, Boomer.