Large Scale Central

The Shed

We took a ride to Altoona today. I want to get started installing the furnace and the Depot was waiting on several other items before delivering it. I’ll still let them deliver the door and window.

Tomorrow I’ll start the install by drilling for the vent. I have all kinds of hole saws in stock. The spec is 3.125" and I have 3.5" which would interfere with screw holes :frowning: So, the local hardware store will get some business in the morning.

I’m debating on cutting a square hole in the metal siding and mounting a wood block that is then drilled for the vent. If I don’t do that I’ll need to be accurate on where the hole goes to not hit on a rib.

The template on the wall is roughly in position…

1 Like

Suggestion when you are ready to paint the interior, use a base coat of Kilz Mold and Mildew primer as a precaution.

1 Like

Good suggestion. The interior walls that show signs of mold on both sides is coming down and being replaced with new 3/8 sheathing. I may retain it for bench work, but it will be treated before re-use.

1 Like

I got the hard part of the furnace install done today. It took longer to calculate where it should go to avoid wall studs and ribs on the metal siding than to do the job!

Hole cut…

Flue/Vent installed…

I’m having the gas line installed Friday, then I can call for Propane.

1 Like

Dumb question for the amateur electricians in the group.

My preliminary electrical plan is to wire around the perimeter for several 15A convenience outlets. For lighting I’ll use low voltage LED cieling lamps powered by a 24V supply and two standard bulb sockets in the “attic” area. The normal current draws will be a stereo system, a desktop PC and monitor and perhaps a few battery chargers. My saws will be the biggest draw, but they are used only occasionally. So far, running on extension cords, my saws have not tripped the 20A house breaker.

I will be running a single 20A direct bury cable to the garage from the existing GFCI box I mounted on the house this summer.

Where this cable terminates inside the garage would you install a breaker box or just a large box for wire junctions?

I think that a breaker box would be misleading, and perhaps a code violation, as it will be fed by 12-2 and probably have two or three 15A breakers. Running properly sized cable from my main panel to legally support a sub panel is not in the budget.

I do like the idea of being able to isolate sections of the wiring with breakers. Perhaps just switches or master GFCI outlets feeding the circuits

BTW, There are no permits or inspections required here in the sticks. That’s not a license to violate the national electrical code, but it’s not enforced. My crawlspace is a perfect example with unsecured wire running all over the place and a few junction boxes without covers. I will be addressing all of that in the future.

then you do not want to look at my shop, i just added another 8’ extension multi plug extension to my system, which is already two extensions long. i figure if only running one item at a time i am safe.

Al P.

1 Like

Right now I’m running off a 50Ft 12-3 extension that has a multi-tap and an extension plugged into it. I’m having no issues, but I want to make things a bit more permanent.

Jon, I’m no electrician, but have a couple questions. Is your house breaker dedicated to this new line to the shop, with no risk of other house loads on it?

I’d at least put a small single-breaker box in, same rating as the house breaker, or less. That way if you trip something, since the fault is gauranteed to be from a shop receptacle (right?), you have easy access, and don’t need to track mud into the house to flip the breaker there. :grinning_face_with_smiling_eyes:

What kind of cable? Some 12awg types handle 25A or 30A.

AI Overview

Yes, you can run a 12-2 underground cable from a 20-amp breaker to a subpanel in your garage

, but there are several important considerations for safety and code compliance. Ensure you use the correct underground feeder (UF) cable or run standard NM cable inside a suitable conduit, and always install GFCI protection for exterior outlets.

1 Like

Been doing the same for over 15ys with 75’ commercial outdoor 12-3 cord plugged into a 20amp GFI outside the house. Now that GFI resides on a very light draw (minimal) circuit inside the house. The final 25’ to my “shed” is another commercial grade cord that enters into my shop with a 1/2" hole and goes to a junction box and split from there.

This way if I get pissed off I can just unplug my shed and leave.

Yes. It is the only load on a 20A breaker. At one time it did run to the garage and/or the tool shed, but the seller cut it and left it coiled up live under a pile of wet leaves with only the black capped!

From the house breaker box to my exterior GFCI box is standard yellow 12-2 w/ground romex. I will run underground rated (UF) 12-2 w/ground cable from the GFCI box to the shed on the load side of a 20A GFCI.

I have plenty of 12-3 Neoprene jacketed commercial cable. I really don’t need it to be buried, especially before winter. I kind of like the idea of being able to unplug the shop. Might come in handy if I ever need to get get a real insurance inspection. The inspection my homeowner’s company did was a very cursory exterior look see.

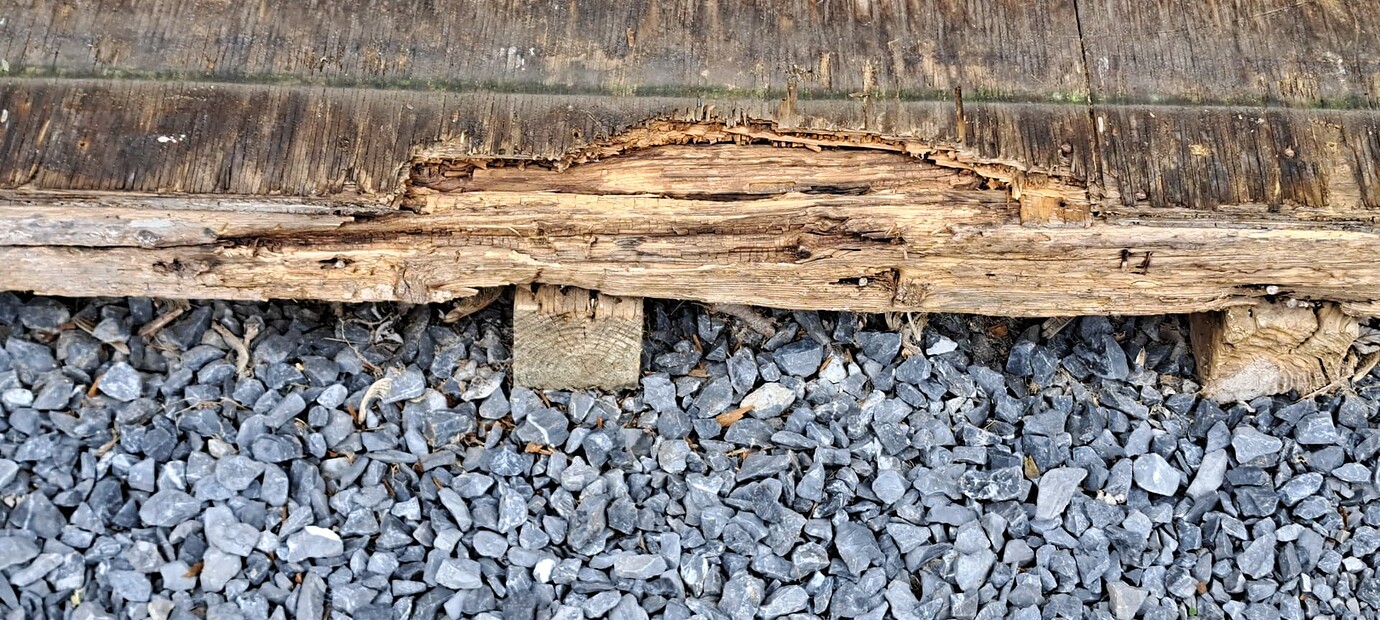
Today I addressed the rot on the front edge. I need this spot to not be spongy as it is close to the new door location.

How it started…

How it’s going…

I started yesterday by cutting away all the rotten plywood. I then soaked all the remaining wood with Wood Hardener. Today I added wood, cut to fit, behind the existing sill resting on another frame member below at the rear of the opening…

Then, using my osculating saw, I cut away enough of the rotten member to insert a leftover fence baluster…

Once all the framing was in and secure, some crazy 10 ply 3/4" from the trash at FEBT was cut to fit. I need a small patch because my piece wasn’t quite long enough…

I also fished some cable and installed an outlet for the furnace in the paneling.

since our last (small) housefire i got caucious.

from the meter at the street, i separated the cables to the house and to my mancave.
both with what they here call “industrial” cable. (5 cables together in a thick mantle) the house and the cave each have a mainpanel, both with all the security brakers (live savers, lightening), one 380V outlet and individual breakers for the 230V lines.
so short after the fire, still cleaning and restoring everything, the nose-bleed price was easy to accept.
in my cave (computers, security cams, workshop, trainroom) of about 20 by 5 yards i got daisy chains of multi plugs, each with a on/off switch. all on, not in the wall (using these rectangular conduits) even the cables of the ceiling lamps are now below, not upon the ceiling.
i hate the idea, to wait, till the fire burnt a hole in the ceiling, before being able to do something with extinguishers, as last time.
and every cable is one number thicker, than the electrician wanted to use.

in the house we started, to replace everything, that has to be done, as well on the walls and over dimensioned.

i know, that sounds phobic - but counting the costs from even a small fire (let alone a real one!) compared, to what the insurance would pay - i feel very clever.

1 Like

There are things about this place that defy logic. There are two holes cut into in the floor. For what reason I can only guess. In any case, they need repair, so that was this mornings task.

I began by cutting the openings as close to square as possible using my 5" circular saw and finishing up with the oscillating tool…

Framing members were added to support the patches…

3/4" 14 Ply was cut to fit and screwed in…

My plumber was here this morning. He did a survey and decided how he wants to do the job. He says he will be back tomorrow with materials to install the line. Propane arrives on Tuesday. I really could have used heat this morning. BRRR!!!

The Depot called this morning too. The door and window should be here tomorrow :slight_smile: The roll-up door comes apart tomorrow with the balance of demo on Sunday.

Expect big progress on Monday and a surprise guest appearance!

Nice work Jon. So many little wonderful “pita’s” but you’re steadily dealing with them.

A bit of holiday cheer for you (and yes, this is Bill’s fault, and Gemini can NOT spell worth a dang):

Good progress again today. The day started out very chilly while I disassembled the roll-up door. The metal panels went to the scrapper next door, but I kept the rollers and the rails for some future idea that I haven’t thought of yet. By late morning it was completely gone. For overnight security I screwed a tarp over the opening… .

Interesting that the only thing attaching that framing to the roof is the siding!

My plumber showed up late morning and got the gas line run by mid afternoon…

I did the final air intake and flue connections then installed the trim that hides all that from above and the sides. This completes the furnace install. Ready for gas on Tuesday!

Tomorrow morning I’ll start the major demo work. The old siding comes off and all of the front wall framing comes down. I found another rot place that I hope I can patch.

I learned today that this used to be my neighbor’s garage. They moved it over here when they purchased this house.

1 Like

More significant progress today. The entire front wall was torn down and all the studs reconditioned (cleaned of nails) for re-use. Several more bad spots were found in the floor, one of which was definitely termite damage. They were patched like the others.

The day ended early for a train ride. I’ll post a pic or two from that in the EBT thread tomorrow. Before quitting, both end studs, nailers for the east and wast wall corners and the top plate were in. Now it takes two tarps leaving a big hole above the top plate!

Huge progress today. Before lunch a ll of the framing was completed…

After lunch the lower 8 feet of siding was installed including cutting in the door and window openings…

Tomorrow the door and window will get hung. The upper siding sections may need to wait as I forgot to order “Z Trim” - the drip edge for horizontal siding seams and no one local has it. I should at least be able to get them cut.

2 Likes

Just like the rendering! You’re really moving on this quickly, great!

And maybe it’s just me but I’m glad to see those two upper wall corners tied back together so soon. :grinning_face_with_smiling_eyes:

With the garage door gone, it’s nice that you’ll get almost half an end wall for shelves & etc.