Large Scale Central

SHASTA PACIFIC 3.0

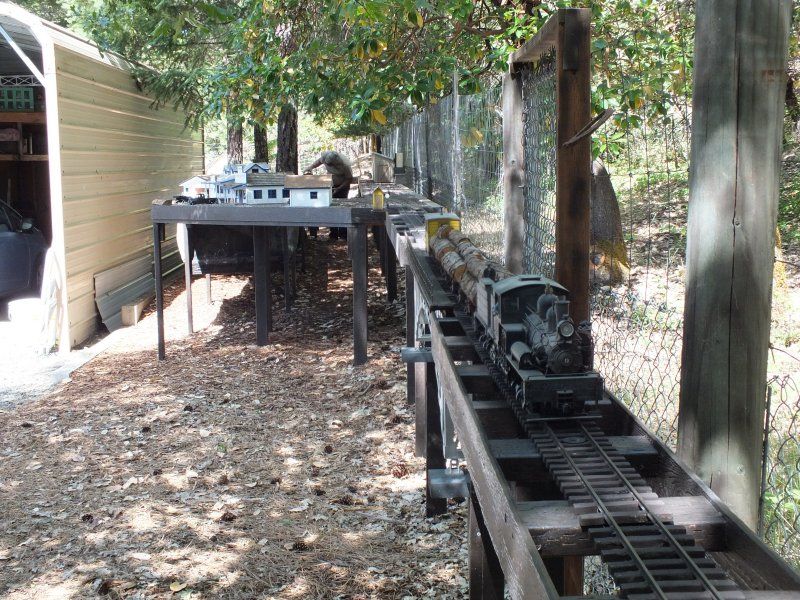
Very nice!! When you are out shooting pictures of trains, from this angle

Just shift right a few inches to loose the fence post behind the tall building and zoom in or crop and the fence wire will disappear into the background unless studied. I need to finish my flats for the indoor. Too many projects, not enough mojo.

Looks fantastic Rick.

I’m trying to get a handle on where these are located. Are these buildings located along that long siding that leads to that shed that’s behind you in that picture?

Are any of those going to become industries along that siding? And are you going to extend that row of buildings further down? Just curious.

BTW, how are the fires out there? Haven’t heard of any more bad news concerning them.

Hi Ken,

Yes that is the location. Non of these will be rail served industries but just support buildings so to speak. Just past the white building will be the Hyampom Depot past that will be either a stock yard or fuel depot, All of these would be rail served of course.

The main two fires are now one and cover about 150K acres and still going, still moving away from us, thankfully, and the smoke drift has been to the West the last few days so the air has been pretty good for us on the East side. So far still no structure loss from this one. Ironically a brush fire broke out Sunday night 3 miles north of us at the Interstate, burned 200 acres destroyed 11 structures including 2 homes and a bunch of cars and RV’s. Thankfully this one is under control and nearly out.

Later

Rick

Nice set of buildings, and the layout… (http://www.largescalecentral.com/externals/tinymce/plugins/emoticons/img/smiley-cool.gif)

Dup post

Andy Clarke said:

Nice set of buildings, and the layout… (http://www.largescalecentral.com/externals/tinymce/plugins/emoticons/img/smiley-cool.gif)

Suck up

Locomotive #20 went into service today. A Bachmann C-19 using Revolution RC , well pleased with both.

See this thread for pictures. https://www.largescalecentral.com/forums/topic/28702/-/view/post_id/372036

Finished the Hyampom Depot today, just in time to put it in the barn for winter(https://www.largescalecentral.com/externals/tinymce/plugins/emoticons/img/smiley-foot-in-mouth.gif). The building is another 3-D flat, approx. 8 inches front to back, that goes along the back edge of the tables against the fence.

The platform is a solid 1 X 10 pine plank, 1/4 inch plywood was used for the box with Redwood siding and trim laminated on.

This is not it’s final resting place, just an easy spot to take a picture. The barrel and box, thanks Boomer, are located to cover the screw heads

that will anchor the depot to the bench work

Update.

Things move along, slowly sometimes, but still move.

After a couple of small operating sessions and the open house it became painfully obvious that something more was needed at the Hyampom yards.

I widened the table toward the fence and added a passing/run-a-round siding to help the flow of operations. Also went ahead and extended the main line about 8 feet,

in the lower foreground, to use as a tail track. The photo makes it look short but the length between the curves is about 7-8 feet.

Had some time so I added the abutments at the ends of the arch bridge. These are made of extruded foam and just sit in/on the framing.

No way these will help the bridge blend into the topography but I think they give it a more finished look. The Oak leaves are about a foot deep,

have to get back to work.

Just a close up of the East abutment.

All for now, more coming soon.

Rick

Rick Marty said:

Update.

Things move along, slowly sometimes, but still move.

After a couple of small operating sessions and the open house it became painfully obvious that something more was needed at the Hyampom yards.

I widened the table toward the fence and added a passing/run-a-round siding to help the flow of operations. Also went ahead and extended the main line about 8 feet,

in the lower foreground, to use as a tail track. The photo makes it look short but the length between the curves is about 7-8 feet.

Had some time so I added the abutments at the ends of the arch bridge. These are made of extruded foam and just sit in/on the framing.

No way these will help the bridge blend into the topography but I think they give it a more finished look. The Oak leaves are about a foot deep,

have to get back to work.

Just a close up of the East abutment.

All for now, more coming soon.

Rick

Rick,

Good to see the Scott Lindsay bridge up again. :slight_smile:

Hyampom Update.

I needed some service facilities to go along with the new Hyampom depot so built a couple of tanks to start with. Water and fuel tanks were a bit of a challenge

as there is only 13 inches from track center line to the fence so they had to be some more of the 3D Flats.

The water tank is made from two coffee cans wrapped with Redwood and fence wire. 6 1/2 inches in dia. it is taller than big around, not really normal for water tanks but this fits the space.

The whole tank diorama is about 9 inches deep.

The fuel tank for the Bunker “C” is made from 2, four inch PVC pipe couplers making it only 8 inches long, but again it fits the space.

The small dioramas are mounted on plywood painted to look like concrete slabs and seem to blend into the scene pretty well.

That’s all for now but a big new addition is in the works.

Rick

That’s all for now but a big new addition is in the works.

Rick

Can’t wait. I’ve been stymied by the weather.

Rick Marty said:

extremely well do layout thanks for the share, Bill

Hyampom Update.

I needed some service facilities to go along with the new Hyampom depot so built a couple of tanks to start with. Water and fuel tanks were a bit of a challenge

as there is only 13 inches from track center line to the fence so they had to be some more of the 3D Flats.

The water tank is made from two coffee cans wrapped with Redwood and fence wire. 6 1/2 inches in dia. it is taller than big around, not really normal for water tanks but this fits the space.

The whole tank diorama is about 9 inches deep.

The fuel tank for the Bunker “C” is made from 2, four inch PVC pipe couplers making it only 8 inches long, but again it fits the space.

The small dioramas are mounted on plywood painted to look like concrete slabs and seem to blend into the scene pretty well.

That’s all for now but a big new addition is in the works.

Rick

1 Like

Time to post some on the new addition.

This is the area between the shop and the property line fence, where I built the line along the fence last year. In the background you can see the wye and the steel bridge where the track comes out of the train shop.

I made the decision to put a patio roof over this section because; the Summer sun beats right into this area from Sun up till mid day, Some of the buildings from the old RR will go in this area and they are not “all season”, and finally this is Oregon and it can get damn wet. If I had planned far enough ahead, not my long suit, I would have put the posts in when I built the tables along the fence, as it is I scabbed them into the existing table system and they turned out pretty well.

The structure on the left is 3 and 1/2 feet wide and 27 feet long and will hold the Redding Yards. The only way to reach this area with track is to use a switch back, actually a double switch back from the stub out you see on the right. This track will drop to the new tables on a 1% grade across a lift bridge, probably a Bascule type lift. This new area, because it is covered from the rain will be on solid OSB table top rather than the usual hardware cloth and weed fabric. For the same reasons I am using regular Doug Fir for framing, except the legs which are pressure treated.

A closer look at the departure from the fence line to the bridge approach, this is just stubbed out and anchored temporarily with blocking so I don’t crash into it and mess it up.

Will post more pictures as I get it done.

Thanks for taking a look

Rick

1 Like

I hope you have slopped the table top so water can run off if needed.

Looks great !

1 Like

I meant to ask you, Rick, when I was out there if you used a railbender when you do your curves? (Or maybe I did ask and just forgot). I know you use aluminum rail, the same as I do, I was just wondering if a railbender helps.

I build the curve with the ladder roadbed and then just tack the rail down to that.

1 Like

Ken Brunt said:

I meant to ask you, Rick, when I was out there if you used a railbender when you do your curves? (Or maybe I did ask and just forgot). I know you use aluminum rail, the same as I do, I was just wondering if a railbender helps.

I build the curve with the ladder roadbed and then just tack the rail down to that.

What. you expect me to remember if you asked me?(https://www.largescalecentral.com/externals/tinymce/plugins/emoticons/img/smiley-foot-in-mouth.gif)(https://www.largescalecentral.com/externals/tinymce/plugins/emoticons/img/smiley-laughing.gif)

I don’t use one for the aluminum rail/track never found the need. I also lay the AMS .250 brass without a rail bender. It is a little springier, but the radius is usually 8 foot or better.

I do the same build the ladder then lay the track to fit. However on this new table there will be no ladder just a layer of 1/2 inch OSB as a raised roadbed.

Later

Rick

1 Like

How does that OSB hold up out in the weather?

Ken, I guess we are going to find out.

I started the OSB decking and the half turntable pit on this end.

The OSB was painted with two coats of oil base stain on both sides and all edges. since it will receive no direct rainfall the only water it will have to deal with is moisture in the air and the oil should prevent that issue. Should work but who knows for sure? OSB is used for roof sheeting all the time and the overhangs are exposed to the air moisture with just a coat of paint for protection.

The Turntable bridge and safety ring are being re-used from the old railroad, it is a half pit design that takes up less table space.

Here is a picture of the pit and table on the old RR before the safety ring was installed.

Here the safety ring is in place, the bridge removed for clarity.

More later.

Rick

1 Like