Large Scale Central

SD60f Build

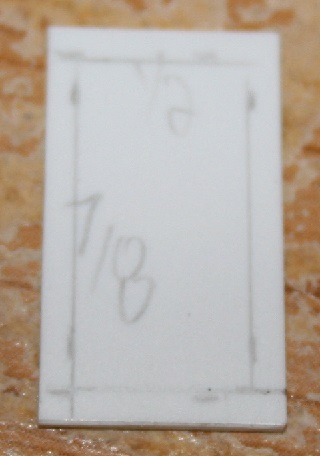
The side nose grab irons sit 1/8" from the sides and rear. The front is 1/4" back from the line you drew for the sand hatch. Drill 3/64" holes within these lines. You should have 1" between the holes.

Add your grab anchors towards the center of the nose.

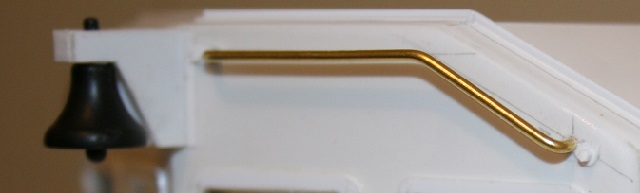
I made a little jig as shown below to help get the shape I was after, and to keep the shape consistent. I started at the left, bending the rod into place, and then cutting off the excess at the right.

Now bend both sides around the outside guides.

This should allow you to get a consistent look.

Mount these with about 1/16" of space between the nose and the center part of the grab iron.

x

Now for the grab irons above the windows. Draw lines 1/8" below the roof lines as shown. On the outside edges, draw a line that lines up with the inside edge of the window frame as shown. The inside holes will be 3/16" from the bell.

Drill your 3/64" holes, and add anchor detail to the outside edges of the holes.

Using 3/64" brass rod, shape your grab irons to match the 1/8" lines you drew.

Now on your roof, draw a center line front to rear. You’re going to mount an antenna 1" from the rear.

I used an antenna from Miniatures by Eric.

Now we’re going to build the side window frames. Start with two pieces of .02" styrene cut 1 x 1 15/16". Mark them up as shown below. The frames are 1/8" except for the one between the front and center windows which is 3/16".

Front Windows - 3/8 x 3/4" / Center Windows - 13/16 x 3/4" / Rear Windows - 3/16 x 3/4"

Cut out the window holes.

Now take two pieces of .02" styrene cut 1/2 x 7/8" and mark a 1/16" frame around the edge.

Take two more pieces of .02" styrene cut 5/16 x 7/8" and mark a 1/16" frame around the edge.

Cut out the centers. These will be the lower part of the front and rear window frames.

Mount theses around the front and rear window holes.

Now take some .04 x .04" styrene and run this around the front and rear holes to build the upper frames.

Now on both sides of your cab, draw lines 1/16" above, below, and in front of the window holes.

Mount your frames in place with the large window towards the front.

(http://www.canadianrailroads.ca/rail/gscale/sd60f/660.jpg)

Now for the rear step detail, start with two pieces of .01" styrene cut 1 1/16 x 1". Mark up as shown below. The blue areas will be cut out.

Cut out the blue areas.

Now we need some venting on the conductor’s side. Cut four pieces of .04" quarter round 5/8" long.

Now on the conductor’s piece (front to the left) divide up between the step holes 1/32-1/16/1/16-1/16-1/16-1/32" as shown.

Mount the quarter round pieces centered to the holes. Flush the tops with the 1/16" lines. Once dry, round the outer corners.

Now mount these on each side of the cab around the step holes. The rear and bottom will sit about 1/16" from the edges. The front will sit against the notch in the side of the cab.

Really great to watch how this came together.

Image result for Emoji Wiping Browwhooo this is hard work just reading this …

Great work Shane …

Oops, I didn’t realise it’s been four months since I’ve updated. I’ve been suffering from a bit of internet burn out.

I finally got all the electrical components I needed for lighting this thing up. I also picked up some brass for the side ladders. Hopefully I can design something that looks okay.

I have LED front and rear headlights installed. I still need to design ditch lights. Ground lights, step lights, and number boards are also complete. I stole an idea from …Mike Dorsch??..( I think it was Mike that used a seperate 9 volt light system. ) The ground lights, step lights and number boards run off a seperate 9 volt system. The number lights can be switched off for use as a trailing unit. The nice thing about this is I can leave these lights on when the locomotive is sitting on a shelf.

Here’s a couple of photos. I tried hard to get some good photos, but they just don’t do it justice.

She’s looking downright professional.

I really Hate this guy…(https://www.largescalecentral.com/externals/tinymce/plugins/emoticons/img/smiley-wink.gif)

Shane, though I have no plans to build an SD60, the skills and techniques I’ve learned following your build will be invaluable in my future modeling projects. Thanks.

John

Paul Norton said:

Here is a video of some HO models.

A pair of full cowl, HO Scale Canadian National GMD SD60F’s. The shells are made by Kaslo Resin shops. Both locomotives are equipped with Soundtraxx Tsunami AT-1000 decoders and 603 SMD “Sunny White” LEDs for lighting.

Here is a video of the full sized models.

Thanks Guys.

Sean, I knew it. (http://www.largescalecentral.com/externals/tinymce/plugins/emoticons/img/smiley-cry.gif)

I had a long day today, designing and installing the ditch lights. What a pain in the butt. That said, I think they turned out okay. I might have to do a night time video.

Stop … Your making me sick … How can this get any better…

Looks better every time you show us a picture. Ditch likes came out better than okay, they look great.

I want one ! Beautiful job Shane.

I want one ! Beautiful job Shane.

Sean, my crews are suggesting windows should be high on my list. I thought I could distract them with the LED lighting. (http://www.largescalecentral.com/externals/tinymce/plugins/emoticons/img/smiley-cool.gif)

Chris, I ended up going with LED’s from HDA Modelworx. Thanks for suggesting them. I ordered quite an assortment as I really had no idea what I needed.

Thanks Mike. Was I correct that I stole the 9 volt battery idea from you?

Shane, yea, transparent inserts in the openings are real good for controlling the temperature and blocking the wind, rain and insects. I can see why them soft diesel-lectric crews would want such things.

Shane , I did use the 9 volt lighting system in a SD-45 project I posted here a couple of years ago . I cannot take credit for the 9 volt idea as i’m sure someone did it before me.