Large Scale Central

SD60f Build

Thanks Rooster.

John, I’m just glad I never had to deal with them.

No problem Richard. CN normally welds a plate over them when they do repaints.

I got the front deck put together, so I guess I better get to work on the cab. The front end will get ditch lights and air hoses eventually.

I have photocopies of cab drawings (and possibly other aspects) from various sources, somewhere, if you could benefit from such, Richard. They’ve already been enlarged to 1/29 scale.

I’ll have to hunt a bit, though, as much of my stuff has been in boxes for a few years.

Mark

Richard said:

Thank you so much Shane I hope you don’t mind my using some of your ideas. I’m just starting the last smurf Pan Am she was a CN. She has some different ditch lights also.

thanks again

Richard

wow

wow

wow

John, you distracted me. Stupid new X-Acto blade.

Shane 1/29 glad hands are now available. MU hoses with 1/29, 1/32 and 1/48 glad hands…

https://www.shapeways.com/product/N9822K2AQ/air-brake-gladhands-1-29-scale?optionId=63787290

Shane Stewart said:

John, you distracted me. Stupid new X-Acto blade.

Shane, an Xacto blade hasn’t fulfilled its destiny until its tasted human blood.

Thank you David. I never realized what malicious little devils they were. That explains a lot. (http://www.largescalecentral.com/externals/tinymce/plugins/emoticons/img/smiley-surprised.gif)

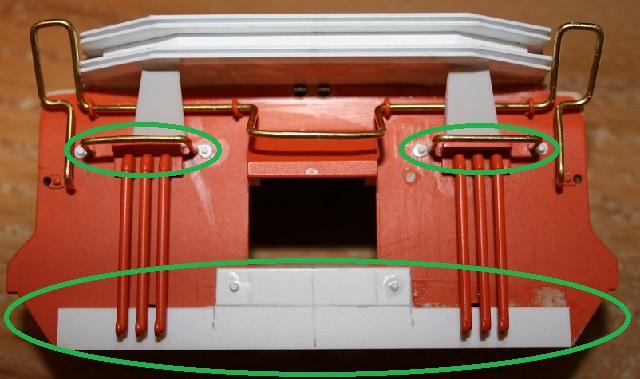
We’re going to add a plate to the bottom of the tail end. Start with a 3 1/4 x 1/2" piece of .02" styrene. Measure it up as shown below, and cut 1/4 x 1" out of the top corners.

Cut two bolt heads from .04" hex and secure them as shown below.

Secure this flush with the bottom as shown below.

Now You can use the same instructions for the front end, but DO NOT add the grab irons over the hoses or the plate at the bottom.

On the front, cut off the mu hoses, and drill some 3/64" holes to accommodate future air hoses.

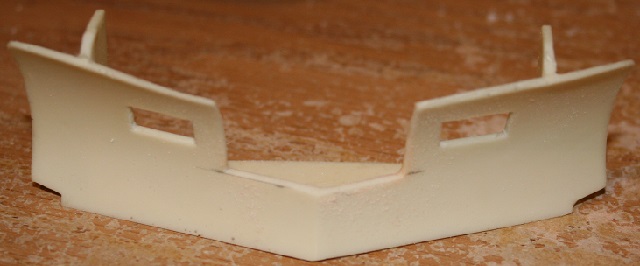
I’m using a plow from Miniatures by Eric.

https://miniatures-by-eric.myshopify.com/collections/g-guage-parts/products/gp1-diesel-plow

The center of the plow needs to be cut down 1/4"

Using epoxy, secure the plow flush with the bottom.

Shane Stewart said:

John, you distracted me. Stupid new X-Acto blade.

Hmmm I’m seeing this for some reason.

https://videosift.com/video/The-French-Chef-Dan-Aykroyd-as-Julia-Child-Classic-SNL

Sean, I was trying to forget, and that video brings it all back. (http://www.largescalecentral.com/externals/tinymce/plugins/emoticons/img/smiley-smile.gif)

Coupler installation. Start by trimming 1/8" off the back of the coupler box.

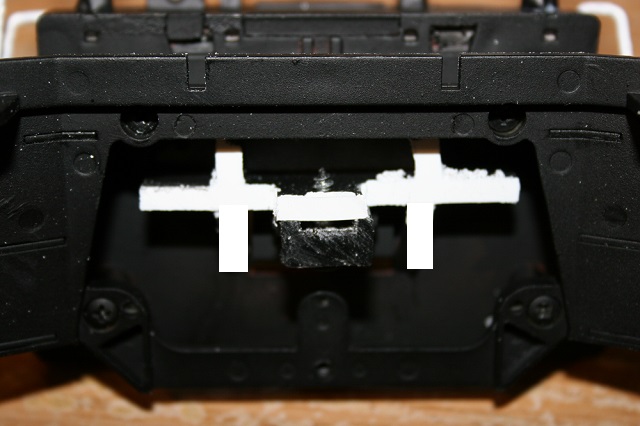
We’re going to build a bracket to hold the coupler snuggly in place as shown below.

This bracket will be made using 1/8" styrene. Start with a 2 x 3/4" piece and mark as shown below. Cut out the 3/4 x 5/16" corner pieces.

Cut a 1 1/4 x 1/2" piece and secure it centered and flush with the back as shown below.

Now your scrap should have lots of corners you’ve cut off. Use a couple to reinforce the top as shown below, and two more will be placed on the sides of the coupler.

Cut the reinforcement flush.

From the front looking through, the bracket fits around the coupler (light blue box) as shown. The above piece is installed flush with the top of the coupler. Once it is securely in place, screw on the coupler, and then add the reinforcement on each side of the coupler. (The two lower yellow pieces.)

From the top rear, you can see how it fits against the plate clear of the two tabs at the top.

View from the back. The bottom reinforcement not only adds strength, it also keeps the coupler from twisting.

Take some 1/8 x 1/8" styrene and cut 8 pieces (4 for each end) 1/4" long.

Cut a corner off as shown below. Do not cut to a sharp edge. Leave a bit of a space at each corner of the cut.

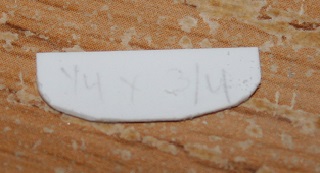
Take some .02" styrene and cut two pieces 1/4 x 3/4".

Shape the front corners as shown below.

On the tops of the anti-climbers, mark a line (red line below) 1/16" from the front as shown below. Measure the stanchion placements as shown by the black lines. (do both sides the same)

Install the stanchion support brackets behind the 1/16" line as shown below. Install the plate in the center overhanging about 1/8".

On the tail end, install the mu socket/bracket in the corner as shown below.

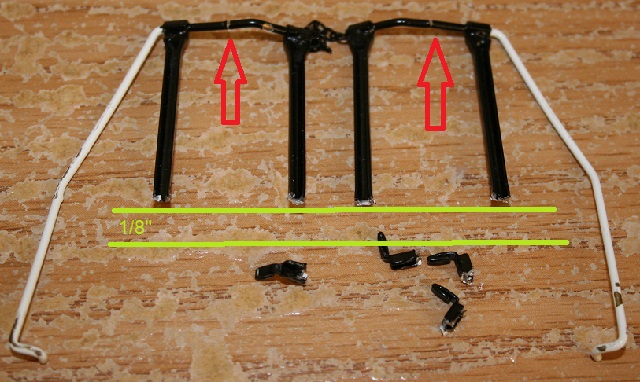
Take your end railings and cut 1/8" off of the bottom of the stanchions. Straighten the first bend in the rail as shown by the red arrows. Twist the bottom connectors, and adjust the stanchions to properly sit in place.

Once you are happy with the fit, epoxy them into place.

Now you can paint them up and add your reflective stripes.

The stripes on the plow are 1" and set at 45 degrees.


Not sure what rock I’ve been under to miss this build log, but its some fantastic work!!! Keep it coming!(https://www.largescalecentral.com/externals/tinymce/plugins/emoticons/img/smiley-cool.gif)

Fantastic detail wok, and excellent write up. Thank you!

I have a question though,

How many people here are going to build this engine? (now that he has provided all the details)

I enjoyed the thorough descriptions. I have a feeling most members here won’t build this, or any modern diesel.

Let’s see if I’m wrong. He has paved the way for people to try.

Joe, back when I posed my how tos on what I built, I never expected anyone to build what I built. But, I wanted to show that even the most complex build, is just a series of simple steps, and that most anyone could build what I built. I also tried to show some of my tricks, and some of the problem solving that went into my builds, again, to show the readers that they could also work through their builds. I look at Shane’s build log the same way (maybe I am wrong). But he has given me some ideas on my E5 build, if I ever get back to it, I can use Shane’s build log for some ideas, and for plenty of inspiration.

I know how time consuming it is to document each step along the way. And how difficult it can be to explain certain steps in understandable terms. I thank Shane for his efforts, tricks, techniques, and inspiration, even though I have no interest in building this model of diesel. I have been reading along from the beginning, and hope to glean some knowledge for when I get back to my locomotive build projects.

Joe Paonessa said:

I have a question though,

How many people here are going to build this engine? (now that he has provided all the details)

I enjoyed the thorough descriptions. I have a feeling most members here won’t build this, or any modern diesel.

Let’s see if I’m wrong. He has paved the way for people to try.

Not this engine, but I have 2 candidates to build into Union Pacific SD40Ns. And I will be using some of these ideas on those.

Chris

I hope everyone who looks at this post gets ideas and appreciates al the effort. I got a reply on mine that I should post every step and explain everything I do. I really think people want to be entertained and in reality, probably won’t do anything.

I would like to be proved wrong!