Thanks John.
I got a new youtube video posted to appease my 5 subscribers. (http://www.largescalecentral.com/externals/tinymce/plugins/emoticons/img/smiley-tongue-out.gif)Now I have to get this build log caught up.
Thanks John.
I got a new youtube video posted to appease my 5 subscribers. (http://www.largescalecentral.com/externals/tinymce/plugins/emoticons/img/smiley-tongue-out.gif)Now I have to get this build log caught up.
Waiting to read how you made the anti climb.
thank you for this build.
Richard
Great video on the progress Shane (https://www.largescalecentral.com/externals/tinymce/plugins/emoticons/img/smiley-cool.gif)
Richard Beverly said:
Waiting to read how you made the anti climb.
thank you for this build.
Richard
Starting 4:20 into the video gives a pretty descriptive explanation.
Fan freaking tastic work Shane !
" Rooster " said:
Richard Beverly said:
Waiting to read how you made the anti climb.
thank you for this build.
Richard
Starting 4:20 into the video gives a pretty descriptive explanation.
Fan freaking tastic work Shane !
Thanks Rooster I saw that but could not hear it that well that’s why I said waiting to read it.
Richard
Thanks Guys.
Well Richard, how about we skip ahead. Prototype note-my anti-climbers are solid, whereas the real ones are hollowed out underneath.
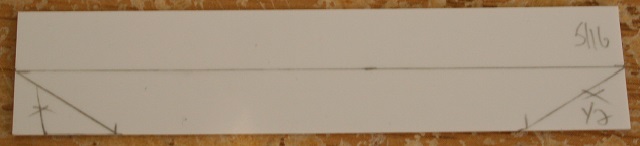
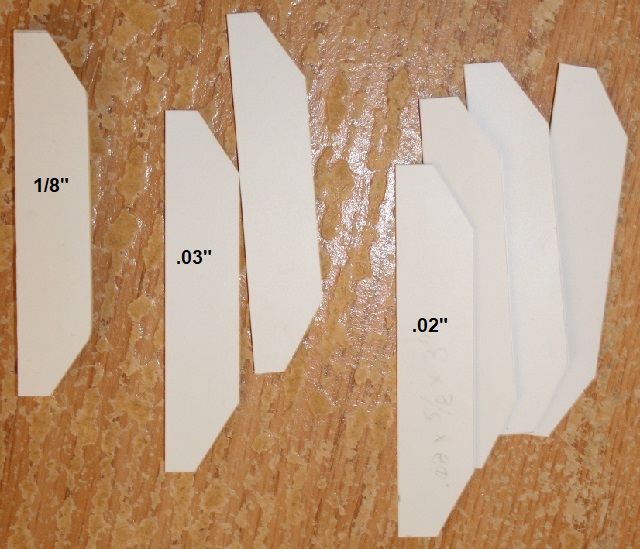
We’ll need 4 pieces of .02" styrene cut 3 x 5/8", 2 pieces of .03" styrene cut 2 7/8 x 9/16" and one 1/8" piece cut 2 7/8 x 9/16".

Measure the four .02" pieces as shown above and cut off the two corners.

Now measure the 2 x .03" pieces and 1/8" piece as shown above and cut off the corners.

You should now have 7 pieces as shown below.
Now take 2 of the .02" pieces and 1 of the .03" pieces. I used a scrap of aluminum angle to help glue everything flush. The long sides are the rear and must be flush. Layer the pieces .02/.03/.02.

Build two of these.

Now glue the 1/8" piece between the above two pieces.

It should look like the piece below when complete. Carefully sand so that the .02" layers all match. You can also slightly round the front corners. The rear corners remain square. The lower piece of styrene is just holding the anti-climber up for the photo.

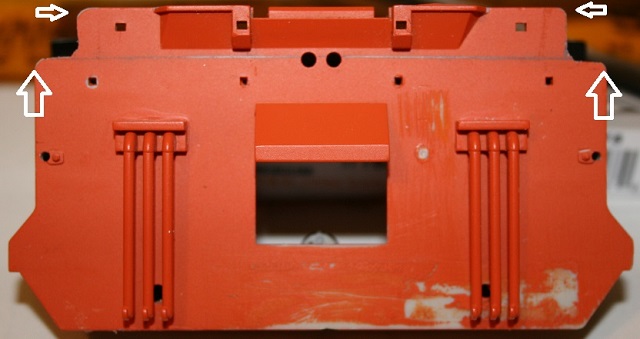
Now take your rear end plate and remove all of the detail parts except for the hoses. (The front plate will be covered at a later date, as it incorporates a plow and ditch lights.)
Mark the corners as shown below. You’ll be removing 1/4 x 5/16" from each corner.

Drill 7/64" holes in the corners, and then carefully cut off the corners into these drill holes. This should leave the inner corners rounded.

Sand the outer corners round as shown below.
Cut the top overhang off flush.

Now secure the anti-climber flush with the top of the end plate. Be careful to keep it squared.

Install the operating lever. My new operating levers were made to match the originals, adding the 1/4 x 1/2" (inner measurement) loop for top operation.

You’ll have to patch a couple of spots on the end plate to bring it up flush with the top.

Drill four 3/64" holes for grab irons on each side of the hoses as shown below. Drill 1/16" to the inside and 3/16" to the outside of the hoses.

x
Now I invited my Auntie Martha over with her fancy lace punch.

Using .01" styrene, I created this beautiful lace. (http://www.largescalecentral.com/externals/tinymce/plugins/emoticons/img/smiley-tongue-out.gif)

Now before you get laughed at, throw this crap away, but keep all the punched out petal shaped pieces.

Take some .04" styrene hex and cut some short pieces to represent nuts.
Use these to make the grab iron anchors next to the holes. I overlap a little and then clean out the holes once dry.

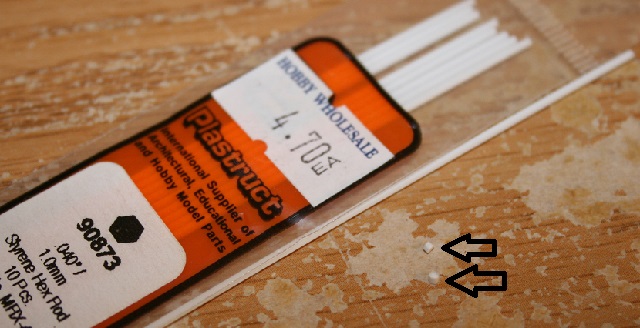
Using 3/64" brass rod, make two grab irons 5/8" wide and 3/8" deep. Install these 1/8" into the plate leaving 1/2" hanging out.

Purty clever.
Now take some .03" styrene and cut two 3/8" right triangles and two supports as shown below. The supports in the diagram are facing you. Sand the back side top and bottom at 45 degrees.

Hold the triangles flush with the bottom of the anti-climber, and mark and drill where the operating lever will fit.

Hollow out the backside of the triangles as shown below. On the back side of the supports, mark 1/8" in from center.

Mount the triangles on the back of the supports along the 1/8" marks you measured. The narrow side of the support is the top.

Mount the supports under the anti-climber over the operating lever. I lined them up with the inside of the hoses.
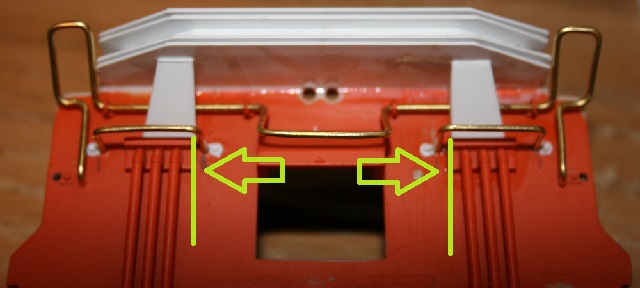
You can see below how they mount over the operating lever.

Note-In these photos, you may notice that the inset portions of the anti-climber are inset more then what you built. I originally used a 1/8" inset, but decided it was too much. I changed it to 1/16".
Well there you go Richard!
Damn nice work Shane !
Thank you so much Shane I hope you don’t mind my using some of your ideas. I’m just starting the last smurf Pan Am she was a CN. She has some different ditch lights also.
thanks again
Richard
Richard, I don’t mind at all.
Is it a GP40 you’re working on? If you give me a few days, I might have some measurements I can share with you. I didn’t spend much time on GP40’s, but I know I measured a few GP38’s which are very similar. I think I also measured the old style ditch lights. If I remember correctly, the anti-climbers on these units weren’t quite as wide. I think where the above ones tapered, the GP40/38’s curved straight back. If you need any detail photos, I’m sure I can help you out there as well.
Shane
yes ex. CN 9470(GP40-2LW) Thank you Shane I don’t want to derail your build what great job you are doing. I do have a question it has 6 class lights 3 on each side of the number boards red,green,yellow.
thanks Richard
Hi Richard, they’re red green and white. The only thing they’re used for now are Christmas lights in December. They do work, but were abandoned before I started. I believe no lights were a scheduled train, green meant there were extras, white were extras, and if there were extras, red was the last train of the group.
Green meant (on many roads) a second section was following on the first section’s timetable. Could be more than one second section. More passengers could over load an engine, so a second train followed on the heels of the first.
White usually meant unscheduled.
The red were warning end of train when running in reverse …
Thank Shane I just never saw a loc. with all 3 color bulbs up there before.
Richard