Large Scale Central

Ron's Challenge 2013

Finally got started on my challenge a few days ago and then slipped on the ice at work and gave myself a mild concussion so missed a few days. As I am in the cold north, am working from just the plans. Here we go As with all my builds I began with a piece of reasonably clear spruce lumber

After about 15 minutes here is the stripwood for the frame

And another 15 minutes all the parts for the frame are ready

Into the frame clamp for gluing. I make all my car frames along a similar plan so I made a jig to hold everything together, makes sure that they are square and straight.

And the frame

Rather than use individual planks for decking I decided to use 3/32 balsa wood and scribe the planks into it. I don’t know if it is any quicker but looks just as good in the end.

A scribed piece before attaching

And the frame with decking attached

In this view you can see how it looks just like individual planks

Some representative brake rigging and the bolsters

Finished underside with truss rods and finished bolsters. Kadee couplers body mounted.

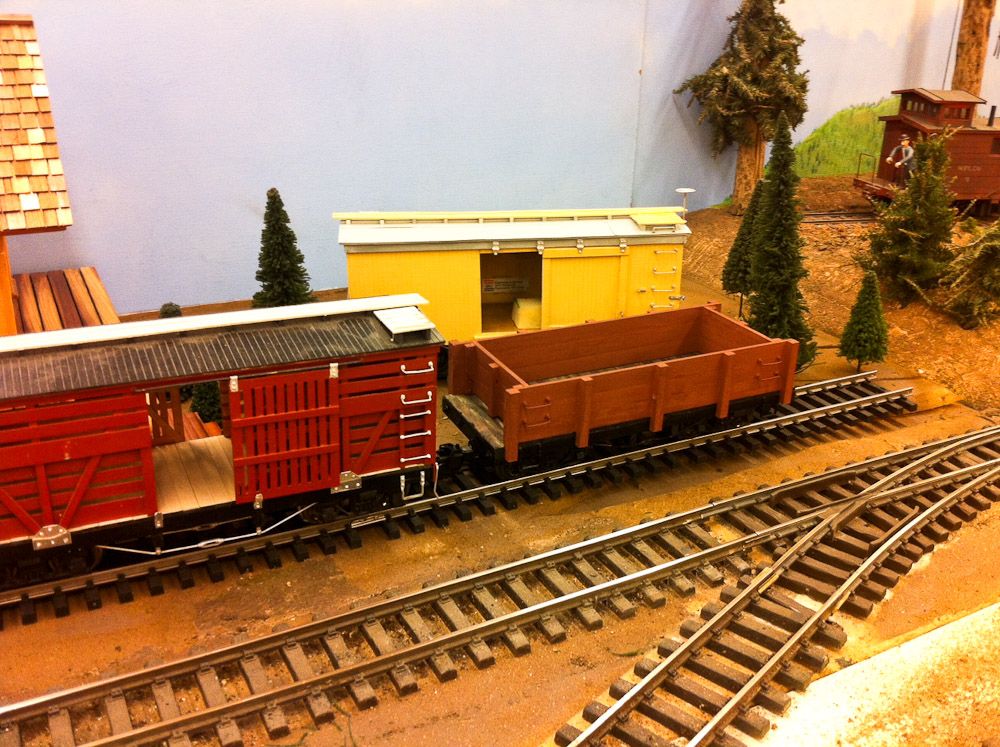
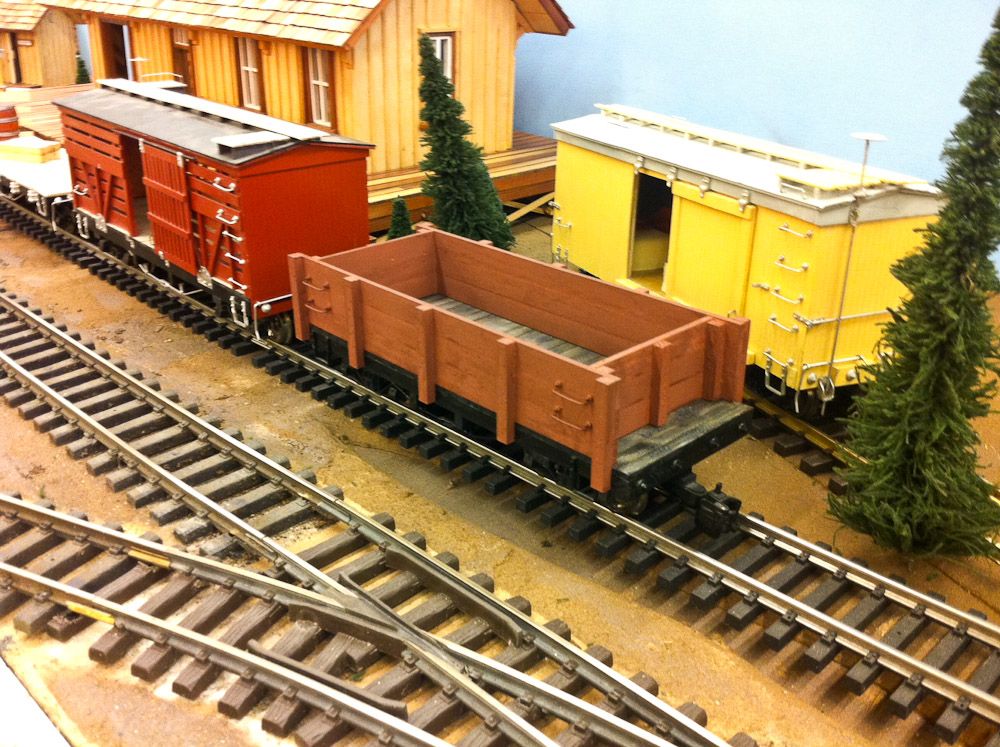
And three shots of the finished basic car.

Truss rods are from a scrapped Bachmann flat car kit and the trucks are from a Bachmann 20 foot flatcar. So far, I have not purchased anything. Because I live a long way from any hobby shops, I tend to keep a lot of stuff in stock. Now onto what the final car will be and adding all the details. Enjoy, Ron

Ron,

Pretty clever idea using scribed balsa sheet instead of individual planks. What did you scribe it with, and did you regulate the depth of the scribe somehow?

Joe, Here is a pic of the tools I use to scribe the wood. It is a piece of hacksaw blade with all the teeth except for 3 ground off and then ground narrower so that it will fit in the knife handle. The depth is just controlled by feel and eye. After the grooves are there then I take a piece of hacksaw blade and cut each groove in about 5 mm. or so at the ends to make the boards look more individual when viewed from the end.

(http://i846.photobucket.com/albums/ab29/trainman57/challenge%202013/DSCN3991_zpsf6aa8ee3.jpg)

Ron

That is a great idea to use the balsa wood and scribe it. Looks really good.
Looking forward to seeing how your build will take shape.
Todd

Hey Ron,

Sorry to hear that you fell and got a mild concussion, how are you doing now? Hopefully you can bring this little beauty to the February club meeting at our house. Oh and BTW I would like to place my order for 6 of these flats cars. Thank you.

Chuck

Chuck, what did you do to your workshop? Turn it into a goat barn?
Make your own! :slight_smile: :slight_smile: :slight_smile:

John, the shop is fine, infact the guy just finished fire taping the ceiling but I’m going in for shoulder surgery a week from this Friday to re-attach a torn tendon and I won’t be able to use my right arm for 4 to 6 weeks while everything heals inside. Then I get to go for physical therapy. Besides I like Ron’s flat cars better.

Hi Chuck

Couple of days rest and I’m doing fine now. Lets see, six flats, shouldn’t be a problem as long as you are not in a hurry. I’m sure we can negotiate a deal. Besides this challenge car I have six other cars under construction that need finishing first. Will try to make it down in Feb.

Ron

Ron,

I am curious…would you be willing to share how you built your car frame clamp… It looks interesting and very handy…
Travis

Hi Travis,

I would be happy to share that with everyone. I’ll get some pics and post something in the next day or two.

Ron

Travis

If you check in the articles section I posted a short how to on the car frame clamp. Now I got to get back to my challenge project.

Ron

I will build one this weekend… THANKS.

Thanks Ron!!!
Travis

When I first started this I had no idea what to do with this car. I didn’t need a short gondola and all of my other cars are based on Colorado narrow guage cars, mostly 28 or 30 footers. Then I thought about a stock car, then why not a double deck stock car or as I call it, a ‘sheep’ car. I couldn’t find any prototypes to base it on, only a couple of pics of full size cars, so I decided, my railroad, my rules. Hence we have a 20 foot double deck sheep car. I drew up some plans and got started. Here is the beginning

(http://i846.photobucket.com/albums/ab29/trainman57/challenge%202013/DSCN4015_zps8d2ab754.jpg)

And the beginning of the planking. The large board across the door will get cut out later. It is only to strengthen the frame for handling.

(http://i846.photobucket.com/albums/ab29/trainman57/challenge%202013/DSCN4017_zps920e6d4f.jpg)

Here is the back side, the beam across the door will remain as it is the support for the second level.

(http://i846.photobucket.com/albums/ab29/trainman57/challenge%202013/DSCN4019_zps3b292049.jpg)

A front view

(http://i846.photobucket.com/albums/ab29/trainman57/challenge%202013/DSCN4018_zps0752baab.jpg)

This is the framing for the end, all cut from spruce except the strip on the bottom which is basswood.

(http://i846.photobucket.com/albums/ab29/trainman57/challenge%202013/DSCN4020_zpsf681d00c.jpg)

I applied the sheeting to the inside of the frame as per prototype practice, using a piece of basswood, scribed to represent individual planks

(http://i846.photobucket.com/albums/ab29/trainman57/challenge%202013/DSCN4028_zps9241ca5d.jpg)

And the completed end

(http://i846.photobucket.com/albums/ab29/trainman57/challenge%202013/DSCN4034_zps34b84624.jpg)

And here are the completed two side and two ends.

(http://i846.photobucket.com/albums/ab29/trainman57/challenge%202013/DSCN4032_zpsa2b3e7b4.jpg)

To be continued:

Here’s my version of a 22’ cattle car. You can see it next to the gon

(http://i1234.photobucket.com/albums/ff403/dave2-8-0/photo-52.jpg)

(http://i1234.photobucket.com/albums/ff403/dave2-8-0/photo-48.jpg)

Hopes this helps a touch!

Nice work… :slight_smile:

very nice work! I’m loving all the variations on this car kit

Ron,

The March 1976 issue of Railroad Model Craftsman has the D&RGW stock cars in both cattle and sheep versions. I have the article if you are interested, and I also had them blow up to 1:20.3 scale (I can’t copy those).

Bob C.

Got some more done Two shots of the assembled body, shows another use for the frame squaring jig. Helps keep the body straight.

(http://i846.photobucket.com/albums/ab29/trainman57/challenge%202013/DSCN4035_zpsc221b724.jpg)

(http://i846.photobucket.com/albums/ab29/trainman57/challenge%202013/DSCN4037_zpsd5794ac6.jpg)

Decided to add a little detail to the end of the flat car. Hand made NBW fittings, grab irons and foot steps. The foot steps are borrowed from a Bachmann flat car kit, trimmed to look better and mounted with pins.

(http://i846.photobucket.com/albums/ab29/trainman57/challenge%202013/DSCN4040_zps782bbcb0.jpg)

This shows the making of the nut for the NBW fitting

(http://i846.photobucket.com/albums/ab29/trainman57/challenge%202013/DSCN4039_zpscaa21833.jpg)

A view of the upper floor installed

(http://i846.photobucket.com/albums/ab29/trainman57/challenge%202013/DSCN4041_zps6d79717e.jpg)

Another view of the upper floor with the body sitting on the flatcar

(http://i846.photobucket.com/albums/ab29/trainman57/challenge%202013/DSCN4042_zpsc821ba57.jpg)

And a door under construction and a finished door. The doors are made of 2 layers of 1/32 plywood in order to make them strong but keep them thin.

(http://i846.photobucket.com/albums/ab29/trainman57/challenge%202013/DSCN4044_zps69ed45c6.jpg)

(http://i846.photobucket.com/albums/ab29/trainman57/challenge%202013/DSCN4045_zps94a0a1c1.jpg)

And a shot of the end of the car, with the holes drilled for the grab irons.

(http://i846.photobucket.com/albums/ab29/trainman57/challenge%202013/DSCN4043_zps8904872f.jpg)

Thats all for now.

That Looks really Nice!!!. Im gonna make me one of those framing squares…