Large Scale Central

Restoring a 1st Gen. Bachman Shay

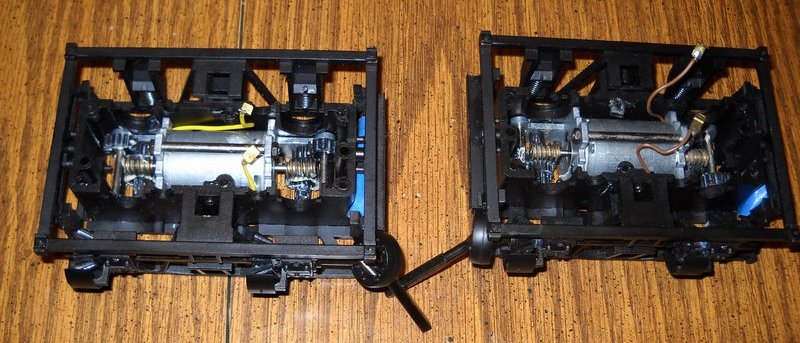
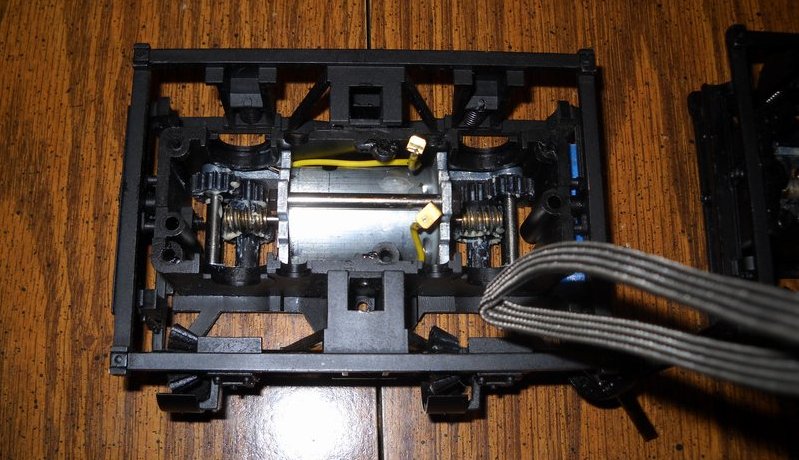
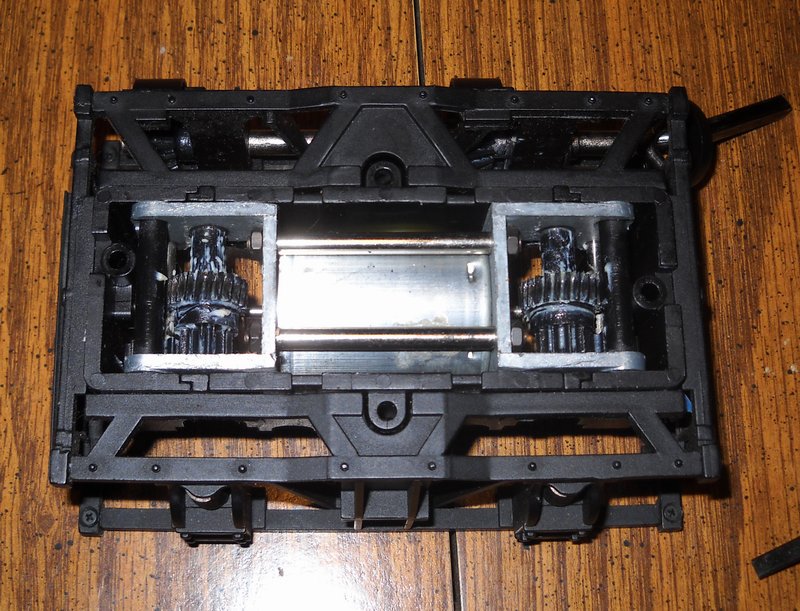
I picked up a 1st Gen. Shay in a barter deal a year or so ago that was in pretty rough shape. I started taking it apart well over a year ago then put it aside when I found both drive gears stripped. I sent off the axles to Gary B. who pressed on some new metal gears for me, but I haven’t been motivated to get back to it before this weekend. Today I continued tear-down. I have removed both trucks, the tender, firebox bottom, steam cylinders, front light and smoke generator in preparation for a bath. I pulled most of the wiring except for the flicker board and the LEDs in the firebox. The plan is to completely re-wire the trucks and put battery, R/C and sound in the tender making this a self-contained R/C loco. I plan on wiring the font and rear lights to the R/C board and utilizing the smokebox door switch for on/off. I haven’t decided on what to do with the flicker board. I could retain it or just cut it loose and loose all the smokebox LEDs and the cab light. A question for those who own this loco - Is the smokebox flicker worth keeping? And since I know y’all demand pictures here is future CVSRy #5 getting a bath in the kitchen sink.

Ephraim Shay is probably rolling over in his grave :slight_smile:

EphraimShay

<<A question for those who own this loco - Is the smokebox flicker worth keeping>>

In my opinion; no.
Gut it, Jon, since you are restoring it to batt/rc.

I do like how the “flicker” shows through the bottom dampers of the firebox at night, rarely see it in the cab. Wouldn’t be a huge loss for me, but it’s kind of neat.

I took out the flicker and put a set of batteries in there. Unless your laying on the ground, you can’t see the flicker anyway.

If you run at night, it is cool to see the orange glow from the firebox. So if the board that controls it isn’t too large and doesn’t get in the way of the other electronics, I’d be tempted to keep it. If it gets in the way, it’s certainly expendable. I might be inclined, however, to then wire the LEDs in the firebox to the lighting output of the R/C board so at least it’s illuminated if not flickering.

Later,

K

Thanks for the opinions. It appears (by looking at wires, not dissembling the firebox) that there are two LEDS up in the cab area of the firebox to show from the door and 4 more on the bottom of the board to show out the dampers.

Once everything dries out I’ll experiment with feeding the board from the motor output of the R/C and see if it works. Wiring directly to the lighting output of the R/C would probably work too, but only in one direction :slight_smile:

I do run at night and I don’t think I need the space so I’ll probably keep the board if I can make it work.

Hi Jon,
I think it is worth keeping… Very nice effect in low light conditions, especially if you have any eye level areas on your layout. It does not seem to present a power draw problem, as I have never had the engine quit before I did.
I found no problems getting around flicker unit during bat/rc/sound installation. I wired the flicker directly to the rc board lighting output (it is always on)

The biggest issues are tweaking the sound pickups so that they work correctly and the condition of the trucks. If you don’t have the newer die cast trucks for the unit, the whole exercise might be in vain.

For EBT fans, I think the unit is worth new trucks as it can be a dead ringer for McKELVEY BROTHERS No.2

Thanks Geoff -

I don’t have the die cast trucks. Besides drive gears, the only problem these trucks show is most of the places where the bottom cover screws go are cracked. I spent part of the afternoon today gluing them back together. I’m hopeful that if I don’t over-torque the cover screws that I’ll be OK. I’ve handled them a lot while working on them and so far they are not the crumbly ones :slight_smile:

I put the axles Gary re-geared for me back together, put them in the trucks and powered them up. So far so good :slight_smile:

So what can you tell me about the sound pick-ups? I have the cylinder unit off the loco so now would be a good time to tear it down if needed. Would I be better off setting up a reed switch / magnet system on one of the trucks?

I’d keep the one that came on the Shay, if it’s salvageable. It stays in pretty good synch with the sound unit. Mine, however does have an annoying “click” to it, so you may be able to remedy that while you have it torn down, if you can see where that problem is. I’m not real crazy about magnets and reed switches, and I avoid them if I can, but that’s just me…:wink:

I agree with Ken, keep the sound contacts.

While the cylinder/valve gear is off the engine, remove the round caps for access to the contacts. Connect a continuity tester or test light to the contacts and rotate the drive shaft.

Use some contact cleaner or conductive lube (I use rail-zip) on the contacts. Carefully “tweak” the contacts so that they open fully and make positive contact when they are supposed to be closed. It’s a very fine line….

Thanks again Geoff!

Jon,
I also have one of the early shays. Removed all the electrics from it and rewired with a Revo receiver, Phoenix sound and a 4 cell LiIon batterypack. Made an extended tank for the top to convert to an oil burner. This is where I put the battery. Everything else is in the original water tank/coal bunker. I don’t run at night so the firebox flicker was not a big loss for me. Might have some pics somewhere if you are interested.
Ron

Jon,

Great project, and timely for me as I have a Shay project next in line on the work bench.
Please keep a close record of checking out that timing as I will need to do that also :slight_smile:
I’ll get started as soon as I can get this crane rebuild out the door.

If you need any original parts for the old trucks let me know as I have a bunch of them lying around.

Later
Rick

One more thing about the first run shays…
Even with battery power and proper lubing, I found that the shay still ran a little erratically (lurchy) particularly at slow speed.
If I recall correctly, I removed a gear from the rear truck and disconnected power so that the rear truck was a free rolling dummy. The engine ran better and has no problem hauling 10 loaded Sierra Valley short log cars, short flat and a caboose on a 2 ½ % grade

I think George Schreyer’s site details getting the click out of the valve gear, and also making the reversing gear work, and also addresses the contacts.

Greg

Jon; I would keep it, I did on all my Shays. Since I don’t run my trains on the ground, it can be seen. One very important thing, check the trucks over very carefully, they are the world worst plastic and may soon disengrat as mine did! Not fun! Start saving you money for a pair od all metal trucks, the only way to go.
I put batteries in the tender shell, boards under the caband in the fire box (requires some cutting) and have all the lites working. Take your time and do a good job which I know you will.

Me, I run my 3 truck almost every operating session, pushing the ‘broom car’ to clean up the pine needles.

Paul

Greg Elmassian said:
I think George Schreyer's site details getting the click out of the valve gear, and also making the reversing gear work, and also addresses the contacts.

Greg


Thanks Greg. I remembered something about that reversing gear and looked at it when I was pulling the steam motors out. I suppose if you are a real purist then you might notice the gear was in the wrong position when going backward. Personally, I’d never know. I will go and read George’s comments. He’s never steered me wrong yet.

As far as flicker goes - If the board still works I’ll keep it. Despite my efforts to protect it is did get a little damp when the engine went through the wash rack.

On the trucks; I’m assuming this is a 1st Generation model. I didn’t research how to tell. The trucks are partially plastic and partially metal. I’ve handled them pretty extensively and they don’t seem fragile or crumbly however many of the places the bottom truck cover screws tap into were cracked or broken. I did a repair job on them but haven’t tried closing them up yet as I still need to extend the motor wire.

Gotta picture? you can tell genrally by the screw locations and sech…

1 Like

Bart Salmons said:
Gotta picture? you can tell genrally by the screw locations and sech…

OK - Here ya go…

The ends of the bottom frame is metal (note screws seen in top view). The gear/motor box is plastic. Hard to tell for sure but I think the brake hangers/top frame is plastic. Not shown is the pictures is the bottom cover. It has lube ports that I don’t think 1st Gen did. Based on that and what I read on George’s site these might be 2nd Gen. Do you concur ?