Large Scale Central

Resin Frog Castings

Disclaimer – this post will be of no interest to anyone using track power.

I make most of my turnouts. I used to buy Llagas Creek nickel silver frog castings and then make the remainder of the turnout from aluminum rail. I prefer using their castings because of the nice bolt detail.

Lately, it has been increasingly difficult to find frog castings from any of the Llagas distributors. I decided to make a few copies to use until they again become available.

I made a mold box from toy Lego blocks and laid it on a piece of Plexiglas acrylic sheet. I put a couple of the nickel silver castings in the bottom of the mold box.

I mixed up some RTV silicone rubber and covered the frogs.

After the rubber cured (four hours), I removed the Lego blocks and pulled the nickel silver frogs from the mold.

I filled the cavities with polyurethane casting resin and allowed it to cure (twenty minutes.)

I removed the castings, trimmed off the excess flash, and sanded the bottoms by rubbing them on a sheet of 100 grit sandpaper in a circular motion.

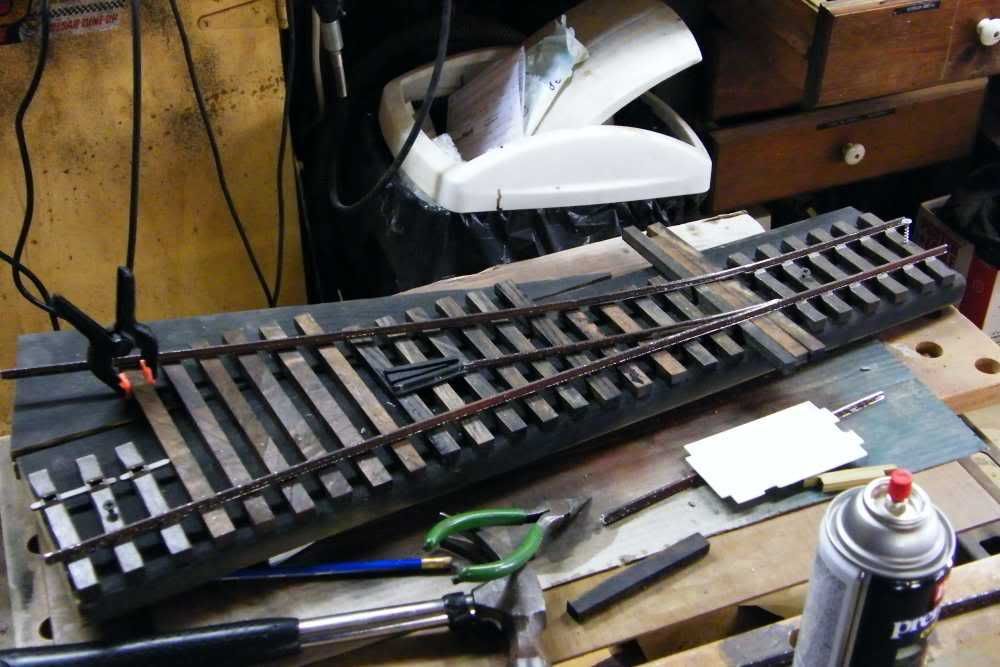
Here is how they turn out. When painted, they look just like the other painted rail components of the turnout.

I figure they will probably wear out faster than the nickel silver ones, but I have plenty of spares for replacements. After allowing for the cost of the RTV and resin, I am still saving about fifteen dollars per turnout using the resin castings. I may never go back to nickel silver!

P.S. These are code 215 #10 frogs, in case you thought they looked funny.

I have found the Llagas Creek NS profiles tough to machine, so I guess you’ll go through a few of the resin frogs before you wear out a NS frog from Llagas Creek.

BTW the frogs look very nice.

I’ve been doing the same thing, Bob, for the last 5 or 6 years. I did however have a bad batch of resin ( I may have mixed it wrong too) that turned rubbery when it was out in the sun for awhile. The frogs were easy enough to replace.

I bought one each of their code 250 #6, #8 and #10 for the specific purpose of casting my own. So far all I ever use are the #6’s.

Many years ago I bought a simple frog that’s mainly just a V groove cut into a 1/4" thick piece of styrene and cast quite a number of them. Not sure what number they are but I’ve cast and used quite a few of them over the years.

Here’s a pic of a switch being made with the V groove frog:

(http://i253.photobucket.com/albums/hh58/rgseng/switch003.jpg)

PS: I never thought of using Legos for the mold though…:wink:

The late Tiny Pearce was experimenting with casting them in white metal using high temp RTV. He had fairly good success with them.

Love it Bob, So far I have constructed the frogs out of aluminum rail. But I do like the detail of the cast units better not to mention the convenience.

I intend to do some aluminum casting in the coming years and will probably try to pour some then. Thanks for the inspiration.

I also use minature wood screws to attach the frog…then I just whip out the screwdriver to change out the frog… Teh molds will last longer if ya use a pattern that doesn;t hae the bolt head detail…

Oops, I already read it, and it was interesting to me.

I’m sorry, will I have to go wash my brain out with soap?

:wink:

What about melting aluminum down say from a free source, and casting the frogs in aluminum?

I’m planning on casting up my own homebuilt frogs as well when I have the chance. I have #9’s and #11’s. For some reason model railroad companies make frogs (and turnouts) in even numbers (#4, 6, 8, 10, 12, etc) but the prototype railroads tend to use frogs in odd numbers (#7 really, really tight!, 9, 11, 13, 17, and then 22 +). Why can’t model making companies follow suit by making odd numbered frogs and turnouts)?

I cast my frog in place for my scratch-built turnout. I used Bondo the fist time I built it, but the Bondo ended up chipping over time. So I recast it with JB Weld, and it lasted for years.

After laying the rails, I made the frog point. I took some glossy paper from a junk-mail flier and cut a strip from it. I folded the strip and clamped it to the rails.

Once that has set up I took a 1/8th inch square piece of wood, coated it with paraffin wax (baking wax) and clamped it to the rails, making sure it was flush with the top of the rail . This will make my flange-way and 1/8 inch wide and deep is a good size for the flange-way. Then I mixed up more Bondo and blobbed it around the wood.

Once the Bondo started setting up I removed the wood and started trimming it to shape with a hobby knife with a new blade. There is a point during the setting up of Bondo where it has the consistency of hard rubber, that is the time to trim and detail it with a knife, if you wait till its completely hard its much more difficult to cut.
Then I did the same thing for the other flange-way

After letting the Bondo set up for a few hours I sanded the frog flush to the top of the rails with a sanding block. Then I took a truck and ran it through the frog to make sure all was working properly.

Once the frog was painted, the switch didnt look too bad. No, not as detailed as a good cast frog, but good enough for my railroad.

I cut and pasted that from a thread I did on another site. As I said, I redid the frog a few years later with JB Weld. JB Weld, like Bondo, has a point while its curing, that its soft enough to be carved.

David,

Epoxy dust is pretty neutral as far as being toxic or no worse than any other dust. Except when it is “green”. Be real careful and use proper safety precautions. Personally, my lips start tingling if I’m around it too much when it is still chemically changing. Always the key to let it alone.

If you didn’t lick your fingers to get the excess epoxy off of them you wouldn’t have that problem :wink:

I was working outside. And since I have already had my lifetime supply of radiation, and I used to smoke 4 packs of cigarettes a day when I was a truck driver, and I used to work with some hazardous chemicals, I figure a little dust isn’t going to shorten my lifespan anymore then it already has been shortened.

Besides, I carved, with a knife, while it was green. But the sanding came the next day when it was hard.

Good old JB Weld. I to used it to make frogs.

Any reason why JB Weld couldn’t be used in a mold?

Jon, since its a 2 part filler material, I do not see why not. I guess the sticking point :wink: would be choosing the proper mold release agent.

PAM works as a mold release or even car wax. Epoxy is green for about a week after chemicals mixed and starts to kick. Nothing to do with hardness to the feel.

Gary, you don’t have to lick your fingers to get the tingling feeling, just the vapors coming off it does it. Besides mustaches, beards and even skin really gets messy with epoxy around. Y’all be careful out there.

Rick, oh, ok. I didn’t know that stuff was “green” that long. I know auto body shops will shape Bondo, or other body fillers, as soon as its hard. Of course they also (usually) wear particle masks when they do it.

That’s all you need to do. Just simple protection, but the stuff isn’t like simple sawdust.

On thing to remember about JB Weld. It is a conductor of electric.