Large Scale Central

Request Opinion -- Smallbrook Studio Motor Block

Update:

It was, in fact, my error. The proprietor wrote back the following:

Although I do not mention the matter in the instructions, in my email to you of the 19th January I did say that to get the chassis to run satisfactorily on LGB track a number of spacers needed to be fitted to the inside of the wheels on the axles and that these would be supplied.

It doesn’t look as if you have fitted any to your chassis? Please remember that there are four etched washers that will simply slip onto the axles but there are also a further eight 4 BA brass washes that need to be opened out and squared in the inside that will also need to be fitted to gain the correct back to back for the wheels to run on the track, this should then do the trick.

I admitted my misunderstanding and thanked the proprietor profusely as a first step to getting on with this project. I hope to get the chassis together this weekend to close this review and proceed to the intended project.

Eric

there are also a further eight 4 BA brass washes that need to be opened out and squared in the inside

That sounds like hard work - squaring the inside? With what? I assume they are meant to fit the square Slaters axles. Looking at my photos, it seems the axle has a shoulder after the square bit (see attached) so any washer that fits over the squared end but against the shoulder will work to widen the wheels set.

Pete Thornton said:

…That sounds like hard work - squaring the inside? With what? …

And the learning continues! All part of moving up the complexity scale in our projects, I suppose. I’ll try to turn to on this project later. I think I’ll do a bit of tinkering and experimenting along the way to get things to set right. and go from there.

Eric

OK,

I had some time to work on this today. The kit comes with 8 brass washers and an additional four that are “squared.” You can see the daisy-chained “squared” ones next to a standar washer below:

You can also see, as Pete T. mentioned, the square axle end. The “squared” washer needed a little bit of work using the jewelers file to the left, but it did pop over the end relatively simply. After installing all four of the “squared” washers, the chassis did sit on the rails, but only just:

Here’s the rub. How do I “square” those other washers? I tried the jewelers file, but that wasn’t getting me anywhere. It was too late to drag out the Dremel, but I am not sure that is the solution. The file I used to clean up the outside of the other washers just so happens to have a handle that is almost the right size an shape:

What if I seat that handle in the hole of the washer and bash the other end with a hammer, effectively “stamping” the shape? Or, I could just procure a washer with a slightly larger radius, which would be easier but less fun.

Hope all are having a good weekend!

Eric

I could just procure a washer with a slightly larger radius, which would be easier but less fun.

I think that is what I was suggesting - definitely less fun. But what do you have to lose? Hit it!

the chassis did sit on the rails, but only just

Eric, you mentioned the existing wheels were 4mm wide. From your earlier photo, you need to move the wheels at least that much to get them even to be on the rails?

My Slaters wheels are more like 7mm wide - similar to an LGB wheel. And what’s puzzling is Smallbrook’s idea that the wheels need washers for LGB track. While LGB rails might be cruder than finescale, they are still supposed to be 45mm apart so any fine scale wheels should fit. (Might be worth checking your LGB track - I have a couple of straights which are 45.2mm.)

Even more interesting is that Smallbrook had you order 40mm axles. That’s the right size for 45mm track. You should not need washers.

Well, I found your wheels. I remembered Slaters had a partial catalog and the 16mm 2’ “small england” (that’s a Tallylyn loco type,) seems to match what you have got.

Pete T.,

Thanks for the suggestion and the legwork. The Slater’s website is a bit overwhelming and not especially easy to use. I am sure some of my track is a bit out of whack, but this was a whole treadwidth too small. If I take three washers and stack them, they are about 2mm wide. Since everything was about 4m too narrow, that will solve the issue.

Anyway, I bashed the center (which was, indeed, quite satisfying), filed the notches, and Dremel-ed a washer to fit. The next washer shot across the lanai. I’m glad I had my safety goggles on! The frustration and safety risk not being worth modifying the other washers, I’ll get what I need at the hardware store.

Eric

P.S. Washers procured. I installed one per side. It’ll track:

Video: Proof It’ll Track

I used 0-5-0 power to push it onto some sidings. It did derail on the frog ~50% of the time. Let’s see how it does when I get the batteries on top and let it move on its own power.

Have a great week everyone!

Eric

Update:

Belated Happy Easter to all who celebrate! Despite the Holiday and lead-up observances, I did some tinkering on this project.

The first order of business was some light sanding and painting of the rods:

The instructions note you may have to slightly enlarge the elongated holes on the connecting rods (left). As fate would have it, I should have just done it, as I found some binding after I got them on. You also have to drill out the holes in the connecting rods for the crank pins. I just lined up on the dimples and hand drilled these. I’ll note the piston rods are basically cotter pins. There is no valve gear. This is fine for my intended purposes.

All of these stack with washers and an itty-bitty not and then screw into the wheels. I found this a bit iterative as I tried to get the crank pins in the recommended distance and set the nut. I was still iterating when I heard dinner call this evening. You can see the layout of washers and nuts in the photo below:

Hmmmm…that metallic paint doesn’t look so good next to flat black…anyway, here is a side shot:

Yeah…that paint looks awful…Good thing I have to take the rods off to enlarge those holes!

I did play with this a bit today as I was slowly screwing the rods into place to see if getting the rods on mystically fixed the issue with this chassis not riding over the frogs on my LGB turn-outs. I’d say the results are inconclusive. I am going to attack the issue from two angles. Pete T. and I are brainstorming (Pete is brainstorming; I am thought stealing!) via e-mail. The easiest answer may be to see if Slater’s makes a wheel of the same diameter with a wider tread. Of course, then I am out $50 and maybe no closer to a solution. Meanwhile, I am going to keep puttering away with the kit as is. Maybe it works just fine with everything set and operating at design speed under its own power? Maybe there is just some rookie error I simply cannot see due to personal inexperience? If nothing else, I feel some need to get this thing to “stock” to make this a reasonably valid review!

Aloha,

Eric

Update:

I had some time to tinker today, building the battery holder and running this chassis back and forth a bit:

The kit comes with two shims that you mount to the chassis to raise the battery deck enough to clear the motor. As installing the battery per plan won’t work in the intended loco (LGB m2075 Battery)), I did not install the battery deck or even wire the DPDT at this time. To test my theory that getting the rods in place and running this under its own power might help it through LGB turnouts, I just jumped for the battery pack to the motor terminals. Observations follow:

  1. The instructions tell you to screw the crank pins in until they just peek out the backside of the wheel. This is an excellent tip. Tighten them much further, and the wheels will bind.
  2. The little thing runs fast! If you order this, order the speed controller. I will use the one I salvaged from the loco we will repower with this chassis.
  3. It cleared one frog consistently in both directions and another not at all. Our track floats on the gravel and the turnouts are old. Maybe it would be fine on a firmer roadbed.
  4. The crank pin on the starboard forward driver kept working itself loose after about 10-20 seconds. I got some thread “glue.” Maybe that’ll help.

Pete T. has suggested a way forward, but that will be beyond the scope of the review of this kit. I’ll fold that into the repowering project. I want to digest what I’ve learned through this kit before closing this review early this week.

Enjoy the rest of your weekends!

Eric

Just catching up with this odyssey now. Looks like you finally have things worked out and learned a lot along the way (https://www.largescalecentral.com/externals/tinymce/plugins/emoticons/img/smiley-cool.gif)

Jon, yes, there has been quite a bit of learning! I would’ve liked a bit more success, though! (http://largescalecentral.com/externals/tinymce/plugins/emoticons/img/smiley-tongue-out.gif)We’ll muddle through…

OK, it is time to finish this thread with my final assessment of this kit… I’ve never built railroad equipment from a kit before, so I am making my judgements from having torn apart and repaired my little iron horses and distant memories of 1:32 armor kits. With those qualifications I offer…

Bottom line: This is a reasonably priced, beautiful little kit with easy to follow instructions, high quality components, and good support. I did find that it did not consistently cross over LGB turnout frogs, but this could be a result of rookie mistakes, uneven or worn track, or my substitution of washers for the ones provided to serve as spacers to bring the wheels into gauge. Still, with turnouts properly aligned, I think this could work “as is” for its intended project if left in “fire and forget mode” happily turning loops through the garden. For those with larger railroad, I could see this chassis as a starting point for locomotives on isolated loops or point-to-point lines or, using its 32 mm gauge cousin, on a narrow gauge industrial or mining line.

Strengths: The instructions are foolproof. They are clearly written for novices like myself. They include a photo of every part with labels. They make assembling the kit a breeze. The best of instructions are no good with bad pieces. The plastic bits are sturdy stuff and required little cleaning. The brass is joy to behold after three years of dealing with shredded nylon gears! The kit is very forgiving, with lots of extra wire on the battery clip and motor leads and slightly larger than needed holes on the coupling rods. The material took paint well and, where holes needed a bit of widening, it took minimal effort with pin vise or file. Did I mention everything passed the Kid-zilla test? Yes, you could use this as an intro to railroading for younger modelers.

Quirks: Note I avoid saying “weaknesses.” As mentioned in the bottom line, the tracking issue could be unrelated to the kit. I mention the issue as an advisement, not a warning. The strangest thing were the washers I was supposed to “square.” The kit came with a tree of squared washers, so why not pack an extra couple trees? It also runs quite fast. The speed controller costs $5 extra. I meant to buy it, but loused up something with PayPal.

Would I buy this again? I am undecided. The Triple O is a turnout rich railroad. I like the visual, and I like the fact that we could, in fact, try operations. If I can resolve the tracking issue with little deviation from the stock kit, future purchases are a no-brainer. In fact, if I can resolve that issue with little deviation from stock, I would be tempted to try one of the loco kits (correct in theme if not in point of fact for our Hawaii-inspired line) for the shear joy of working with this manufacturer’s product. If, however, getting the chassis to work right on my railroad would require $40-$60 of purchases for a better wheel set, I would probably just buy a new STAINZ chassis as my starting point.

And that’s that! If I have a breakthough, I’ll reopen this thread. Otherwise, Pete T. has offered a way forward using a graciously donated wheel set, but, as that is a significant deviation from stock, I’ll cover that in “Rehab of the Missile Sponges Part the Second - Christmas Thomas

Eric

P.S. My computer is getting wonky… I may go silent for a couple days…
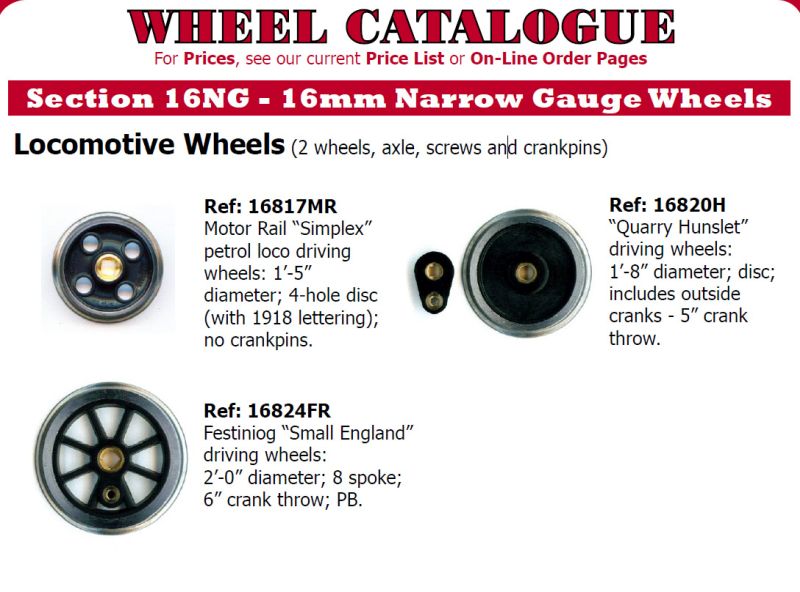
I asked my UK pals on GScaleCentral.net about this, and discovered that wheels designed for 16mm scale are 4 to 4.5mm wide. Eric confirmed his wheels were 40mm back-to-back before he started adding spacers. I was mentally wrestling with 2 issues.

  1. 4mm wide wheels on axles that are 40mm back-to-back means the total width over the wheels outside the treads is only 48mm. On 45mm gauge track, that is 1.5mm on each rail, and if one wheel is hard up against the rail head, then assuming the flange is 1mm (+/-) there will be 3mm on the rail at one side, and 1mm+40mm+4mm (flange+back-to-back+other wheel tread) from inside that rail to the other side of the other wheel, which is 45mm, so the other wheel isn’t even on the rail. As you see in the photo.
    So you can’t use 16mm standard wheels on 45mm gauge axles on 45mm gauge track.

  2. Adding spacers or washers is fine in theory, but in practice you are opening up the back-to-back and the wheels will pick the frog. As Eric discovered.

Addendum to my observations…

Kid-zilla and I decided to push and pull this chassis around the railroad using Diesel Dan. It bugged me that the chassis would derail on certain frogs and not others. Though actually taken at the end of our investigations, the video below shows the worst of them (though no derailment this time):

Video: Diesel Dan Helps Trouble Shoot the Chassis

The photos below show what we found using 0-5-0 power:

Note how high the after driver comes off the rail as the forward driver crosses the frog! Closer inspections showed considerable wear on the frog that my LGB / Bachmann / PIKO wheel sets can rattle and bump across:

The dark patch in the plastic is actually a groove worn into the frog. While less dramatic, the other problem spots were not dissimilar. All of the troublesome spots are older LGB turnouts that pivot about midway down the rails instead of at the frog itself.

Still, it bothered me that my stock LGB 2075, which has the same wheelbase, navigates these 1980-s vintage frogs just fine. As an experiment, I raided the dive locker for a 2# weight. The stock 2075 comes in at about 5#:

Video: Diesel Dan Helps see What a Dive Weight Does for Things

Still the bump, but this rig happily circled the Triple O for some time without intervention.

Not shown in all of this are my attempts to use Pete T.‘s donor wheel sets and the original LGB wheel set. I couldn’t get the drive gear to fit over the formers’ axels, so I abandoned the effort. I made a furtive start with the latter, replacing the ungeared Slater’s wheel set with the LGB one to test the theory that a larger wheel diameter might help it through the worn frogs. I stopped when I realized that I have to fit the drive gear over the LGB axel, and I had run out of time for further tinkering. Clearly, if the frogs were the issue, all of my equipment would be making short, accident ridden trips! If I remember, I’ll run this test with my handful of LGB cars that have those really small wheels to eliminate wheel diameter as a factor.

This was a lot of effort to effectively prove Pete’s mathematical assessment that "you can’t use 16mm standard wheels on 45mm gauge axles on 45mm gauge track" especially given the vagaries of an outdoor layout!

Have a great week!

Eric

Eric,

just caught up with this topic and you’ve hit the nail on the head with your latest observations - it’s the flange height which is causing your problem.

When a wheel crosses the frog the flange will run on the base of the V as shown by the wear mark in your pic, the smaller flange on your new wheels compared to the LGB flange allows the wheel to drop into the gap, unless you can find a wheel with deeper flanges that will fit your axles there isn’t much you can do to cure it.

You may find that when the chassis is in a loco with a bit of weight to stop it bouncing it will reduce the tendency to derail but it will still ‘drop’ into the frog. I suggest you carry on with putting the chassis into your loco and see how it turns out, it will probably turn out OK particularly once you have the speed controller fitted so it runs at a sensible speed.

A dab of JB Weld will fill the void in the frog. It will need replaced on occasion but will also help the problem (https://www.largescalecentral.com/externals/tinymce/plugins/emoticons/img/smiley-cool.gif)

David Marconi,FOGCH said:

A dab of JB Weld will fill the void in the frog. It will need replaced on occasion but will also help the problem (https://www.largescalecentral.com/externals/tinymce/plugins/emoticons/img/smiley-cool.gif)

Yes, that will help the semi-scale wheels with small flanges, but then the LGB wheels will bounce. As Allan says, the LGB wheels ride on the frog gap filler.

I discovered when making my own switches that you can’t win. You either set everything up for LGB-type coarse wheels, with a filler so the wheels ride smoothly over the frog, or you build to semi-scale standards where the wheel rolls from the point rail to the frog without dropping very much - like the prototype. Either way will stop the other type from working properly.

yes Pete I thought of that ergo the reason for having to replace once in a while. But seems to me the biggest issue in this instance is the derailing of the smaller flanged wheels for which the patch could relieve while the larger flanged wheels will ride on the flange. IMHO

as always YMMV

the derailing of the smaller flanged wheels for which the patch could relieve

David, I think not. The smaller wheels with a wider back-to-back will drop in to the frog gap, but also will hit the point of the frog, because the check rails are designed to support a 40mm back-to-back. Anything larger won’t go through without bumping on the frog and potentially derailing.

Eric might get away with it as he is only going one way around his layout, and thus the wheels are pressed outwards and the frogs are on the inner side? I am speculating, btw.