Large Scale Central

Request Opinion -- Smallbrook Studio Motor Block

Aloha,

2021 is fast upon us, and I am busy evaluating options and budgeting the casbh for the main push in 2021, the “Rehabilitation of the Missile Sponges,” the upgrading to near-model status of cheaper motive power we acquired to let the youngest visitors and crew interact with the Triple O. To that end:

  1. Has anyone tried / used the motor blocks from Smallbrook Studio (link)?
  2. Will they hold up to the elements, namely rain, high humidity, high temperatures, and proximity to the coast?
  3. Are they relatively rugged?
  4. Are they suitable for a loco to pull a string of LGB Fedlbahn-series / HLW mini- style cars? How about a single or a pair of “full size” 4-axle cars?
  5. Has anyone ever combined them with a Magnetic Critter Control (link)?

The possible intended purpose(s) include:

  1. New power for a battery powered LGB m2075 Christmas Thomas. This would be a “plantation loco” and, in season, our Christmas tree loco.
  2. New power for the EZ-TEC “prairie” Gordon. As mentioned elsewhere, intent is to make this think look like a 1:24-ish road engine. It would pull one or two coaches to emulate the pictures I’ve seen of real OR&L consists.
  3. New power for the B’mann railbus Charlie. Pete helped get this thing running, and then it “Bachmann-ed.” Again. Like everything else I own from them. This would involve relatively major surgery, replacing the drive axle with this motor block and enclosing the batteries in a cargo bin.

Thanks in advance for your thoughts,

Eric
Eric, the only way you will probably find out is to try one, they appear to be a robust solution, and the vendors product line is extensive list of what appears to be high quality kits of English lineage. you might try some of the forums across the pond to get more info, or try the 7/8 forums as well.

AL P.

Al,

Thanks very much for the other possible directions for research. Sometimes its knowing what questions to ask, and sometimes it is knowing where to ask the questions! I am tempted to just “take one for the team,” procure a motor block, and report back.

More to come…

Eric

Hi Eric,

Sorry to hear about the Railtruck. I have a couple of spare motors and I am actively waiting for a rear axle to arrive and some bevel gears so I can work out a fix for the cracked axle gear. I get the motors from Bachmann - SD45 HO scale appears to use the same one! Let me know if you want to try it.

Not sure you can put an 0-4-0 in place of the single axle. It will probably need a pivot, like the one I made with helical gears. I do have an NENG railtruck with a worm geared axle from NWSL - it could also be a solution to the Bachmann Railtruck problems.
https://www.largescalecentral.com/forums/topic/30894/another-lame-duck-neng-railtruck

Re: your other questions.

I see no problem with the Smallbrook chassis. Slaters wheels are good, and it has a brass gear. Shipping from the UK has got very expensive though. And I don’t think any chassis will hold up to your elements if you leave it out in the sun and rain!

However, another option might be a Bachmann Lil’ Big Hauler engine chassis? You can probably get one very cheap in used condition. Either chassis should be able to pull a couple of small cars.

Aloha, Pete!

Thanks. At Al’s suggestion, I did a bit of research on Smallbrook. They seem to have an enthusiastic following in the UK. I wrote the company directly to see which, if any, of my planned projects would be a good match for the the motor block. I am still awaiting an answer. If they think it’ll pull, I think this little motor block will be a perfect way to give new life to Christmas Thomas (the dying battery powered LGB m2075) and to possibly experiment with that Critter Control.

Charlie the railtruck has become my 1:20 scale rolling Moby Dick. All the other projects are “for fun.” This one is personal. It’s ongoing defiance precipitated and then accelerated Oldest Son’s drift away from the hobby. Had we bought the HLW truck for a few bucks more, he might still be enthusiastic about the hobby. Water under the bridge, but seeing Charlie dormant on the shelf again gets my blood boiling…

Emotionalism aside, I have reservations about B’mann products as a solution. In addition to Charlie, we have their 2-4-2 that bucks and whines, a re-chassis-ed Big Hauler that blew its factory solder joints (at least this was repairable!) and busted the vermicelli-thin and apparently vermicelli-brittle wiring to the leading truck, and an Egg Hauler awaiting the inevitable result of similar high quality components and quality controls. Maybe he climate and B’mann just don’t get along or I am under kapu (jinx). Whatever reason, be it material, climatological, or metaphysical, I am really exploring other options for this one. To that end, what would you think about using this little motorblock in a trailer that pushed Charlie along?

Eric

I think this little motor block will be a perfect way to give new life to Christmas Thomas (the dying battery powered LGB m2075)

I agree. As far as pulling is concerned, it only works off 3-8V and the photo shows a mere 3x1.5V batteries. I’d probably go to 6V as the r/c gear will probably need that too.

Be aware that other countries, especially those in the middle of serious lockdown (e.g. UK,) are unlikely to answer business emails in the week after Christmas. I’ve had several email conversations with Michael Rayner, the owner, when I did the Emily coach conversion.

I am really exploring other options for this one. To that end, what would you think about using this little motorblock in a trailer that pushed Charlie along?

Not a big fan of pushing, but it will probably work.

What has failed in the Railtruck this time? (Feel free to email me instead of consuming this thread!) Is it the motor, pickups, or the back axle gears? New, (not-Bachmann,) components are readily available to fix it. I’m working on bevel gears for the axle, and the motor in my NENG railtruck will probably fit.

Pete,

Thanks. I hadn’t factored in the lock-down and the fact the UK hold to the “Twelve Days of Christmas.” I’ll engage the company later if I don’t hear back.

As for the railtruck, I’ll kick the discussion to e-mail to keep this thread clean.

Eric

Update:

After an e-mail exchange with the proprietor, Michael Rayner, I ordered Smallbrook’s “G-scale” motor block to repower our LGB m2075 Christmas Thomas and convert “him” to M&K Sugar Co. #15, Komaka Kalikmaka. Mr. Rayner, I should add, was very patient with my questions, prompt with his answers, offered a few suggestions, noted possible limitations, and alerted me when the block was on the way. His customer service made me even more anxious to see what we could do with his motor block!

But first the Mik!

I’ll post photos of the kit in this thread after the kit arrives, then continue the review when we get into the repower project.

Aloha,

Eric

Looking forward to a review. I would say that pre-sale customer service is the most important customer service experience you can have, followed closely by “Im having an issue” support.

Update:

Guess what arrived today? Well packaged, all the way from the United Kingdom, one 45mm battery powered motor block, shown next to Christmas Thomas, its ultimate intended use:

The bubble wrap was such that there was no way anything shook around in this box. Kid-zilla, serving as inspector today, requested help pulling it from the box.

The box contained a lot of bits and parts. Please note, as this review goes forward, I’ll be comparing / contrasting with the LGB, Bachmann, and PIKO in our collection. I’ve never owned anything like this, so bear with me!

The gears are brass…beautiful, beautiful brass. The axles are metal, which will preclude operations when track-powered locos are on the loop if they are not insulated. The motor is much heftier than the toy motor with which LGB saddled its customers in these poor m2075 battery variants.

Note the wires are thick, and the motor tabs long. Soldering is not my forte. This was a pleasant surprise!

The chassis and its extension are substantial…

…and they look like they were intended for this project!

The connecting and drive rods are of the same stuff. Everything else is metal.

We took a wheel and ran it over an LGB frog. Smooth as glass. They are a bit smaller than what they will replace, but my care level is about zero:

The kit includes four pages of instructions that include tips on gluing and painting. I, for one, need both!

The cost was ~$120, including shipping, and, as I already mentioned, customer service was superb. LSC members might remember my last m2075 rehab project (Challenge Accepted - Large Scale Fantasy Locomotive) used a second-hand STAINZ motor block. By the time I got the block, the motor, a new set of gears, I was probably in for about the same. That motor block also had electrical continuity issues and likes to eat its gears. Because of that, I weighed buying a new STAINZ chassis, which would be ~$220. That would have added details like reversing gear and rivets, but, for this project, those sorts of details are in excess of need.

I have a project that precedes this in precedence. When that is done, or done-ish, I will assemble, paint, and test this motor block prior to installing it in Christmas Thomas to complete this review.

I have been hanging around this site long enough to know that reliable, affordable engine blocks are in high demand for folks’ projects. Hopefully, my investment will bring the crew’s special loco back to life and offer others an option for their own projects!

Aloha,

Eric

The axles are metal, which will preclude operations when track-powered locos are on the loop if they are not insulated.

I think you will find that the glass-filled nylon spokes are all the insulation you need. I really like those Slaters wheels.

I finally got to start assembling this chassis. I followed the instructions verbatim, having never worked with this material or a mechanical model before. I did refer to the parts diagram often, as “front” and “rear” were not obvious to me. The instructions lay out each piece on a grid and label them. Easy!

First, you have to remove the flashing (photo by Kid-zilla):

There really isn’t a lot, for either 1:1 or 1:24 personnel. What there was came off easily with the X-acto knife.

Next up, it says to drill small holes into the fore and aft extensions. The fore extension had an easily located dimple. The aft extension had a dimple, but right on the edge of the piece. You can see it on the piece our foreman is holding:

I eyeballed a spot midway down the plate and drilled away. I used a pinvise to drill, fearing the Dremel would melt the plastic.

After checking, double checking, and triple checking, i lightly sanded the future joints and applied Loc-Tite (the recommend glue) to stick this all together. I tried to use the recommended glue drop in a loop of wire using capillary action to draw in the glue method. No joy. I used the lightly squeeze and let it run method. Joy!

It then advises you to ream out the axel holes. The 1:24 gang and I easily handled this:

A very small amount of material came out of each axel hole. This was going great! It was off to the paint shops for a coat of flat black primer on the future exposed surfaces.

After the paint dried, the wheels and axles went it very easily. Quartering is almost fool proof, and, again, the instructions are superb. I still had to put on the port side drivers two or three times…(http://largescalecentral.com/externals/tinymce/plugins/emoticons/img/smiley-frown.gif) At least the crew and I had no problem getting the gear on:

Wow! I tested the wheels, and everything spun wonderfully. This was going so well, the 1:24 gang and placed this on the tracks and tried to roll it along the yard. Diesel Dan was on standby to push it around the Triple O:

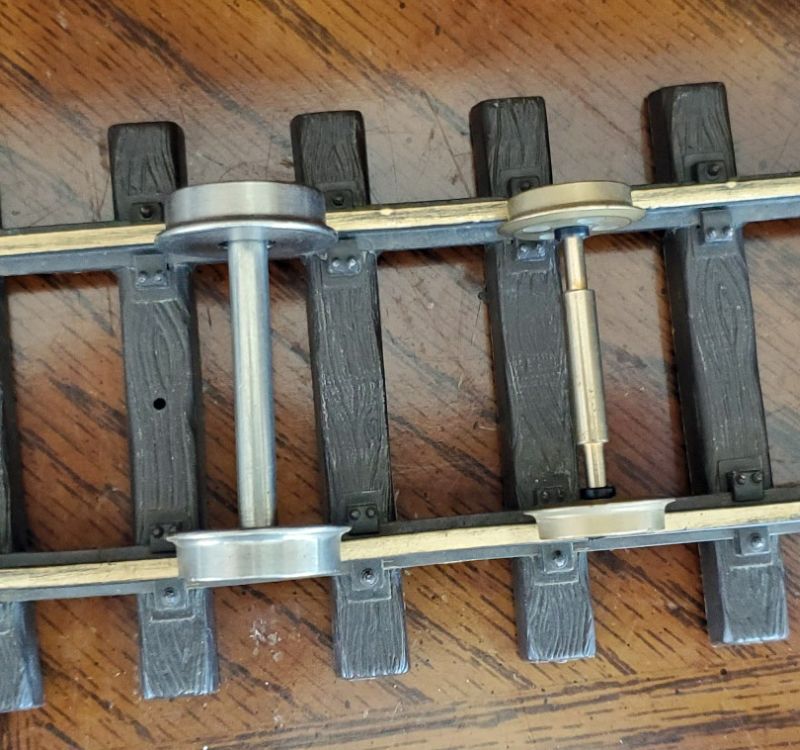
Anybody else notice anything wrong, here? Somehow, this whole thing is not in gauge! Top shot follows:

Basically, it is one rail width too narrow! I am not sure what I did wrong here. Maybe I ordered the wrong wheel set? This whole kit is so well put together, my suspicion is “builder error.” I’ll contact Smallbrook and see what to do next, unless someone sees an obvious error and easy solution first.

Eric

Basically, it is one rail width too narrow! I am not sure what I did wrong here. Maybe I ordered the wrong wheel set?

Eric, as far as I know, there are only 2 Slaters axles sizes: 32mm gauge and 45mm gauge. Check the back-to-back measurement - 32mm gauge wheels should be 28mm apart.
https://www.16mm.org.uk/resources/wheel-standards/

Yours don’t look that close but I can’t think of anything else. They don’t have washers or other spacers.

Pete,

Thanks for the reference. Flange-to-flange is 40 mm, so that is correct. If I place it on the track very carefully, it will just barely perch between the rails. The slightest bump, however, sends this thing down on the ties. I tested this around the garden, so we can assume this is not multiple, localized gauge issues that only impact this chassis. Are the wheels themselves too thin?

I wrote the company. Maybe I missed something obvious. In the meantime I will chant incantations of healing over that B’mann railtruck.

Eric

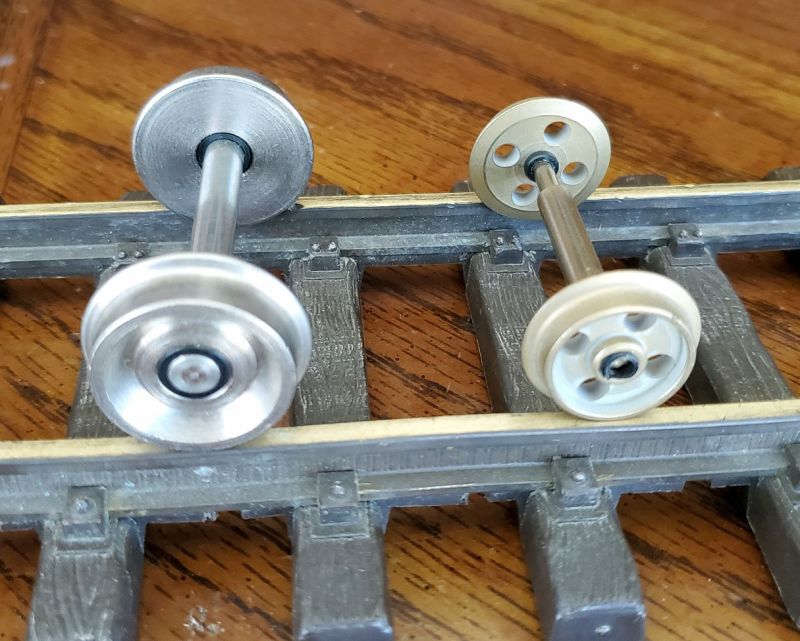
P.S. For an addition point of reference, here is the motorblock sitting next to an LGB wheel set:

I pushed all wheel against the rail on “top” in this picture. You can see the LGB wheels are much thicker, which keeps the wheels set on the rails. I am wondering if I ordered the wrong wheels.

Eric

can you just move the wheels outboard a bit on each side to give more a wider stance?

Pete Lassen said:

can you just move the wheels outboard a bit on each side to give more a wider stance?

Pete, that would alter the back-to-back so the check rails on the switches wouldn’t work properly. They would probably derail on the frog.

Eric, Slaters makes lots of different wheels in different sizes. Those look like fine scale wheels, maybe 1/32nd. My large ones are 7mm wide at the tread, about the same as the LGB wheels (pic attached.)

OK, based on the exchange above, I am pretty sure I ordered this kit with the wrong wheels…The “7 mm wide” reference was the clue. The kit comes with either “Slater’s 16mm scale 32mm diameter wheels” or “7mm fine scale 4ft 10 spoke.” I checked my invoice and selected the “corse” wheel set. My wheels have 8 spokes and are 4 mm wide. I didn’t associate “7mm” with tread width when I made the order; rather, I associated “fine” with “fine scale” and “fine scale” with references to “shallow flanges and extra derailments.” Sometimes, you need to know you need to ask a question…

I am waiting to hear from Smallbrook. If I don’t hear from them, Pete T., I’ll take your suggestion and write Slater directly.

Eric

I didn’t associate “7mm” with tread width

And you were right not to do so. The 7mm refers to 7mm:ft scale, in other words, O-scale (1/48th to you, 1/43rd to the UK guys.) You got a set of O scale 4ft (prototype) wheels so they should be 28mm diameter (over the treads, not flanges.) O scale coarse is still a lot finer than G scale coarse.

It just happens that a few months ago I was looking for some small pilot wheels, and I bought some F scale (1:20.3) and some O scale wheels from Gary Raymond.

I think they are both technically finer scale than LGB, but you get the idea.

This still begs the question of how you got 8 spokes instead of 10, and no counterweights!

The 16mm scale (16mm:ft) 32mm diameter would be larger and wider. But you would have to tell Slaters you already have 45mm axles. Looking at your original photo, the 32mm diameter wheels might be much closer to the old plastic ones?

It is possible that wheel is the 16mm scale 16824FR 2’ wheel after all. We won’t know until you ask them.

Pete T.,

No word from Smallbrook. I took your advice and wrote Slaters. Also, correcting what I posted yesterday, the kit comes with:

Slater’s 16mm scale 32mm diameter wheels with 40mm back to back axles, powerful 3-8v motor, brass worm and wheel drive, tough resin vacuum cast side rods, supplied with 8ba crank pins for the side rods supplied and the original Slater’s crank pins for your own side rods and includes dpdt forward, reverse with centre off switch. The kit is complete with all screws, wires and parts required and comes with good clear instructions. Glue, paint and batteries are not supplied.

Also available with 10mm scale 3ft 9 spoke wheels at no extra cost.

I am almost certain I ordered the wrong wheels. Again, this comes down to me not knowing when to ask a question.

Eric