Large Scale Central

Moving On To The Lowwer Yard

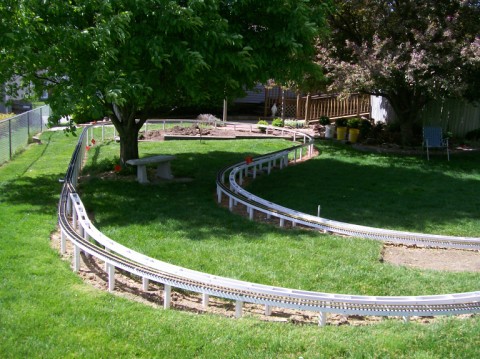
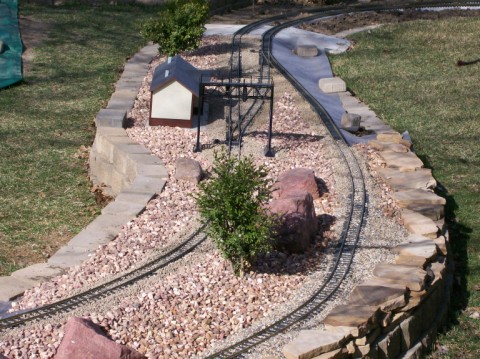
I have not given up on the yard, just postponed it until I really decide what to do with it and I am tired of constructing, destructing and starting all over again. What I have done here is exactly what I envisioned I would want in a garden Rail Road, but I was distracted by the 1:20.3 movement which is ok and I am purchasing in that direction. I decided to go back to my original plan of 3 years ago and use it. so the following photos are about 90’ of roadbed and track. I made it level within ±.2% all the way around to our pond which I will landscape up to the roadbed. I have a 20’ circle (62.83’) of track and roadbed to complete the loop. Then I can sit back and watch em run. This gives me a base to expand from. I used the PVC and Trex ladder method as others have used here, after visiting Bruce Chandler and seeing his work I was sold on this method of construction, Here are some pictures. This is my original loop where I Installed a y to venture across the yard.

Next will be looking East back twards the Y

Next looking west

and one more.

By the way, I staked the ladder every 24" with 1"PVC pipe which is not enough if elevated, I’ll go back and install another 1’ PVC at 12"

I started using the 1" PVC (Sched. 40) when I did my expansion. Seems to work better than a square stake. Then again, mines only a couple inches off the ground.

(http://i253.photobucket.com/albums/hh58/rgseng/expansion/expand001.jpg)

Looks great, John. I like those graceful curves. (You too, Ken)

Looking good although I noticed that brown park sign in the back ground. Strange our sign went missing for the Big Bald Rock trail. Wonder where it went. Just Joking :slight_smile:

John,

Very nicely done.

Guys,

The photos don’t do John’s work justice. It is really nice.

Looks good John,
I spaced my supports every 2’ however I have spacers every 6"

Shawn said:
Looking good although I noticed that brown park sign in the back ground. Strange our sign went missing for the Big Bald Rock trail. Wonder where it went. Just Joking :-)
Sorry that sign is a mistake for a new construction project, nice try though

JN

Mario McCarthy said:
John,

Very nicely done.

Guys,

The photos don’t do John’s work justice. It is really nice.


Thanks Mario, you are a real gentleman

Thanks Bruce and everyone else for the compliments.

BTW, I think I read it some ware but found out the hard way, if you taper the end of a stake and drive it in the ground it will go in angled towards the taper, but if you cut it square it will go in straight. I guess that is why they put a point on survey stakes.

JN

John Neal said:
Thanks Bruce and everyone else for the compliments.

BTW, I think I read it some ware but found out the hard way, if you taper the end of a stake and drive it in the ground it will go in angled towards the taper, but if you cut it square it will go in straight. I guess that is why they put a point on survey stakes.

JN


Actually John if you taper the end or make a point on it the first frost heave it will shove it right out of the ground. With the stakes in flat the tend to float however the do move up and down.

David Russell said:
John Neal said:
Thanks Bruce and everyone else for the compliments.

BTW, I think I read it some ware but found out the hard way, if you taper the end of a stake and drive it in the ground it will go in angled towards the taper, but if you cut it square it will go in straight. I guess that is why they put a point on survey stakes.

JN


Actually John if you taper the end or make a point on it the first frost heave it will shove it right out of the ground. With the stakes in flat the tend to float however the do move up and down.

Thanks for the info, but with all the problems in The peoples Republic, one thing we don’t have in the Sacramento valley is frost heave. :slight_smile:

John Neal said:
David Russell said:
John Neal said:
Thanks Bruce and everyone else for the compliments.

BTW, I think I read it some ware but found out the hard way, if you taper the end of a stake and drive it in the ground it will go in angled towards the taper, but if you cut it square it will go in straight. I guess that is why they put a point on survey stakes.

JN


Actually John if you taper the end or make a point on it the first frost heave it will shove it right out of the ground. With the stakes in flat the tend to float however the do move up and down.

Thanks for the info, but with all the problems in The peoples Republic, one thing we don’t have in the Sacramento valley is frost heave. :slight_smile:

Well I thought of that but wasn’t sure what part of California you were in?

Been very happy with the ladder, I went with pvc 1x2, and 1 1/2" pvc pipe. The ladder has spacers every foot and the pipe is every two feet apart.

(http://www.trainboard.com/railimages/data/500/Eastcurve11_Medium_Web_view.jpg)

Shore looks nice Don!

Jerry, Here is one of the after photos,

(http://www.trainboard.com/railimages/data/500/Ballast21_2_Medium_Web_view.jpg)

I had hopes of completing the initial project this weekend by completing the loop around the pond, But the property owner has other plans and informed the crew that the pond has to be re-built before completing the right of way. Just what I wanted to do! so here are a couple of construction photos.

(http://www.lscdata.com/users/johnn/Pond.jpg)

(http://www.lscdata.com/users/johnn/pond2.jpg)

(http://www.lscdata.com/users/johnn/pond3.jpg)

Todays progress, was as mentioned above stopped short of completion due to the pond rehab which is real ugly at this point, but I did get some more track down as shown in the pictures to follow.

(http://www.lscdata.com/users/johnn/trackon.jpg)

The track today was laid was not weathered I will weather the track in place thinking it will look better.

(http://www.lscdata.com/users/johnn/trackon2.jpg)

in this picture you can see the Switchcrafters #6 switch for the reversing loop.

(http://www.lscdata.com/users/johnn/trackon4.jpg)

I have made it automatic, method recommended by Dave Goodson at the the little v spring thingy doesn’t want to work on the switchcrafters switch.

(http://www.lscdata.com/users/johnn/autosw.jpg)

Ain’t it great when a plan comes together. Nice work!

Looks great John. Do you weather the track with spray paint or brush?

I’m a spray paint guy (see http://www.cvsry.com/car_%26_loco_mods.htm for details). I tried the weather-in-place once because track was already down, but now I paint before laying track. It’s not perfect because ties can shift, but it sure beats masking at ground level.

I’m going to follow your lead and paint the ladder before it goes ion the ground too.

And can we have more details on Dave’s spring switch idea? I was going to try the ride-on railway method with a stud off the end of the throw-bar with a coil spring, but that wire idea looks cleaner. Can it keep heavy locos from splitting the switch?

Jon Radder said:
Looks great John. Do you weather the track with spray paint or brush?

I’m a spray paint guy (see http://www.cvsry.com/car_%26_loco_mods.htm for details). I tried the weather-in-place once because track was already down, but now I paint before laying track. It’s not perfect because ties can shift, but it sure beats masking at ground level.

I’m going to follow your lead and paint the ladder before it goes ion the ground too.

And can we have more details on Dave’s spring switch idea? I was going to try the ride-on railway method with a stud off the end of the throw-bar with a coil spring, but that wire idea looks cleaner. Can it keep heavy locos from splitting the switch?


The previous track was weathered and then installed, it was hard to bend and when the ties shift it left bare spots, I use spray paint and as far as masking, I don’t, just paint and I use Acetone and wipe the rails quick and clean. I am planning on making a moveable mask for painting on ground level.

As far as the switch goes I don’t think anything will split the switch, but we will see and that will be after the wife finishes the pond.

JN