Large Scale Central

Mik 2019: McGillicuddy's Building Supply - Jon R.

Yea pricey,

Last time I checked it about 7-8 years ago it was about 300$ per sheet plus shipping. If I remember it would have been cheaper to drive to Sacramento and back to get it (300 plus miles) than to pay the shipping. Used Blue foam building insulation instead(https://www.largescalecentral.com/externals/tinymce/plugins/emoticons/img/smiley-foot-in-mouth.gif)(https://www.largescalecentral.com/externals/tinymce/plugins/emoticons/img/smiley-laughing.gif)

Jon Radder said: That is the battle raging in my head at the moment!

This is good !

Jon and Rick,

Thanks. I’ll look for the pink and blue stuff!

Eric

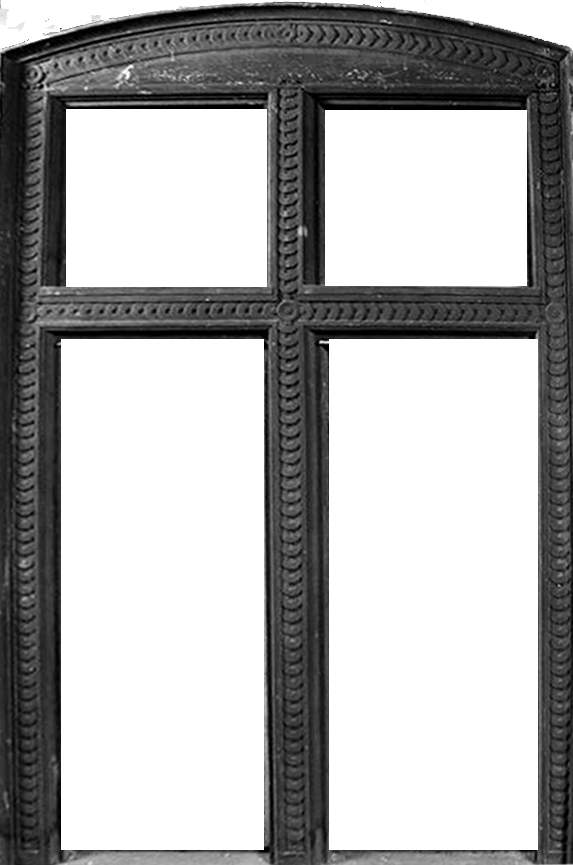
I’m getting hung up on windows. Many of these early industrial buildings had their original windows replaced with plate glass and extruded aluminum frames. Thast was the case with my inspiration building. I’ve not been able to find a good picture with original windows. This one just doesn’t have enough detail for my idea…

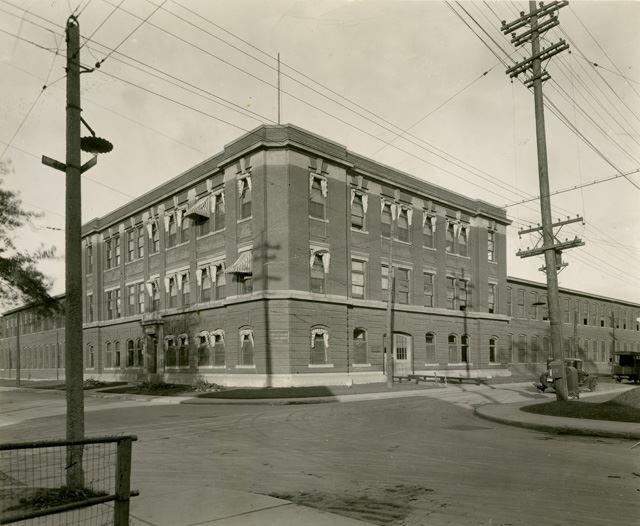
What I WANT to do, is find an interesting photo of an early window style and size it to fit my openings; print the photo in black & white on vinyl, cutting away the panes, then mounting that on clear acrylic. This will allow a view through what once was to a black & white interior shot mounted an inch or two behind the window. Looking through the ghost window frame to the ghost interior.

Finding window pictures is the easy part. Recapturing my Photoshop skills to to square up photos that have been lost to time is a challenge I have not yet conquered. No worries; shop the Used Window market on the interwebs. They have plenty of straight on shots. Problem is the finding the right arch shape for the arch top windows. I tried modifying the drawing to match what I can find, but it just doesn’t look right, so I abandoned that idea.

I guess I’ll be spending part of the day today re-learning Photoshop transformation tools. I recall that there was a built-in function for this purpose and can even visualize the tutorial, but can’t seem to find it either. Maybe I should install the tutorial disk and browse around.

Jon, I like what you are trying to do with the windows. Keep plugging away at it, you’ll find a way to get what you want. In the meantime, I’ll be sitting over here in the corner with my cup of coffee patiently waiting and providing that much needed moral support (https://www.largescalecentral.com/externals/tinymce/plugins/emoticons/img/smiley-wink.gif). Looking forward to the final product.

Are you going to add the canvas awnings ?(https://www.largescalecentral.com/externals/tinymce/plugins/emoticons/img/smiley-cool.gif)

@ Jon Photoshop commands to correct images .

Open photo > Crop to leave extra around subject.

With image open on screen.

[Command - A] Selects all the image

Do these steps Under the EDIT pop down select: [EDIT] > [ TRANSFORM] > [ DISTORT ] Grab the corner box and move to correct the image.

Hope this helps.

Spent the morning re-learning Photoshop. I think this one will work (https://www.largescalecentral.com/externals/tinymce/plugins/emoticons/img/smiley-cool.gif)

My goal is to have a completed drawing in time to print at work on Monday. Then I can actually start carving on the real thing.

David Marconi,FOGCH said:

Are you going to add the canvas awnings ?(https://www.largescalecentral.com/externals/tinymce/plugins/emoticons/img/smiley-cool.gif)

No - they didn’t survive into the modern era!

Dave Taylor said:

@ Jon Photoshop commands to correct images .

Open photo > Crop to leave extra around subject.

With image open on screen.

[Command - A] Selects all the image

Do these steps Under the EDIT pop down select: [EDIT] > [ TRANSFORM] > [ DISTORT ] Grab the corner box and move to correct the image.

Hope this helps.

It would have helped if I had checked back here first! In the crop tool there is a checkbox for Perspective. That automatically does most of the corrections. You can then use Transform to tweak it. I’m not good enough yet to do it with Transform alone.

OK - It’s time for the Architectural Review Board to submit comments. Other than the main door, which I’m not crazy about, this is the final drawing…

I also did another full size mock up as a final check of size and fit. Thought I’d get an idea of the interior simulation while I was at it. These aren’t the final photos or the final lighting; just proving ideas and noticing what will need to be done to achieve what is in my head. Getting close to what I had envisioned…

Dude,

That is so cool.

Well done … well done … (https://www.largescalecentral.com/externals/tinymce/plugins/emoticons/img/smiley-laughing.gif)

Ditto…what they said.

Double Ditto… (http://www.largescalecentral.com/externals/tinymce/plugins/emoticons/img/smiley-cool.gif)

Jon, I am loving what you are doing with the photos in the windows. That is just way cool. Now the cherry on top would be a picture of Sean as a kid with his nose pressed up against a window watching the trains go by (https://www.largescalecentral.com/externals/tinymce/plugins/emoticons/img/smiley-surprised.gif)Really enjoying watching you put this together.

Thanks all. Photos in the window is an idea I borrowed from Bruce Chandler.

Now that I know how I want this to look, I need to work on some more framing to hold it forward off the wall to give some space to view the photos at an angle through the windows. While I am at it I may add the first few feet of bench work at the level of the flat board in the mock-up photo. I cant do any cutting until Monday night after I have the drawing printed on vinyl as my cut pattern.

if you can, (spacewise) it might be a good idea, to give the whole thing some depth.

where i used inserted pics or drawings in windows, i put them one inch behind the window openings.

that gave me enough space, to cover the backside of the wall with alu foil and hang a bulb or two to lighten up the pics.

Jon Radder said: Getting close to what I had envisioned…

That’s a good feeling when a project starts shaping up. (https://largescalecentral.com/externals/tinymce/plugins/emoticons/img/smiley-smile.gif)

In the words of John “Hannibal” Smith, “I love it when a plan comes together.”