Large Scale Central

MBTA 1011 (F40PH)

Hi folks,

My latest project has arrived…a 3D printed F40PH by Mark Dashnaw!

Here’s a prototype picture of MBTA 1011.

http://photos.nerail.org/showpic/?2014083119580421991.jpg:bysearch:1011:SEARCHTYPE=SIMPLE&PAGE=1&BOOL=ALL&SEARCHSTRING=1011

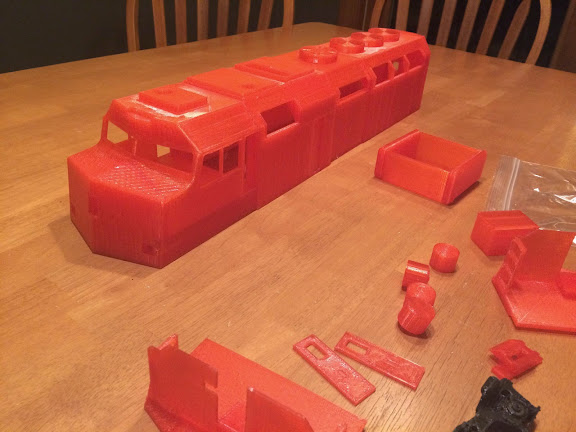
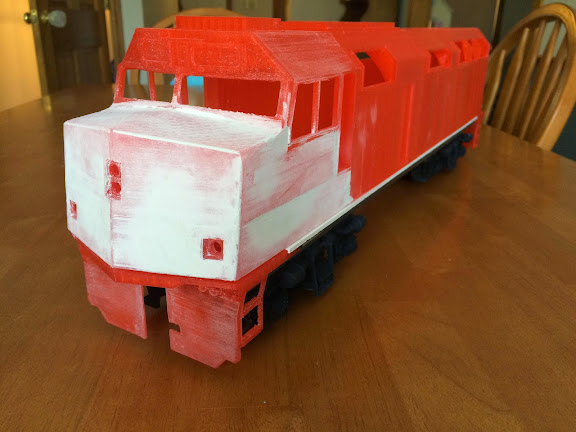
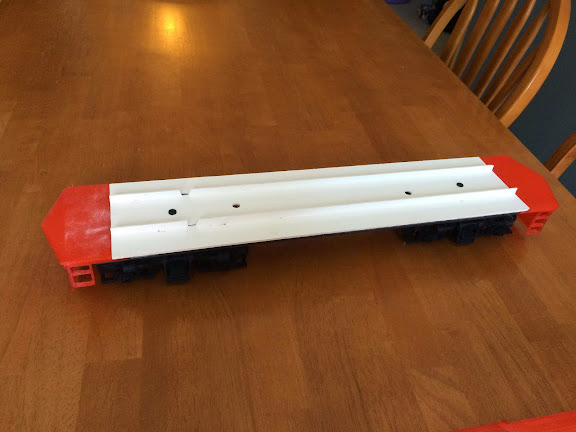
Above is the model before filling and sanding has begun. I’m going to be trying both the smooth-on self leveling epoxy and traditional Bondo methods. I’ve begun bondo work on the fuel tank, and it has gone well. I chose MBTA 1011 because it reminds me of binary code, and oddly enough it translates to 11 in base 10, which I thought was kind of neat. Plus it was computer generated!

The runner up was locomotive #1004…you’ve got to love a number like that in a radio controlled environment. (Ten-Four, 10-04)…(roger, Roger)…what?

As of today, I can report that the 1004 (which looks horrible) soldiers on through the winter, whilst her sister 1011 recently made her way into the scrap line still looking quite presentable. All 18 of the original F40PH locomotives on the T are set to be replaced this winter.

I don’t know which MBTA locomotive passes by my shop in Cranston RI everyday but it is in pretty sad shape, would like too see a shiny new one rolling by!

Hi Vincent,

You’re probably seeing the F40PH2Cs and GP40MCs down your way. The old F40PHs are most likely kept to the northside because of reliability issues and cab signal technology? …

I’m not sure if many of the new HSPs have made it on the south side yet, as they go through their review testing on the north.

Rockwall Canyon Jeff said:

Hi Vincent,

You’re probably seeing the F40PH2Cs and GP40MCs down your way. The old F40PHs are most likely kept to the northside because of reliability issues and cab signal technology? …

I’m not sure if many of the new HSPs have made it on the south side yet, as they go through their review testing on the north.

For more information on the HSP-46s than you could ever want:

http://www.railroad.net/forums/viewtopic.php?f=65&t=51137

Cool keep us posted on the build Jeff

Okay, time for an update! I have the whole car body glued together…its quite a solid rig now! After adding USAT trucks to the underside, i felt that the frame looked a bit thin, and the space between the trucks and floor needed something inbetween. I found some steel angle iron in the basement and milled off the ends to make them fit the sill plates Mark printed. As you can see ive done a bit of plastic filling on the nose, but theres still a lot to do. Im going to try my luck with the self leveling epoxy when i feel up to it!

Looking good. Like the look of that loco. Later RJD

I’m watching this with great interest. Looks good from here!!

Jeff,

It’s been a while…how is this project progressing?

Yeah anyhow Brian!

Thanks for digging this back up!!

Hi Brian,

Thanks for bringing up the F40 again…I could use a little kick to get started every now and then. Hopefully this weekend I will be able to get a layer of self-leveling epoxy over the remaining rough surfaces. After that, its off to the sanding booth and then a coat of primer to see how I did. Aside from the body work, I’ve already found an appropriate pilot, bell, and horn for the engine.

I’m interested in your report on the self leveling epoxy. I’ve been turned off by the current 3D print technology due to the rough surface. If the epoxy proves reasonable to apply and works well it would be a game changer for me. Not that I need more to work on.

Jon,

Whether or not the self- leveling epoxy works well, I’m still sold on 3d printing. Sargent’s plastic filler (bondo) works very well! If I hadn’t already bought the epoxy, I would have keep going with the bondo…and probably painted already!. I ended up buying a mini reciprocating sanding tool with interchangeable heads to get into all the square corners.

Anymore get built on this engine yet Jeff?

Anymore get built on this engine yet Jeff?

Hi Joe,

Thanks for the “nudge” to get going on this project again! I’ve had two factors which have slowed progress…namely good weather for garden railway construction and a large custom paint project I took on for a friend.

I decided today (since it is raining) I would take on some work on the F40PH. I’ve been holding off on using the XTC3 self leveling epoxy out of fear that the vapors would be too intense to use in my basement workshop. This is not the case, however. I think the dust generated from sanding bondo is probably more harmful than the fumes involved in this product.

Mixing was very simple. I measured out the components by weight using a electronic kitchen scale. The product applied nicely with few runs. I will have to do several applications since the locomotive has many angles. Given this is a self-leveling epoxy, it is my assumption that the application should best be applied only to surfaces facing upward. In two hours (when the first coat dries) I will apply a second application on one of the sides of the car body. I’ll take some pictures along the way, but I have a feeling the revelation of its success will only be seen once the shell is primed.

I can’t wait to see and hear how it came out.

Also if you like it better than Bondo?

Hi Sean,

I don’t have it perfected yet, but its definitely much better than using bondo! There may still be some situations where bondo has a place though, such as large gaps or holes.

I finished up the fuel tank and primed it up with Krylon Gray Primer…worked great! I had a few little surface flatness issues, but im sure the 1:1 model has a few of them too.

Incidentally, MBTA 1011 has been dragged up to the old B&M shops in North Billerica, MA with a string of her classmates for storage (or graffiti, or dismemberment…)

http://photos.nerail.org/showpic/?photo=2015062317531625042.jpg&order=bydate&page=2&key=

The epoxy goes on quite smoothly. The exception is in areas where I used squadron puddy. For some reason the epoxy bubbled a bit in those locations. This was very easily sanded out, and in some cases a second coat of epoxy cleared up the problems. The pictures don’t really dont really do the product much justice…

I have a few more details to sand out and fill, and then its off to be primed.

I am gonna love the day when we can 3d print a whole engine and not have all the work required to clean up the molding. I do not think we will have to wait to long for that to happen, probably a couple years at the most. Looking good so far! Mike