Sean , you said
“Is that the same as a water letter outer ?”
Have you left something off , because I am at a loss as to what you mean ?.
Mike
Sean , you said
“Is that the same as a water letter outer ?”
Have you left something off , because I am at a loss as to what you mean ?.
Mike
Mike Morgan said:
Sean , you said
“Is that the same as a water letter outer ?”
Have you left something off , because I am at a loss as to what you mean ?.
Mike
Drain, spigot, faucet, etc…
Ah , thanks Ken , silly of me .
Mike
Greg - Thanks for the confirmation/compliment. Those were for the most part my thoughts. After all, it is just a hobby…
Mike Morgan said:
Sean , you said
“Is that the same as a water letter outer ?”
Have you left something off , because I am at a loss as to what you mean ?.
Mike
I was referencing the Three stooges (video https://www.youtube.com/watch?v=Syuq9Mjvwe8#t=311) were they had water in the boat and Curly was drilling holes in the bottom of the boat , and Moe asks what are you doing , Curly says “making water letter outers”
Sorry Sean , the link wasn’t there .
I was hoping there was something to laugh at , thanks for trying . I can imagine the scene you mention , they were clever blokes , the Three Stooges .
Mike
Aha ,
and Ha ha .
Got it this time .
They were good fun to watch , just the same as when I was a kid in WW2 going to the “Penny Dreadfuls” every Saturday morning .
Great times , thanks for the reminder , and thanks Mark and Sean .
Mike
Like a ‘water otter’ is used to heat water.
tac
tac , you get worse . Knowing your expertise , you’ll be saying next you can’t get much beer out of a gun barrel . Unless it’s Anzio Annie
Mike
Well, I finally made all the final connections, pulled out a couple 2 footers and the rollers. Set the loco up on the rollers and propped the tender up on a couple 2x4 blocks on a section of track. Made the loco/tender connections, plugged in the battery and threw the power switch to battery. VOILA! I have sound! The usual ‘boot up’ sounds - compressor, steam, a couple shovels of coal. Made sure the TX and RX were on the same frequency, assigned an engine number and … no speed control. Asthe speed increases the sound card increases chuff rate, not the way I intended it. No speed control on the loco either. GRRRR. Checked the ‘motor outputs’ on the RX and there is no voltage out. The green indicator light on the TX is light and according to the manual that indicates the TX is functioning. I think I am missing something in the programming, and am too tired and frustrated to continue tonight Will dig again tomorrow. At least as far as I can tell, the magic smoke is still contained.
After reading again, re-reading and then reading again, I finally found my error. In the G2 decoder manual it states (2 connections) Motor ‘A’ and (2 connections) Motor ‘B’ which I interpreted to be Motor 'A" plus and minus, and Motor ‘B’ plus and minus. NOT SO! Burried inthe small print it states one from Motor ‘A’ and one from Motor ‘B’. Once I got that straight, VOILA, she runs as it should.
Now that I can see it run, it seems I still have a chuff signal issue, but that is for another day. The chuff timing is about 1/4 axle rotation fast, and for now I can live with it. I will get with one of the electronics wizards to work that ou.
Someone asked for video. Next club meeting in two weeks. If my camera cooperates (don’t have a video camera), I will get some video. And between now and then I need to change out some truck springs on an AMS tank car that does not like to play well on the club layout. Cliff sent me some alternate springs to try. Need to let him know if this will be a fix.
Bob, I re-read the entire thread, and also looked at your wiring diagram, it appears you are using auto-chuff, not chuff contacts/switch.
I think you will have to set with the phoenix programmer, or maybe it can be set by DCC.
Greg
Greg,
Called Phoenix and spoke to John. He explained that the board had not been configured for the sensing of the chuff trigger external to the board. He provided direction as to how to reconfigure the board. Will update as soon as I get a chance to open the tender back up and give it a go.
Great, I thought that with all the effort you have gone to, a chuff exactly syncrhonized with the piston movement would be the icing on the cake.
Regards, Greg
Waiting for the video!!
In getting the R/C working on the rollers, I discovered that the no. 3 driver was not on the roller. NOT GOOD!. Off the rollers she came and the investigation began. First discovery was that the suspension on the No 3 was fully compressed, with no downward travel, even when suspended. Step 1, remove the boiler shell.
When I installed the Rodney Edington drive, I chose to secure the motor with some zip ties out on the end of the motor down to the frame. (Sorry, no pics, wasn’t thinking that way.). Pressing down on the top of the gearbox (stock) and it would not move, As soon as I cut the zip ties, allowing the overhung motor some free motion, the suspension immediately freed up.
The next thing I did was, based on a suggestion on the Bachmann forum, I replaced the springs in the trailing truck with a couple slightly heavier and slightly longer. This raised the cab end a bit and did visibly level the frame a fair amount.
Next, I picked up a weight from a broken 0-4-0 from a fellow club member. I am adding it in front of the factory weight. The later run(s) by Bachmann added weight here. It took a little modification to the weight and adding a perch to place it on. I may not be able to install a speaker in the boiler now, but I can live with that.
I am having some computer issues, so I will have to add the pics I am taking at a later time. This little NetBook does not have the horsepower to edit the pics to suit. More as I progress through.
Sean - Video on the 18th on the club layout, providing my camera and the weather cooperates.
Bob, I found when I installed Rodney’s motor that the third driver liked to jam in the up position with the springs fully compressed. It may be due to the motor being farther back, i’m not really sure. at any rate I installed a spring between the gearbox frame and the gearbox itself.
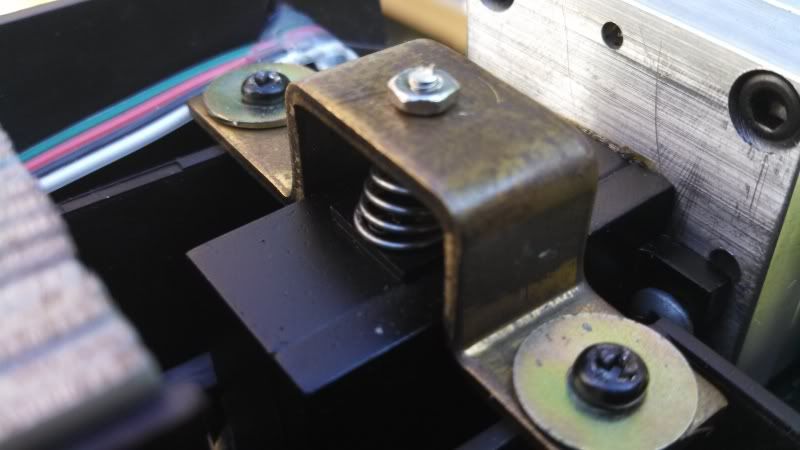
It has worked very well for me. It did away with my K’s butt drag and also helped with the pony truck derailing.
Terry
Terry,
I will not know for sure how beefing up the trailing truck springs and adding weight in the smoke box will work until I can get to the club layout in a week or so. I do know that just sitting on the bench, the pony truck seems to be much more ‘planted’ on the table. I am of the opinion that whatever path is taken, balancing the loco front to back will get the requisite pressure on the pony truck to keep in on the track. Almost every fix that has been presented has had the end result.
I am hoping that the combination of all the mechanical changes will result in a very reliable and smooth running engine (if not a bit louder than it used to be).
I totally agree. And don’t worry, the gear noise fades away as they wear in.
Terry