I actually kind of like the crackle sort of look. Gives it an old feel. Weathered.
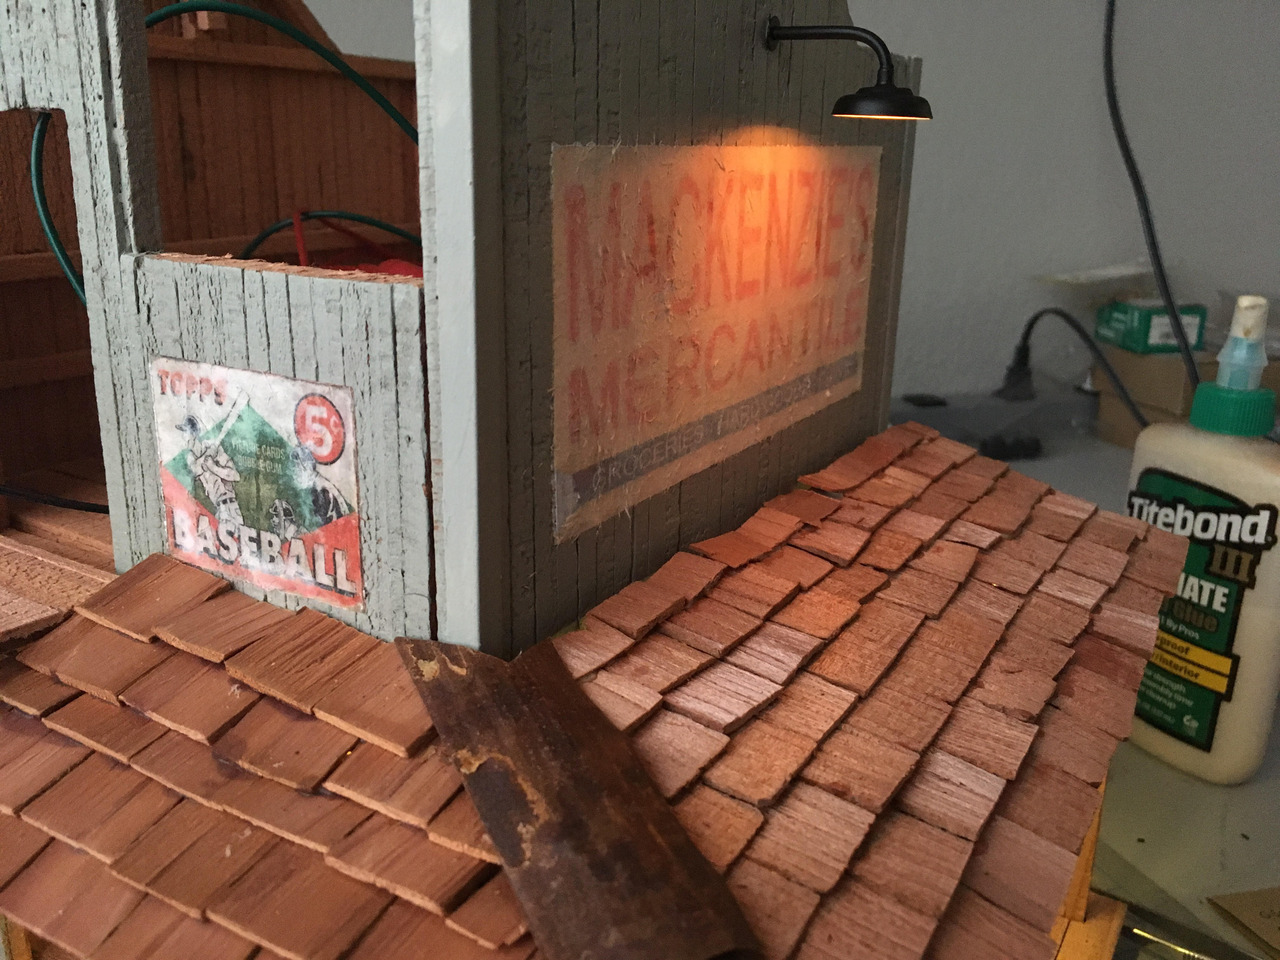
Awning roof on, main signs on, test fit one of the top lights. Still more weathering to do on the signs.

Not totally happy with my gel-toner-transfer signs. We’ll see how they survive more weathering…
Great job, Jim. Are you doing the building roof in wood shingles also? They really look good on the awning.
Thanks Dan. I’m actually thinking of changing it up on the main roof: right now tar paper (wet/dry sandpaper) on the big peak and corrugated metal on the dormer. My thinking is that, with roofs being so “in your face” in models (since you are looking down at it), having a variety of colors, tones, and textures makes them more interesting. We’ll see how it works.
I’m also toying with trying out a “metal” roof. If I have time and it works, I’ll possibly use that instead of the “tar paper”.
Looking great.
Jim, now that you say that, I think you mentioned the use of “tar paper” early on in the build. The various roofing material will also give additional credence to the age of the building. I would speculate that through time and as repairs were needed, they would use what ever was available to them. The signs really add to the look of the building, but the one on the front, well, it looks like what it is … paper stuck to wood and then peeled off. I think if it didn’t have that fuzzy, damp paper look to it, it would look fine. Now, I certainly don’t dislike the sign or the method, as a matter of fact I’m hoping you perfect it so I can use it one day, I think I’m seeing what you are seeing. Make sense? It may be the lighting because the one on the side doesn’t look the same. It looks perfectly fine to me. Anyway, the building is going to look great, heck, it looks great now. If you decide you don’t like it, send it down south and I will be glad to put it on my imaginary layout (https://www.largescalecentral.com/externals/tinymce/plugins/emoticons/img/smiley-wink.gif)
Dan: I think I agree with you about how this big sign looks. I’m going to redo it and see if I can get it to work better the next time.
Here’s my theory of what went wrong: the last time, I was thinking that the gel was too thick, and so it wasn’t following the contours of the wood well, so this last time I put the gel on much more sparingly, hoping to make it a thinner layer.
However, I think what happened was that the gel wasn’t thick enough and so the toner adhered more strongly to the paper than to the gel. So I’m sanding off the existing sign (surprisingly hard actually) and am going to put another layer of the sign right on top of the other one.
I hope this works!
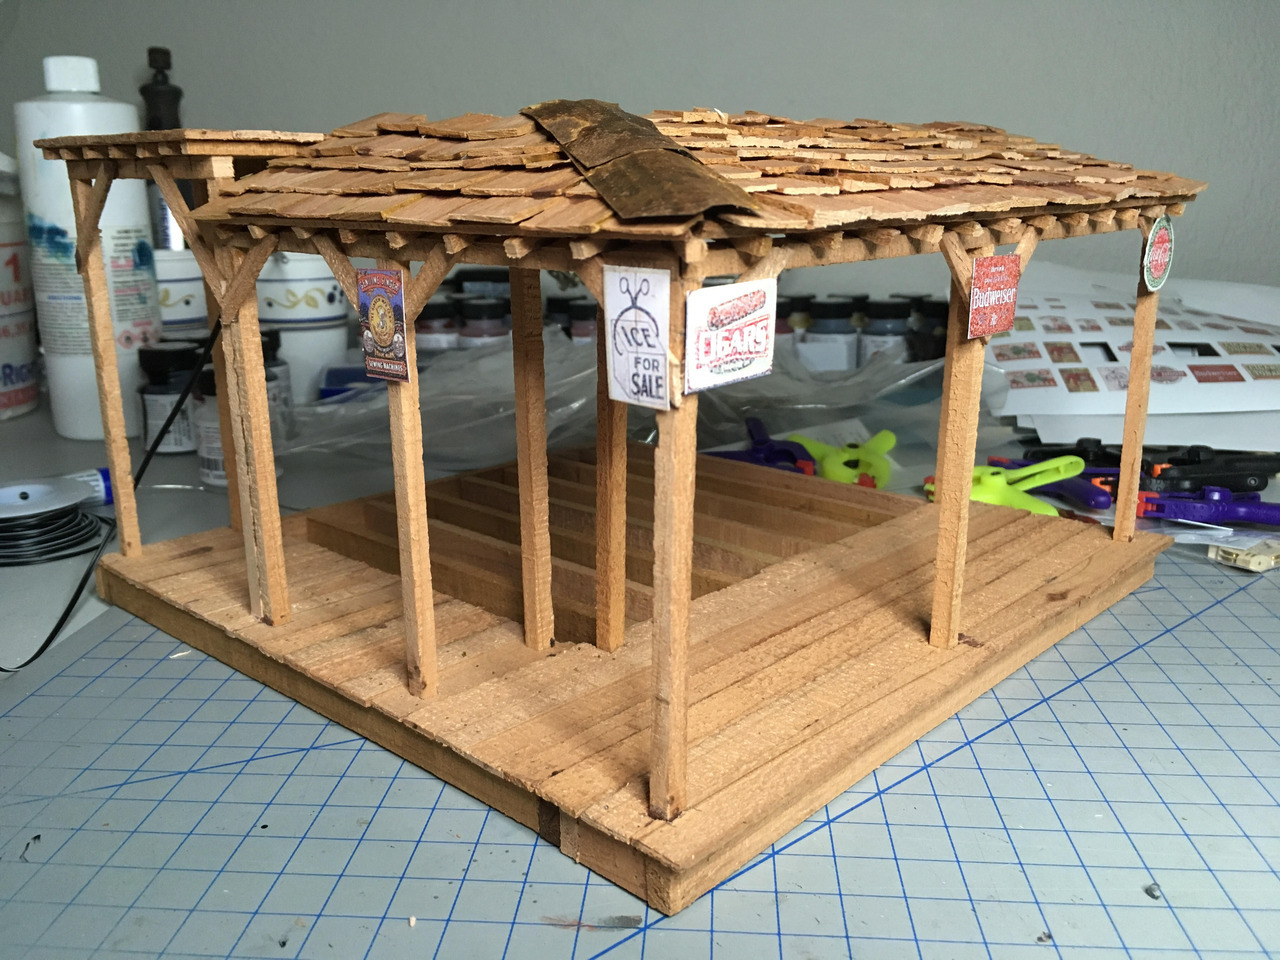
Add some signs to the awning area:
Jim, if you ever get tired of the building itself, you have a good start on a nice outdoor bar (https://www.largescalecentral.com/externals/tinymce/plugins/emoticons/img/smiley-wink.gif)
I reapplied the main sign last night and removed the paper backing this morning. This time with a lot more gel and a lot more patience at removing the paper backing. There’s a tiny bit of a double image here (because I couldn’t remove all of the first sign) but I think I can hide that with judicious weathering:
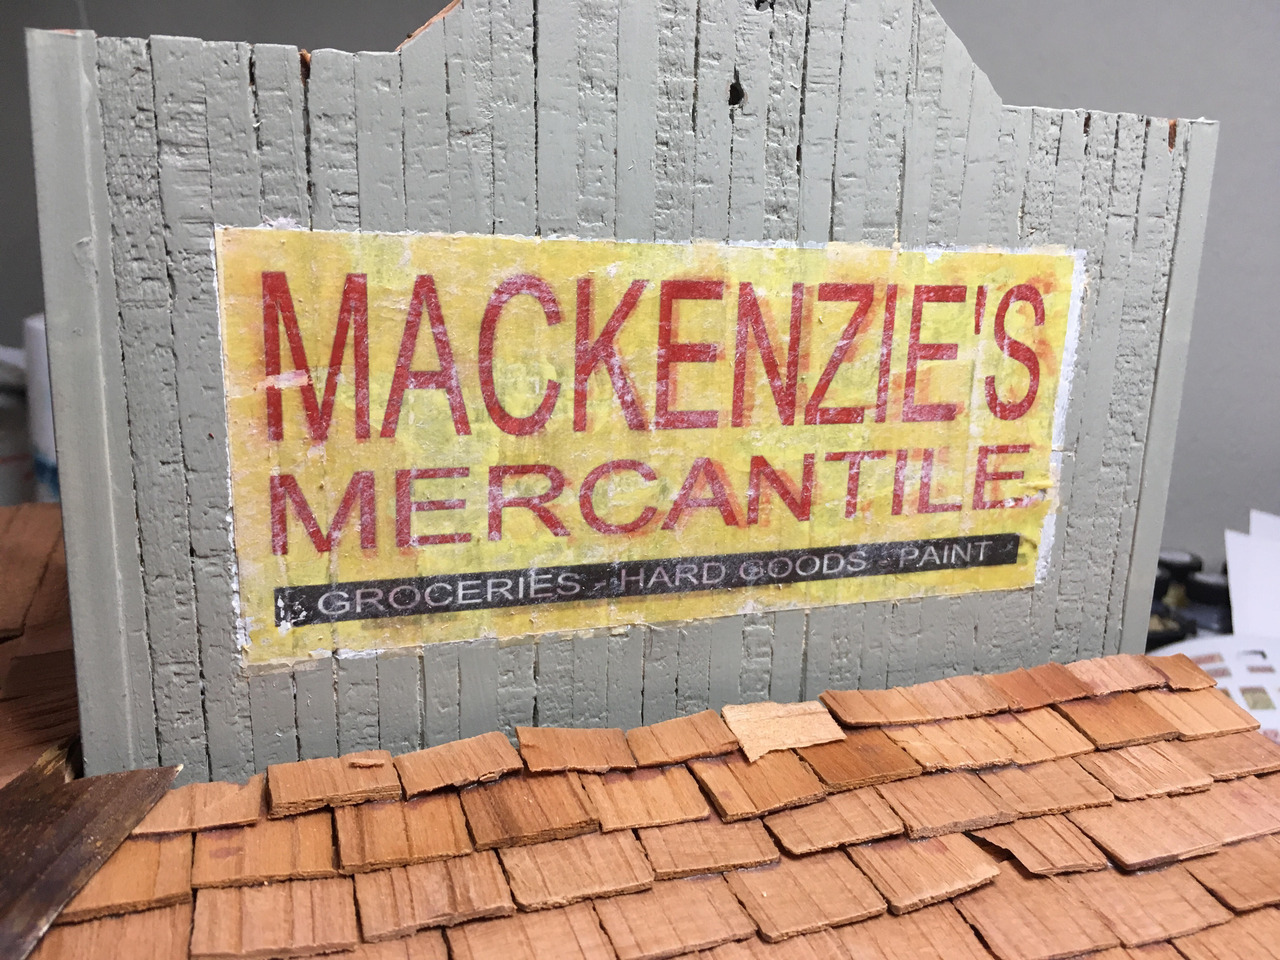
So, we’ll see if it works after weathering. I’m cautiously optimistic.
I’d leave it, I think it looks great, looks like the sign has been repainted
So Jim,
The lesson is apply a liberal amount of gel to get complete transfer of the toner and then be patient to get all the paper?
Glad you stuck with it. I still think this has real potential and the second one looks better.
Bill: Thanks. I continue to be amused that whenever I screw up it just “adds character” :-). What a great hobby!
Devon: Yes, plenty of gel and mucho patience at removing the paper. If you recall, you wet the paper (using a wet rag) and then gently rub it with the rag (wrapped around your finger) to remove the paper. What I found is that you have to take a stab at it (it will appear you have removed all of it) and then let it dry a bit. It will start to show the white of the paper as it dries. Continue to use your wet rag and even your bare finger to gently remove more and more (pretty thin) layers of paper until when it dries you no longer see any white film. If the toner starts to be removed stop rubbing in that area and declare victory because it is an imperfection that “adds character.”
At least, that is what worked ok for me this time around.
Thanks Jim. I am glad I gave you the suggestion so you could perfect it for me so i dont have to(http://www.largescalecentral.com/externals/tinymce/plugins/emoticons/img/smiley-tongue-out.gif)
Not sure if you noticed, but you have been giving me more techniques and learnings (about steam engines) than I could repay with a simple exploration of this technique. Hope you end up being able to use this in an entertaining way!
That looks much, much better, Jim. I really like this technique, at least with you doing it. If I try it, it will probably look like a jumbled up mess. Thanks for sharing with us.
Looking good Jim.
Don’t forget posting a sign that reads “Post no Bills”
OK, last picture for the weekend. The upstairs door is done now I have to figure out how to build hinges for it (I’d like to be able to open it). Trim put on and painted. A tiny bit of weathering to the sign. Hoist light figured out and test fitted.
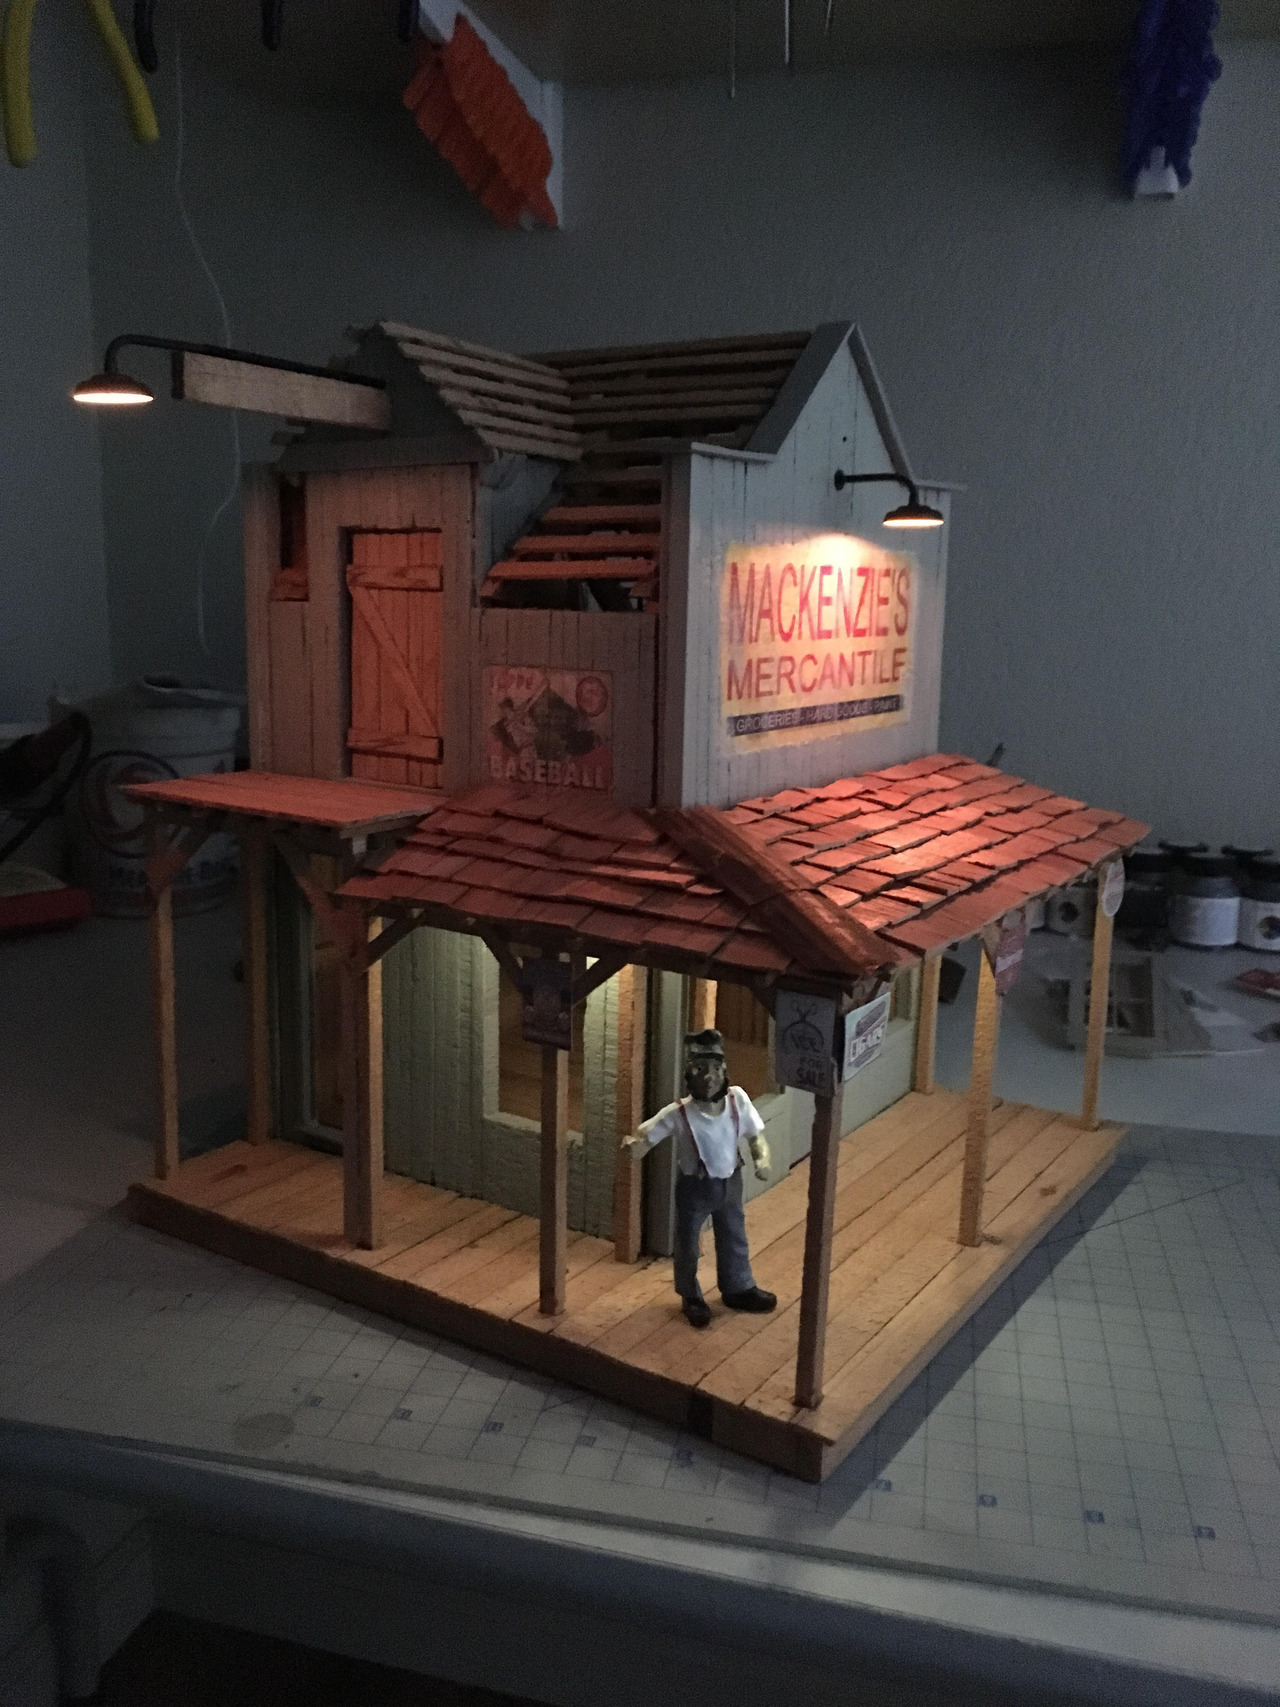
Next up roof and hoist and then maybe this weekend I can try to build some of the outside merchandise displays.
That’s looking awesome Jim
That really looks nice, Jim. The lights add a nice touch.