Large Scale Central

Grist Mill on the D&BHW

I saw a Grist Mill when I was visiting Tennessee and really liked the old building look. I started researching to see if there might been something like that in my neck of the woods. Sure enough Grist Mills were common all over the United States and so it would look right at home in the Black Hills of SD.

[IMG][img]

This building will go along my creek and will have a functioning water wheel. I thought the wheel adds some animation and I have a place to deliver cars on the railroad.

[IMG][IMG]

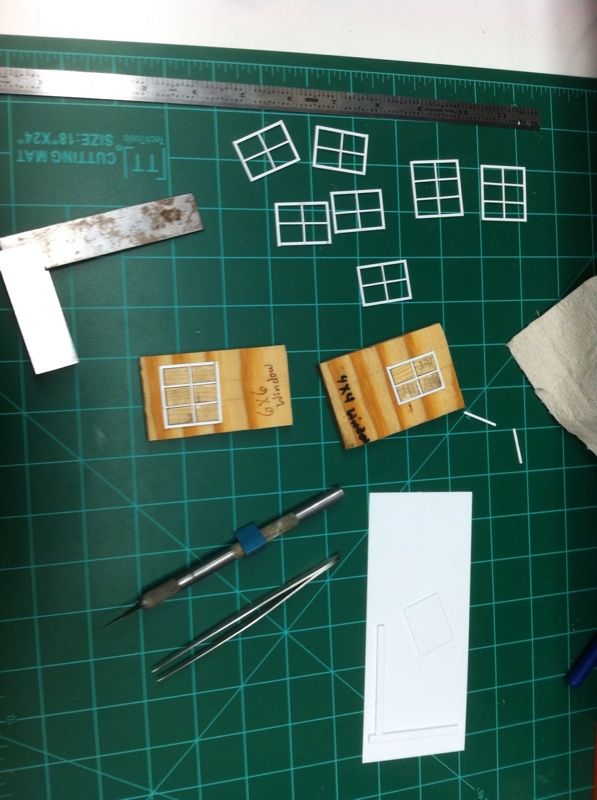
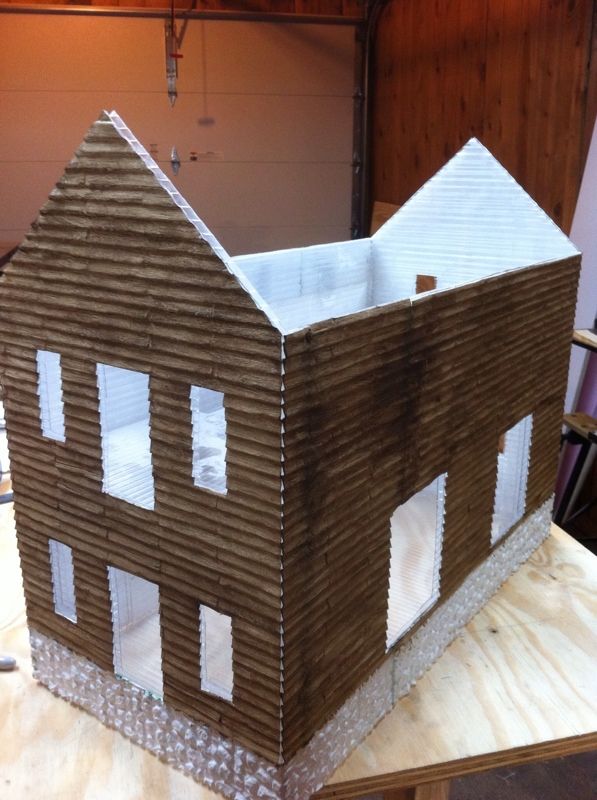
I started with a Coroplast core. However, I used a Polycarbonate based material instead of the Styrene based stuff most of us usually use. I found mine at my local Menards. It is a common paneling they use in making Greenhouses. I chose this stuff becasue it is a little more rigid. The building is 12" wide x 22" long x 18" tall at the peak.

[IMG][IMG]

I also built a dock out of the coroplast material. I used redwood for the legs and supports. I’ll laminate some styrene over the top to simulate wood planking.

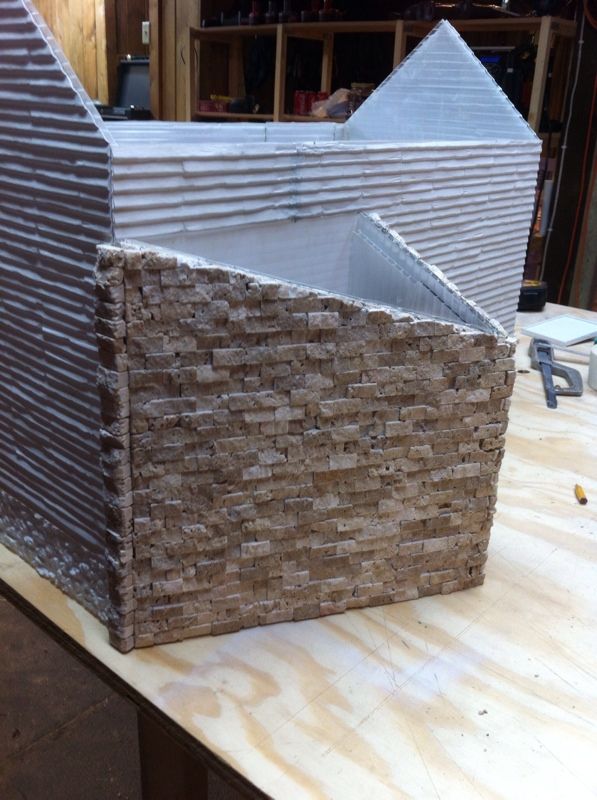
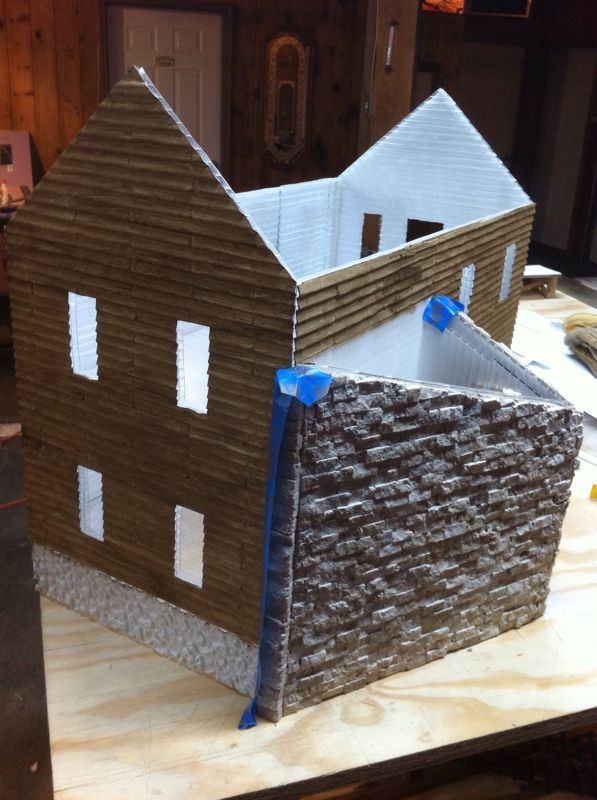
After I glued the core together with PL3000, I laminated textured veneer sheets from Ozark Minatures to the outside. I used the 9" lap siding. The detail is pretty good and it goes on quickly. It would have probably be talking about this project in about 2 years had I built the siding piece by piece. I also used the random stone for the top 3 scale feet on the bottom of the building. I did this more for a different look.

[IMG][IMG]

[IMG][IMG]

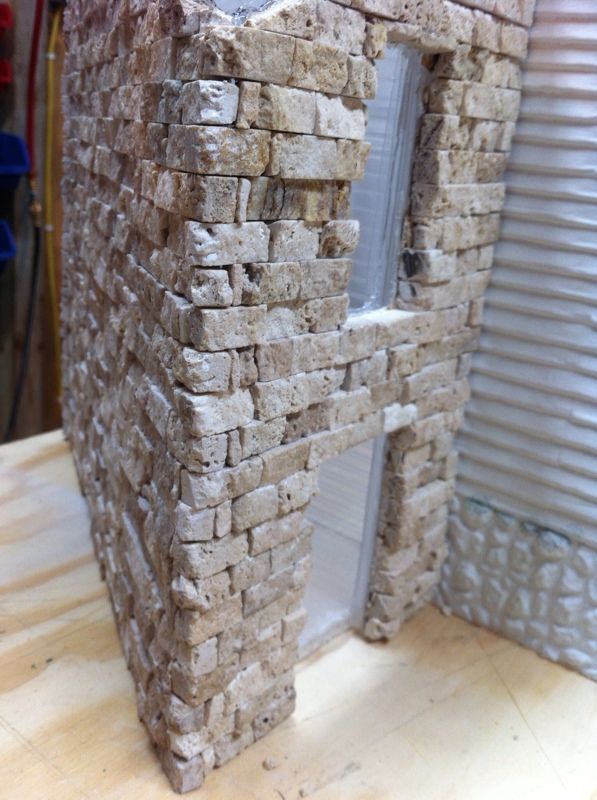
Next I decided to use the Solistone tiles that you can get at Lowes for the addition the water wheel is attached to. I cut mine with a Roto Saw with a masonry blade. I used my Dremel, but it was taking too long, so I got “More Power!” The Roto saw worked pretty good and cut the material pretty fast. I attached the tile to the core with Locktite Construction Adhesive. That glue had worked real well on a lot of other projects I have done around my house, inside and out, and I figured it would work good for this. We shall see.

More to come…

Part 2

IMG[IMG]

Next I cut holes for a window and a door. I used my trusty Roto Saw for this. I then used the Dremel for the corners and to “square up” the opening.

IMG[IMG]

Next I had to figure out how to finish off the corners. What I eventually did was glue full squares on the ends to extend them out beyond the end of the wall. As the two walls came together the blocks interlocked. After the glue had set up real good, I trimmed off the ends of the blocks with a pair of flat faced cutters. I think it came out real well and since I had glued the blocks together, the corner is real solid.

IMG[IMG]

The other end is a little different. I ended up just gluing a row of bricks to cover the end. I then went back and trimmed off the corners a little bit with my flat faced cutters.

IMG[IMG]

This picture shows the dock doors cut out and also the front door and a door for access to the second floor. It also shows that I have laminated the dock with some more textured veneer from Ozark Minatures.

IMG[IMG]

I was initially going to use Grandt Line Windows and Doors, but decided I would give it a try and make my own. I copied Bruce’s article on making windows and started going to town. Actually it was not as hard as I imagined. This picture just shows some of my work in progress.

IMG[IMG]

IMG[IMG]

IMG[IMG]

This is my first coat of paint. I’ll add more layers like Ray does.

More to follow…

Looking good Jake!!! I’ll be watching this with anticipation.

Chuck

Jake,

Looking great, nice work with the stone.

If you have the time and inclination please explain your painting process as you go along.

Thanks

Rick

Rick,

The painting process is pretty low tech. I first sprayed the building with white primer. I made sure I didnt put it on too thick and cover up the cast in detail of the textured veneer.

Next I used acrylic paint. The pictures above are my first coat of Raw Umber. I apply it by squeezing a small dab of paint on a plastic container lid.

I used a flat brush that was roughly the width of the boards. To apply the paint I used what I call a modified dry brush technique. I load the brush with paint and then I dab it on the plastic lid to get some of the paint off. Then I apply it to the model. I try to apply the paint so that it is not uniform as aged wood is definately not uniform.

Now that I have a base color I will start to add other colors to vary the color of the wood. I’ll use Burnt Umber as it will be a little lighter and probably some Yellow Ochre thinned down with some water. I use water to thin the Yellow Ochre because I dont want it to overpower with the bright color, but give a subtle highlight to detail.

I noticed in the last picture that the seem I had to fill colored different. I’ll have to blend that better with the other coloring. Hopefully it will work out ok.

To be honest, I’m not that great of a painter, and this technique is pretty easy. Just layer the colors and make sure things dont look too uniform.

Ilike it! you are using alot of materials that I’m not familiar with but they sure are going together well. The stone looks terrific. Please highlight how you plan to build the water wheel when you get to it. Is that real water on your RR and will it actually turn the wheel?

Keep up the good work.

Todd

I like it alot! How has the Liquid nails held up for you outside?

And when you say roto saw, what kind is it?

Thanks,

Terry

Todd,

I thought long and hard about how I was going to build my water wheel. If you haven’t guessed I’m trying to stay away from wood as much as possible because I dont want to worry about rot. Most of my building is plastic painted to look like wood.

But, I wasn’t confident in my skills to scratchbuild a water wheel. However, I found an ad in GR a few months back and they have a kit that is made out of Styrene. I bought that, although I have not yet assembled it, but it looks like its pretty easy to build.

IMG[IMG]

It is from these guys: http://www.rrstoneworks.com/mills.htm

This wheel is an overshoot design and I will use it as an undershoot, but it should still work fine.

Terry,

I say Roto Saw, but the technical term is RotoZip Saw, made by Bosch.

IMG[IMG]

This is a handy tool, as it is a little stronger than the Dremel. I put the grinder attachment with a masonry wheel on to cut the stone. I would caution you, dont cut too fast. The Limestone blocks are a little brittle and will chip off if you go too fast.

Liquid Nails: I didnt use Liquid Nails. I used a product called Power Grab Construction Adhesive, by Locktite.

IMG[IMG]

You should be able to get this at just about any hardware store.

My previous uses are: I used it to glue down tile to a plywood top for my counter tops in my kitchen when I remodeled it. I even used it to glue the rounded edge pieces. When I had to replace a broken dishwasher I had to literally cut the tile off the plywood, becasue the glue was so strong and would not release.

The second use outside is: I glues down wood lap pieces on top of my roof for my concrete shingles to sit on. I did this because I had layed a product called Ice and Snow Shield on top of the plywood roof. The top of this shield stuff has a layer of polycarbonate to give the stuff some strength. Since I had done all this work to lay the stuff to stop some leaks in my roof, I really didnt want to start putting holes in the stuff by nailing down the wood lap. So I glued it with the Power Grab. That was 5 years ago and the wood is permanently stuck to the sheeting. The only way its coming up is if the wood rots.

That is why I got the idea to use the Power Grab on my stone.

A lengthy explaination, but I’m long winded!! :slight_smile:

Glad to hear that. I used that same stuff to glue the stones to the enginehouse. Never used it before and found it while browsing around in Lowes.

And that Roto-Zip is like a Dremel on steroids…:wink:

Following this build with great interest. Is it me or are there a whole lot of pix missing from this thread? Sure would lile to see 'em!

… It’s me. They came thru slowly on my dialup. Thanks.

Rick asked for a detailed explanation of how I paint my building. I gave an explanation but no pictures, as I didnt have any…:slight_smile:

Here is some pictures I took last night of how I paint my buildings.

IMG[IMG]

This is a look of the paint I used. It is a simple acrylic paint I had gotten somewhere. The color is Raw Umber. I like Raw Umber as it gives a darker aged wood look. From the picture you can see I squirt some out on a piece of plastic. I use plastic container lids, pieces of coroplast, whatever I have laying around.

IMG[IMG]

I then take a wide brush and load it with paint. I then dab off a lot of the paint on the plastic lid. I guess you could say this is like drybrushing, but there is still a lot of paint on the brush.

IMG[IMG]

I paint with small strokes. For the siding I go with the siding and the simulated wood grain. If you tried to go any other direction is would not look right.

IMG[IMG]

This is just some more painting done. I will go back with a second coat if I want the color to be darker. The thing to remember is multiple light coats. If you try to put all the color on in one coat it will look wrong. The multiple layers simulate the multiple layers of weathering that occurs with multiple freeze-thaw cycles.

I also will add some other highlighted color such as Burnt Umber, which is a little more brighter, and Raw Sienna which is a little more Yellow. I will put these colors on in very light layers and will vary the area I put them, to try to simulate the wood weathering differently instead of uniformly.

Hope this helps.

This building looks great so far! Nice job!

Thanks Ray,

Looking at your building projects that means a lot.

Here is some pictures from this weekend. I hoped to get more done, but had a bad headache yesterday so didnt get a lot done.

IMG[IMG]

This is a picture of the process i used to paint the rock. I used a grey color and painted the entire piece, rock and all. Then I wiped off the top of the rocks. I went back and used a brown and red color to repaint the rocks. I finished with drybrushing a grey and white mix to highlight. I was trying for a limestone, the geologist considered the results acceptable.

IMG[IMG]

IMG[IMG]

IMG[IMG]

These pictures are of the finished product.

IMG[IMG]

This is a picture of some windows I made. Like I said before I used Bruce’s article on making windows and made my own. I was a little nervous doing this, since I had never done it before, but it actually is not that bad. I would recommend anyone going to attempt making their own windows, to buy a NWSL Chopper. I didnt have one for the first few windows I made. I bought one after and wish I had started that way.

IMG[IMG]

These are some doors I did. These are from www.rrstoneworks.com . I cut off a lot of the door frame as these were built to be put in a thick stone wall. I also detailed the freight door.

IMG[IMG]

This a closeup of the freight door. I used a saw blade to make the wood grain. I also scribed joint lines and then used the end of my #11 blade to make nail holes. Just to make something different, I added damage to the one door. I tried to make it look like something had been dropped or whatevern and it went through the bottom of the door. I’ll paint some more so it wont look white.

I did start on putting some trim on but forgot to take pictures. I’ll take some tonight.

looking good…

The grist mill is really looking good. For not being a painter you sure are doing a great job.
A grist mill is on my list to do, of course then I need that creek.
I still have to give a try at using the same materials. One of these days.

…(http://www.freethoughtnation.com/components/com_comment/joscomment/emoticons/funny/images/smile.png)…

As promised, here is some more pictures.

IMG[IMG]

This has some windows installed and trim. I still got to build the bottom door, but I’m not sure what type of door I want to build.

IMG[IMG]

A little closer view.