Large Scale Central

Fixing Gresley Teak Coaches

I now have a couple of 1/32nd LNER/UK locomotives, and a set of 3 coaches. The consist needs a brake/guards van for the guard/conductor. In the UK the run on the rear, unlike a US combine that usually runs at the front.

I brought back from the UK a set of ‘part-finished’ teak coaches: a GNR brake/guards coach, two Gresley passenger coaches, and a 1st/brake guards coach.
This is the GNR brake/guards coach. It looks too tall.

This one is a regular ‘composite’ (passenger) coach. I already have one in my set of 3, and I only got 3 pairs of trucks for my 4 coaches, so it is being sidelined for now.

This is a funny hybrid, of 1st class and 3rd class compartments with a split bathroom/lavatory in the center and no corridor connection to the next coach.

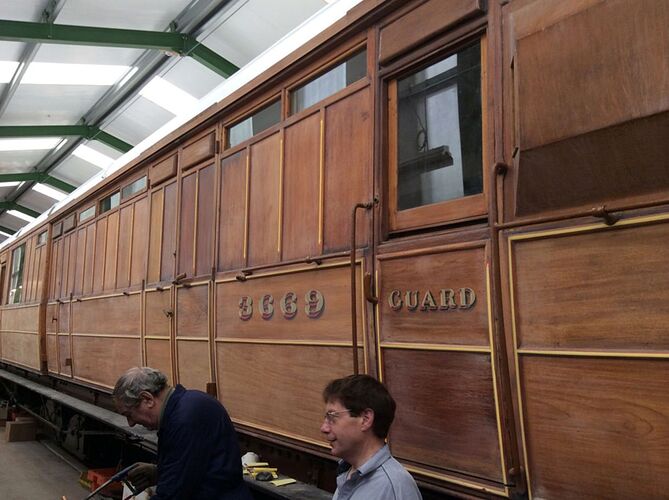
And finally the current project, a 1st/brake guards coach. Beautiful work on the ends but maybe it got dropped. The ‘glass’ in the windows is real glass, 3mm thick!

1 Like

I’m just about finished with the window and panel replacement on the 1st/brake which is my current project. This is the side with the broken ‘glass’, now replaced with 3mm clear acrylic.

An issue with these is matching the wood as you repair them. Here’s my paint test table. I finally settled on “English Chestnut” stain.

The uprights on the left on this are new, stained and cut to match. The coach is interesting, as a previous owner outlined the panels with gold lines: He even wrote “Luggage” and “Guard”, etc., though you can hardly see them. Makes it easier for me to align the original parts! He also grooved for the joints at the edges of doors, which I repeat with a fine screwdriver, though I need to get some black paint in them.

What none of them have is proper beading on the paneling. This is what a prototype coach looks like:

Here’s the same coach before gloss varnish, so you can see the beading, which is half-round 1".

What a great project, Pete. And great work. I don’t suppose one often restores a car made of reak teak!

They’ll look awesome behind your newly acquired loco.

Glad to see you have a workbench up and running.

but that should be doable.
the screwdriver scratched grooves and very fine fishingline.
(and lots of time of trembling-free painting the beading)

Will you be adding HEP cabling and ditch lites? I gotta ask for my own sanity??

No. Never. Ever and 20 chars.

1 Like

If you look at the number of beads on the prototype, I don’t think fishing line will look too good.

In the woodworking photo, there’s a pile of strips of wood on the right:

This is Basswood, with a 1/32ndx1/64 half-round bead cut in to the top surface and repeated thru 2" wide. Here’s a better extract showing the many strips of beading.

Kappler did it for me, but couldn’t cut away the back to release each strip. After much experimentation, Peter Cross (Mr Kappler) sent me 3 or 4 strips of basswood, also of western red cedar and sugar pine. The two strips in the pic are western red cedar and basswood. I ordered enough for 3 coaches, and now I have enough for about 10!

One difficulty is cutting the strips without letting them split along the grain. I suspect there may be a lot of wastage.

I did experiment when they arrived and found I can trim away the back with my mini table saw set to about 1/32nd. That gets me one strip but it still has to be separated.
The Plan is to try to mount an Xacto blade on the saw’s rip fence so the strip gets cut at the same time as it get slimmed down.

First thing is to stain most of it English Chestnut.

i did not know, that it is possible to cut halfrounds of half a mm.

about this:

well, if there is no newer way to do it…
when i have to cut small pieces of veneer or plastic of 1mm or 0.5mm thickness, i use a very oldfashioned papercutter, that cuts downwards, not sideways.

It’s basically half-round 1/32nd diameter - is that half a mm? seems more like 0.8mm?

Peter Cross at Kappler didn’t either, though they sell 1/32x1/64 wood. He had to ask his toolmaker if it was possible.

I wish I had one. But I’m not sure how it would work on this wood.

P.S. I will have a lot left over.

In the meantime, I finished trimming the windows.

And I painted some beading. So that’s the next job.

Pete,
I kinda found a way to prevent following the grain/split with an x-acto knife while cutting that thickness. If you draw your cutting line then take a piece of brass/metal rod like 1/16" dia. and center it over the line with a piece of masking tape.

Then press down on the entire length of rod essentially creating a channel to follow that pushes the grain together so it won’t follow it. Then take a straight edge against the one side of the rod and use the other side as your cutting fence …if that makes sense.

or use a metal rule and a (new) pizza cutter.
(again you get the effect, to cut from above, not sideways)

i was not calculating, but making an estimated guess for 1/64.

in your 1:1 pic they look like half an inch to me.
(25.4mm (1") dividided by 64 = 0,396 mm and about half an inch 13mm divided by scale (29) = 0.448mm)

anyhow, i’m very interested, how you will get that done.

Just throwing this out there. Would using bamboo and a draw plate be useful?

https://www.byrnesmodelmachines.com/drawplate5.html

The bamboo might be easier to split due to its straight grain.

Yes, but I’m working with a pre-cut half-round.

Don’t understand that. I have to cut in the groove between the beading, so a metal ruler and cutting tool are clearly the basic tools.

As I’m using the saw fence to guide the panel over the rip blade, in order to thin it to a proper half-round, I’m thinking of bolting a fresh Xacto blade to the fence. It should split it as I push the panel over the blade.

I’ll take pictures.

Yes, but not for half-round. I need a flat side to glue it down.

Well I gotta tell ya’ Pete you done made me look these dang things up cause they are cool looking.

Now I kinda think the CVRR want’s one of their own versions with high speed trucks, HEP cabling, ditch lites and all the junk underneath! However I’m leaning towards black walnut and brass 1/2 round cause I got plenty in stock.

round two of inadequate explanations:

maybe i should have written “lengthwise”.

woodgrain = harder and softer layers of wood.
(the heavier the wood, the harder the grain. like teak)
normally it runs more or less along the length of a board.
(the nearer the angle of the grain is to the angle of the board, the greater the danger of “derailing” your cut becomes. normally under 5° )
if your ruler is clamped down, or held very firmly, cutting mistakes only occur, if - in the direction of the cut - more and more grain appears from under the ruler. (if, in direction of the cut, the grain disappears under the ruler, the ruler works like a “guardrail” )
so, the easiest way, to evade “run away” cuts is simple:
stop, look and aim.
the wood, ruler and knife give a sh!t, which way you cut. - its just your habit.
look in which direction the grain runs under the ruler - and cut in that direction.

if you fix a blade to the fence, the blade becomes the fence. if it gets caught in the grain, it levers the board away from the fence.

“sideways”
if you use a knife or a saw you move it forwards and backwards to make a cut.

if you use scissors, you drive the blade(s) from above (and from below) into the material.
without any room for desviations of material or blades. (no following any grain)

“pizzacutter”
go, cut a pizza with a knive. the knive “draws” the cheese for inches. (sideways)
use a pizzacutter. it cuts from “above” and leaves the cheese in place.
(or, it follows the ruler, and does ignore the woodgrain)

(two ways, where i learned the hard way about grains. splitting trees for building cattle corrals and carving matchsticks and veneer for 1:32 layouts)

Sounds great! I’d suggest chemically blackening the brass first?

I guessed that’s what you meant.

Anyway, I am pleased to report SUCCESS! I was somewhat worried about this bead-cutting exercise, as you may have noticed.

I’d been thinking of mounting a blade on the saw fence, but that wasn’t tall enough. Then I remembered I had bought a finger-fence kit to match the saw, which is taller and clamps to the original fence.

The fingers hold the thin wood in place so it gets the back of the beads cut/thinned off when I push/pull it through the fingers.

I set up the blade with a couple of washers, and tested it with my 1/16x1/32 strip.

Looks good so off the the saw. I was astounded when it worked! Here’s the first bead strip:

I found after cutting 3 strips the back was wandering, so I’ll have to start trimming the bead plank before cutting to make sure I have a real edge.

As I had 3 strips, I taped them to the coach to see how it looked:

To say I’m pleased is an understatement!

4 Likes

I was left alone to work on my trains today, so a few experiments ensued with how to put acc glue on the strips and not on the side of the coach. I finally found that, rubbing the back of the bead strip with the end of a small screwdriver, that has been dipped in acc worked like a charm. The little black thing is the screwdriver blade.

And here’s one side with the long strips. Now to start cutting and gluing all the verticals. . .

2 Likes