Large Scale Central

Fixing Gresley Teak Coaches

I finally got started on the rest of the beading.

And started to find the strips that didn’t have enough glue. But I persevered with the acc and screwdriver applicator process.

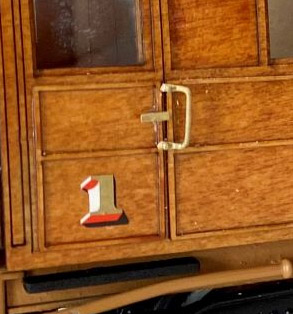
That’s the first door and one end done. In the past 2 hrs I’ve done the next door as well. There are 14 doors on this coach, so I am working on ways to make things go more smoothly.

One good thing is that the upright is a standard size all round, so I already set up a jig to measure and cut them. Theoretically the horizontals on the doors are all the same size, but as I already glued the long ones, they get cut in place.

A new Xacto blade works well, even on the coach surface. I started cutting the beading at 45 deg to mate at 90 deg with the next piece. Not sure that’s necessary.

A little more progress. My shipment from the UK arrived.

Tenmille, who used to be exclusively 10mm:ft or 1:30.5 [it’s an old UK scale,] are now adding 1/32nd kits to their range. They have announced some Gresley coaches, like mine, although they are $400/kit plus shipping. They do sell parts, and I bought decals/transfers a few weeks ago.

This shipment is door handles and grab bars.

The handles are just a “T” in brass. I’m not so sure about the grabs. They said they used their BR/SR grabs and that’s what they sent.
This pic, from their website, shows their test build with the grab, which essentially blocks access to open the door!

Tenmille door grab

I suspect I will be shortening them, or using regular brass. The prototypes are much more vertical and do not have flats to bolt them on.

For the past couple of weeks, whenever I had time, I have been adding some beading. Finally finished one side.

( I didn’t make the ends. They were like that when I got it. The other end is much less finished.)

The coach should have thin paneling vertically parallel to the windows. When I got Kappler to cut the beading, I also ordered some 1/16x1/32 and some 1/32x1/64 basswood. The latter is a good size - unfortunately my panels next to the windows are flush. I don’t think they can be recessed so I can add 1/64th" strips.
However, the panels at the brake/guards end could have strips. What you see now is just gold paint. I’ll have to think about the idea of strips.

And then I move on the the other side, which has more doors and more fiddly beading. Sigh.

3 Likes

I stained some of the 1/32x1/64 strip and started on the upper panel strips.

The wood is so thin that it breaks if you look at it. In the pic, there’s a strip at the top of the window, which has a broken piece and the upright is also broken. Sheesh.

But now for some good news. I was looking at the other side with its 5 doors and thinking what a pain it was going to be to make paneling for all of them.

Then I had a brainwave - couldn’t they be 3D printed?
So I emailed our favorite 3D printing guy @Cliff_Jennings and asked nicely if it would be possible to print 25/32" x 33/32" rectangles with a crossbar. No problem, he said. (Well actually he said 1/32nd wide outlines might not work.)

But it did, and I am ecstatic not to have to make 5 door panels and 4 panels in between (realizing they were basically the same, just longer, I asked for 50/32nds versions too.)

They are so light it is almost impossible to get them to line up - a little glue will help. I did a paint test on a previous test print and this seems like it works.

Now to get on with painting and gluing these little rectangles.

1 Like

Painting the rectangles wasn’t too tricky. First wash them and dry them.

Then stick them on painters tape (thin it - my first attempt using regular width tape meant I could hardly get the panel off the glue!)
The paint is regular acrylic dark brown.

Then I had to scrape paint off the back and overpainted sides so they might stick.

All that took a couple of hours. This morning I spent maybe 30 minutes gluing the first batch of panels to the coach. Doing it with strip would have taken forever, and wouldn’t look as neat.

3 Likes

After I finished the 3D rectangles, there were plenty left (thanks, @Cliff_Jennings) so I figured I could cut two and join them together.

Then I had to glue down the bottom over the tumblehome.

The broken glass that came out of the coach did a good job of pressing them down without getting acc glue over my fingers!
And here’s a pic of the 3D side with the bottom panels applied.

The next job is to add the upper panels, using my 1/32 x 1/64 strip . . Very fiddley.

This is the non-3D side with my wooden strip paneling.

I guess they could have been printed too, except they are not spaced regularly.

2 Likes

Pete,

This is an amazing project!

Eric

Amazingly time consuming. And wood-consuming. I had to stain some more 1/32x1/64 strips yesterday as I ran out. I think I have used about 6+ft, despite having those nice 3D printed parts!
I’m trying to get it finished before I leave Florida for the summer, which is doable.

One time-comsuming part is making all the door gaps consistent. When I put the upper strip in place I have to go back and cut through the door gap, and half the time one side will not be as well glued as the other, so it disappears.

A historic moment today when I finished paneling the second side. This is the one with Cliff’s 3D panels below the windows. They look a little darker as they are painted with dark brown acrylic.

Next job is to give it another coat of stain/varnish to cover up the visible unstained wood!
Then finish the second corridor connection, add couplers and re-attach the trucks.

2 Likes

Why?
20yrs from now it’s probably just gonna end up painted silver with a pantograph on one end, HEP cabling and ditch lites for push pull service in the corridor anyway.

Not looking much different after a varnish, but it does have a shine.

So on to the dirty roof.

A scrub didn’t budge any dirt, so I guess a can of white paint will be needed.

One of the corridor connections was missing, so I bodged up one from some bits of wood used on another coach. It has glue-soaked cloth between the two bits of wood. Unfortunately, the other end is a very neat model of a corridor connection, so one day I will have to make a matching version.

It is held in place by a screw and a wooden lip - so I can easily remove it!

Next project is the couplers. The UK guys use hooks and links, so there is a hole in the buffer beam for that. We use knuckles, and I usually have to adjust the height.

The couplers are Acccraft 1/32nd, which I happened to have in my coupler box. All my other Gresley coaches have Kadees, but I know they’ll couple together. I put a pin in the coupler to test the height.

My standard coupler height gauge:

And there’s the couplers mounted and ready for action.

Almost done - well, actually I am done except for reassembling the body and trucks.

The final job was to install door handles and grabs on the body. They came from Tenmille in the UK.
I measured the handle shaft and found a #64 drill to be pretty close. Here I am attempting to keep the drill in the pin vise from moving. I use the Xacto to start the hole.

Then I shortened the handle shaft

Much the same process was used for the grabs, though I had to cut off the original pins that mount them. You can see an un-modified one on the left.

As I mentioned, not much to do except put the roof and the trucks back on.
Oops.

I’ll have to find some end-beam mounted couplers - Kadee 1779 probably.

I took those couplers off and took the beauty shots. The roof still needs work, though the white roofs turned grey fairly quickly in use. This coach was obviously not recently shopped!

3 Likes

Looks beautiful, Pete. I honestly had my doubts on the printed trim, but you sure hit it out of the park.

How many of these coaches will you be doing?

The side with the most doors has the 3D trim, as all the spacings are the same or close.

This one was the most pressing, as I have a rake of coaches with no combine/guards brake van.

I got this next coach in the set of 3 ‘part-finished coaches’. It’s a “semi-corridor” with 1st class at one side and 3rd class at the other, and toilets between the 2 sides with no connection. It already has wood strips on the sides, so I will probably leave it alone.

This next one is an enigma, as it is in MD and I’m not. But it is the same as one of my existing coaches - a regular composite. It has a nice roof, nice details, and needs some paneling!

There were only 2 sets of trucks with my 3 coaches, so I think this will have to wait.

Here’s my rake as of last October before I started working on this coach. The left coach is a GNR (Great Northern Railway) brake - but it looks too big; maybe the wrong scale (UK uses 10mm:ft, or 1:30.6 sometimes.) It will be replaced by the new one. In the middle are my 3 professionally built coaches, and the right side is the semi-corridor. It has to be at the end as it doesn’t have a corridor!

2 Likes

I stopped at Jerry’s (@naptowneng) for pics as the sun was brilliant [It was almost noon so I didn’t get much sun in the right places.]
Here’s my new LNER Apple Green D16 locomotive, which is the correct color for pulling Gresley teak coaches. (They hung around for an long time, so my LNER Black B1 will also be correct.)

And a closeup of the finished coach. This is the side with @Cliff_Jennings 3D printed panels.

4 Likes

A gorgeous & unique train, on a beautiful layout, on a perfect day.

Fantastic work, Pete, and Jer, the layout looks great.

Pete,

“Gorgeous” is an understatement.

Eric