Large Scale Central

Expanding South Willow Hill

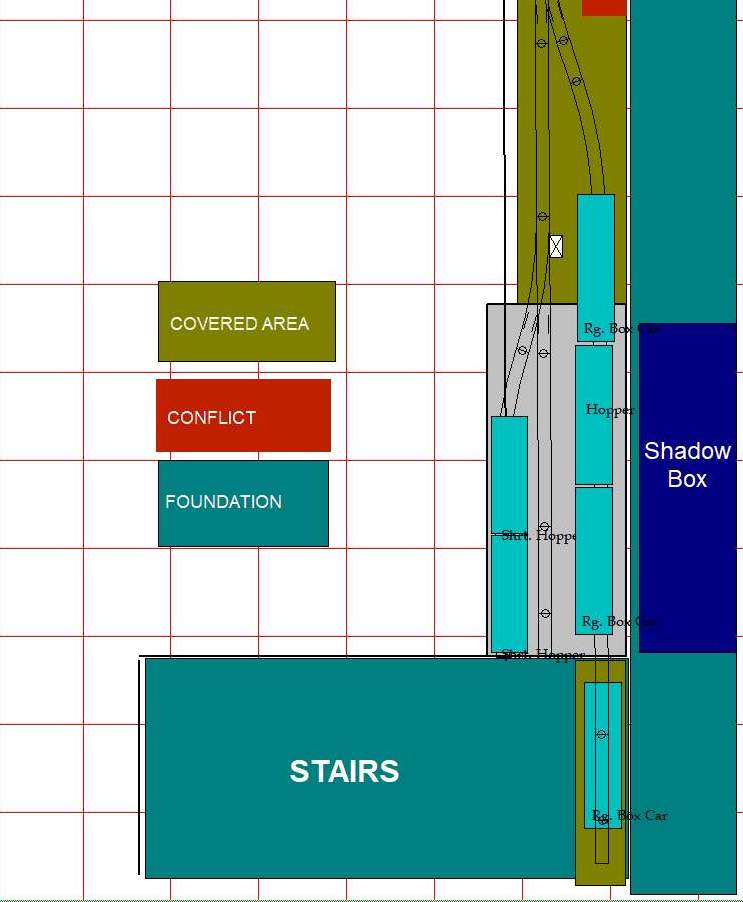
Well thank you. I’m really not in love with that triangle section as I have a book case that really needs to go back on the wall by the stairs, so using Andy’s suggestion I’ve eliminated the run-around and added 3 more car spots on the lead to under the stairs. This could be run similar to my long track at South Willow Hill where there are 5 industries taking 8 cars all on the same track. The only issue here is that this will be a pretty good down grade to get under the stairs so and car spots would require brakes (chunk-o-wood under a wheel). By eliminating the run around I can get another industry along the front edge and leave the end of the main open for drilling cars. So here is V2 for your perusal / comment…

Jon, looking at your revised version, my thought is why even try to drop down to under the stairs for one boxcar spot…

Why not just keep it all level and use the above track plan, minus under the stairs… It sure would be a lot easier to build and look more prototypical as level…

The 3 car track would be one industry and the front track with the 2 cars could be another industry or team track, or whatever… The middle track could be storage for for another industry load, or just a place to spot cars while working the industries…

Just food for thought…

Andy Clarke said:

Jon, looking at your revised version, my thought is why even try to drop down to under the stairs for one boxcar spot…

Why not just keep it all level and use the above track plan, minus under the stairs… It sure would be a lot easier to build and look more prototypical as level…

And run it under the stairs and have a “Low Clearance” sign, (ya know, like the one you made for me) flats and hoppers only.

Well Jon,

I would like to add some confusion if I may !

Since you are an EBT fan along with a few others and because I’m turning into a history freak/geek anymore I would like to share this link to make you think!!

https://libraries.psu.edu/about/collections/sanborn-fire-insurance-maps

Scroll down and you know the EBT towns …check out some of 1:1 thoughts and perhaps you use something related into your evil plan.

HAVE FUN !!

Good post Rooster, Sanborn maps are the coolest things going for history research.

I’m kinda set on running under the stairs. I have the box partially built and test-fit today. I have in my head this industrial building that you only see the face of like a flat except the track door is open and you can see the car and details of the dock inside. The illusion would be that there might be many more than 1 car inside this structure.

My earliest idea for under the stairs was as an engine shed for my porter who would work a little industrial area here - some of which could be short cars on R1 track,. Then I realized that I could get a car under without a ton of work my thoughts wandered in this new direction.

Here is the box being test fit…

And who wants easy anyway! I think this one track dropping down behind the foreground will be pretty interesting visually. What none of you know is that this scene will be the first one you see if you enter the basement from the outside. It will be far across the room, but the rest of the railroad is not in sight from the door.

The box has just a little extra overhead clearance for a box car…

I checked out the grade at final level and it works out to 3% from the front edge of the box to the pipe…

Vacation is over, so progress will be slow from here on out.

" Rooster " said:

Just a thought…instead of climbing back there and painting. Perhaps get some stick on glass film for the new window that they sell at Home Depot and Lowes. That way you can still let the natural light enter with less work and hide the wall. https://www.homedepot.com/b/Window-Treatments-Window-Film/N-5yc1vZarc3

I may have mentioned in an earlier reply that I have some film in stock. It’s a narrow roll but I can handle having a seam. For testing purposes I only did the right hand pane. It does tone down what you can see through the window, but then again I like the clear view too. Another plus for film is that it adds a pretty good security barrier at night limiting the view in from the outside. Here is what the test looked like without and with interior lights on…

Jon, looking at this pic you can gain a half inch of clearance (or grade) by beveling the edge of plywood at the stringer.

(https://www.largescalecentral.com/externals/tinymce/plugins/emoticons/img/smiley-cool.gif)

Jon Radder said:

(chunk-o-wood under a wheel).

Drill a hole and insert wooden dowels … you can have them @ diff. locations and no one would be the wiser…

This will be a great place for … https://www.candlewoodvalleybuilding.com/

You could print a front and mount it around that box.

Image result for railroad  warehouseImage result for railroad  warehouse with track entrance on the endImage result for railroad  warehouse with track entrance on the end

A print would be the lazy way out! I think this front may be my challenge build. I do like your business name suggestion and the logo could be used to highlight the front…

2021 EDIT to fix external content.

David Marconi,FOGCH said:

Jon, looking at this pic you can gain a half inch of clearance (or grade) by beveling the edge of plywood at the stringer.

(https://www.largescalecentral.com/externals/tinymce/plugins/emoticons/img/smiley-cool.gif)

Good thought, but the box will have a side where it is open now to prevent anything from ending up in the black hole under the stairs. I left the side off so I can paint and/or detail inside the box. My design has that piece attached on the outside so I’m actually going to loose a little more. But once it is built I can try grinding off a little to make it a snug as possible.

Jon Radder said:

A print would be the lazy way out! I think this front may be my challenge build. I do like your business name suggestion and the logo could be used to highlight the front…

Isn’t that near you ?

Jon Radder said:

Good thought, but the box will have a side where it is open now to prevent anything from ending up in the black hole under the stairs. I left the side off so I can paint and/or detail inside the box. My design has that piece attached on the outside so I’m actually going to loose a little more. But once it is built I can try grinding off a little to make it a snug as possible.

He was thinking of using something like this

See the source image
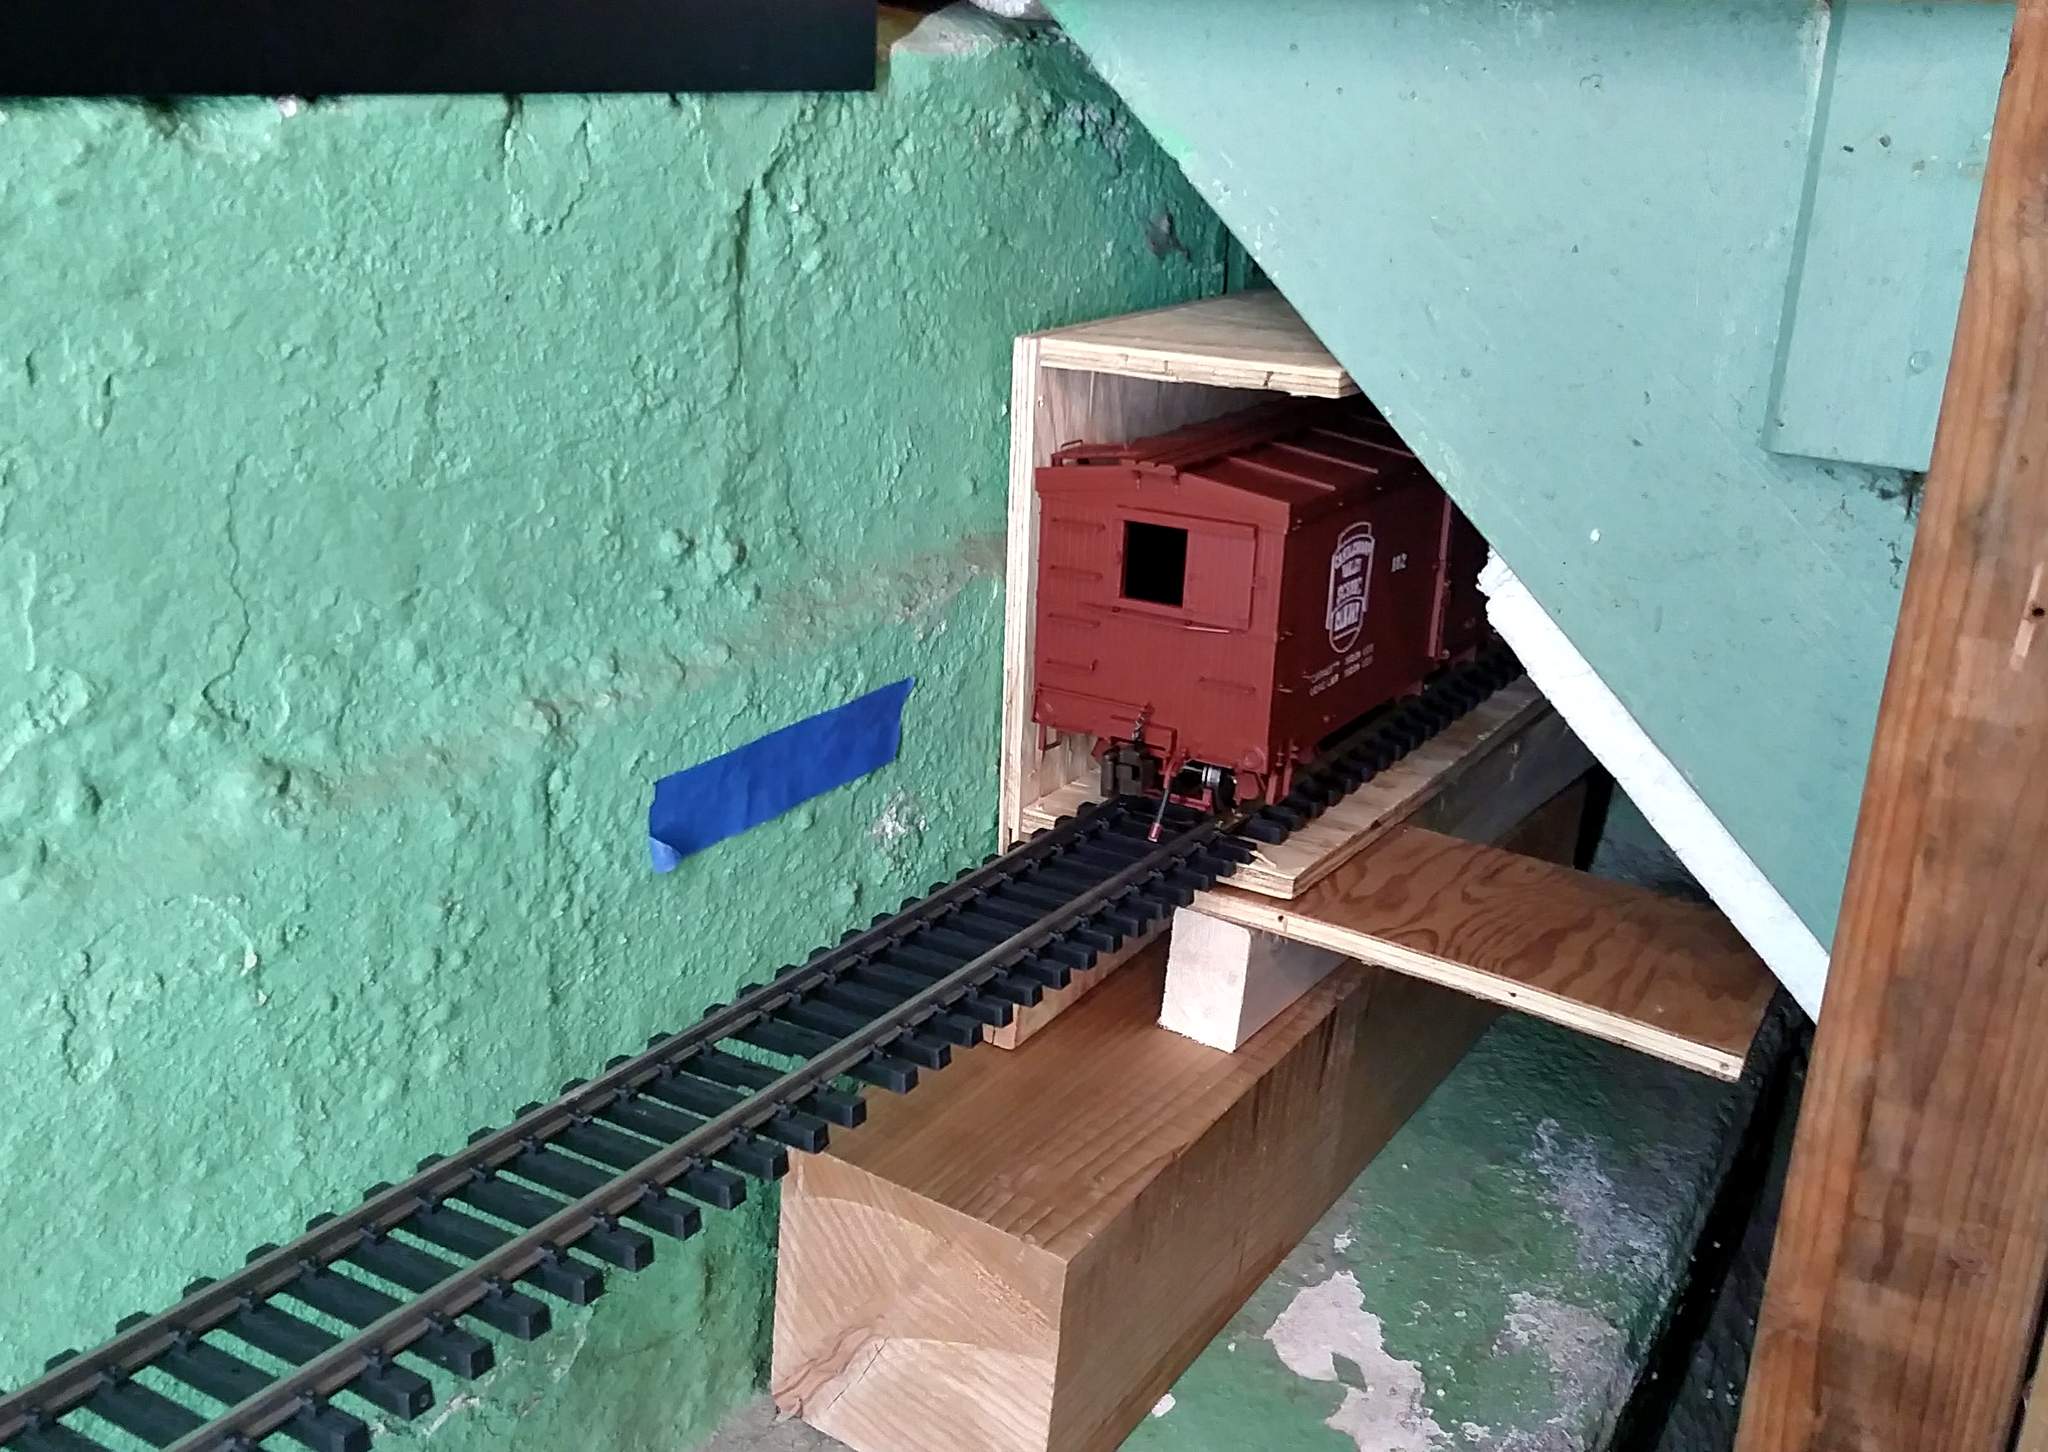
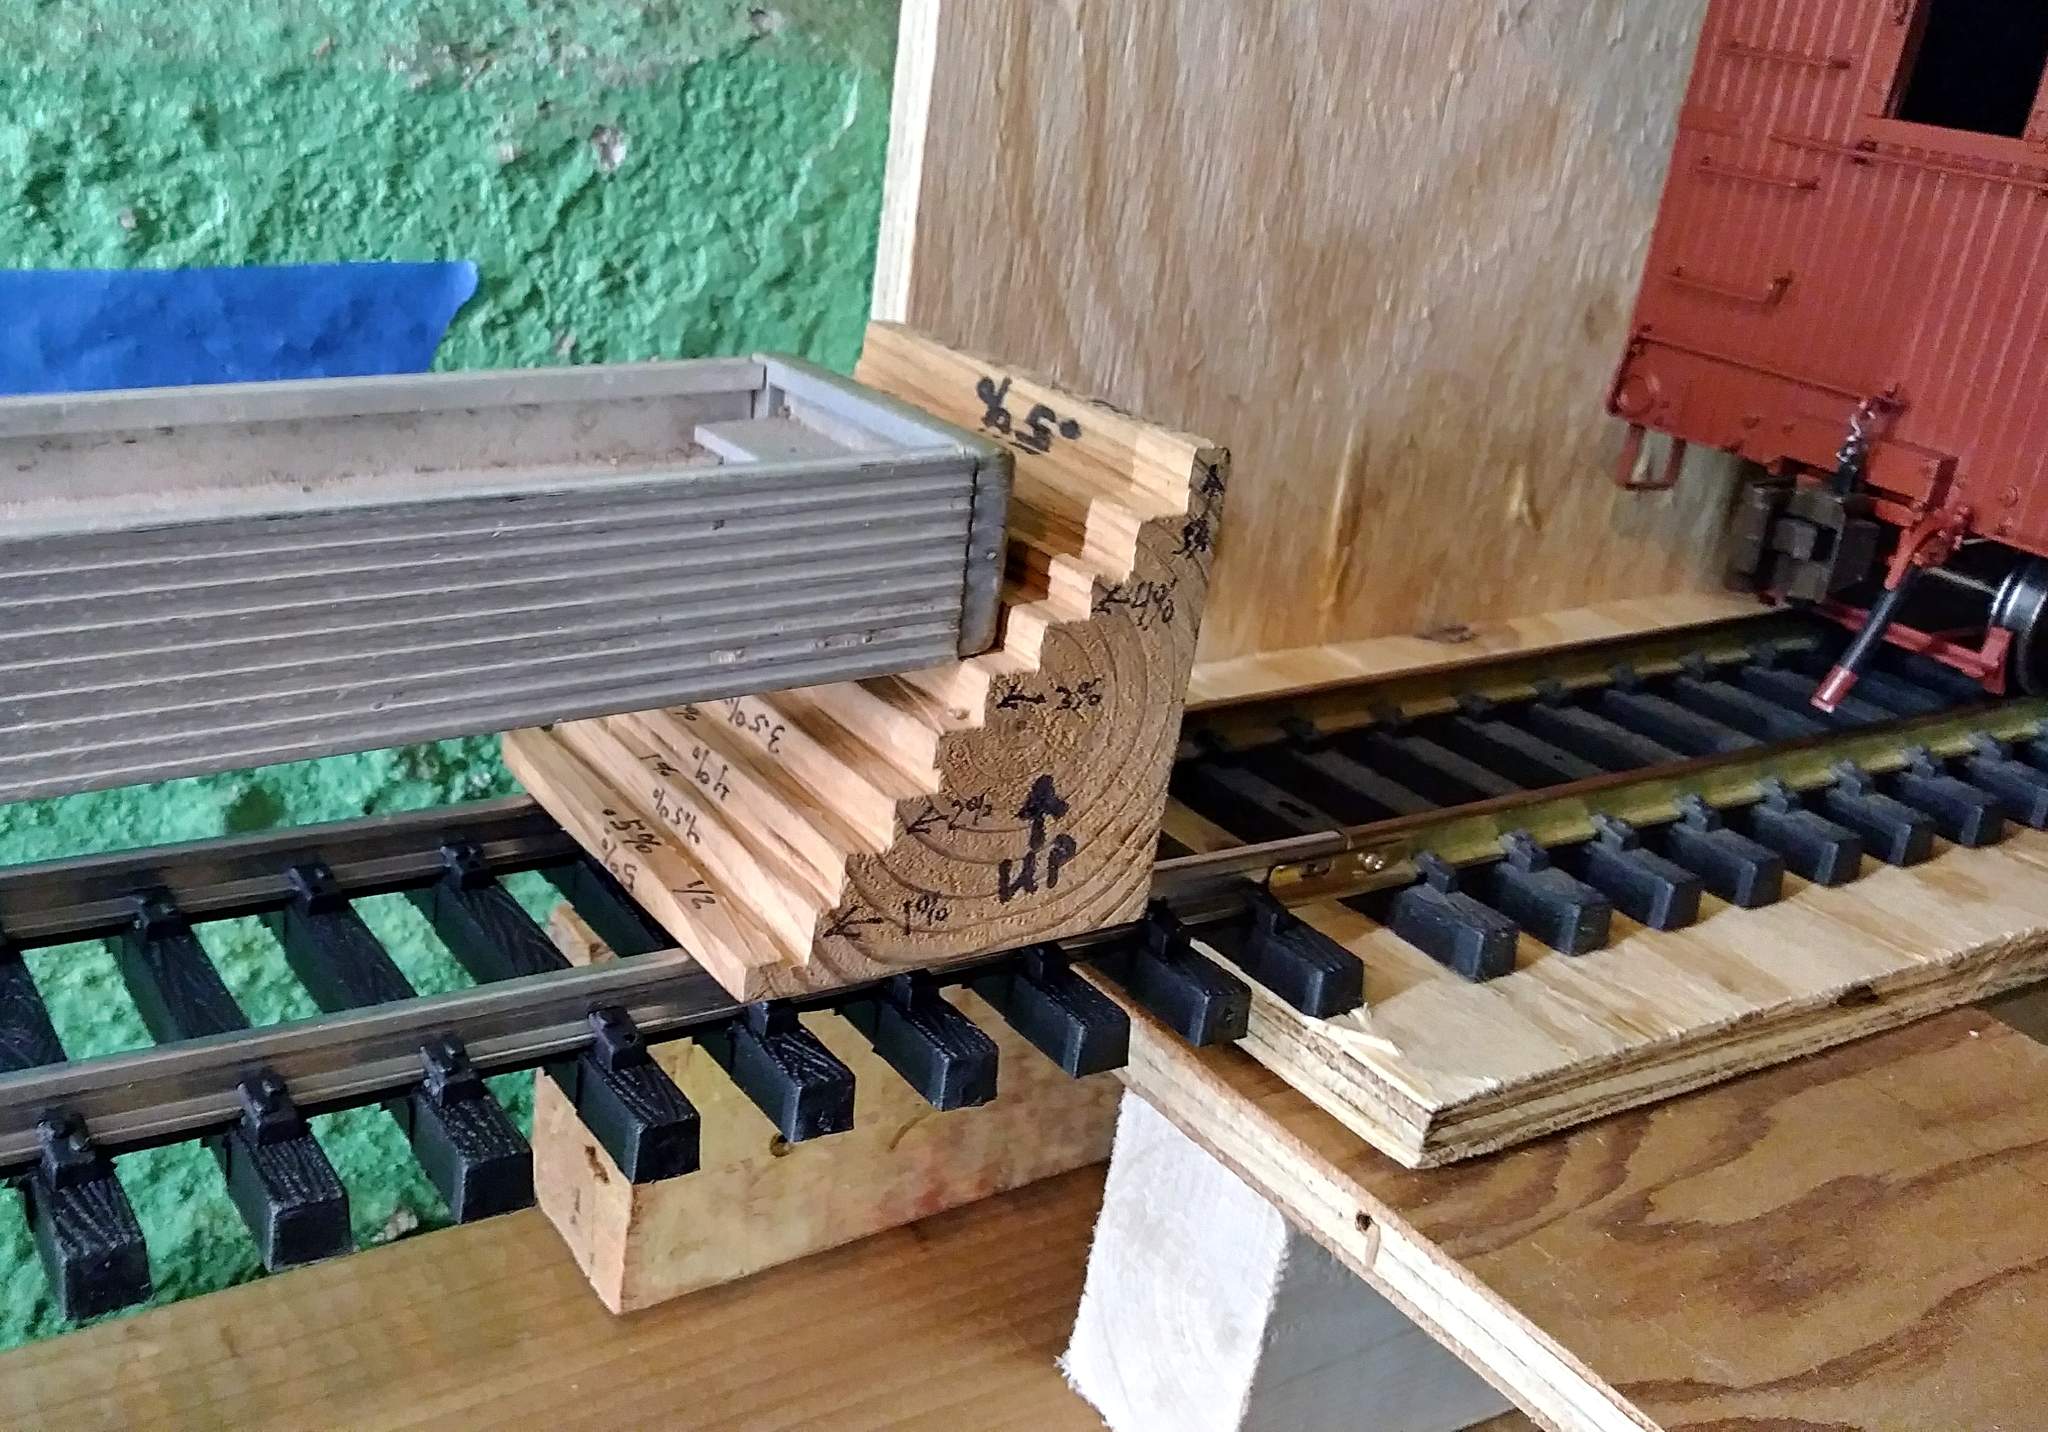
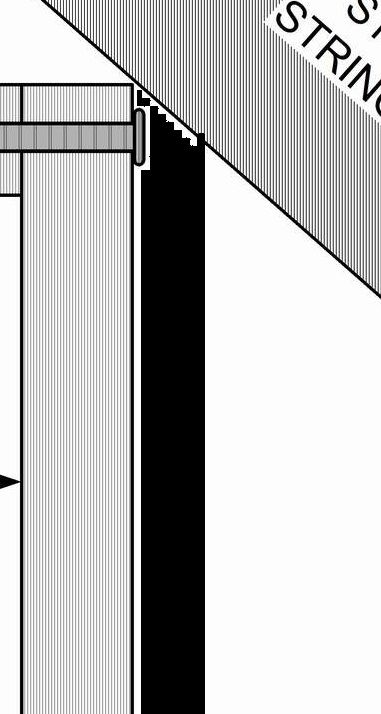
see the 1’ marking in the drawing ( the pic is just for a visual ) that would be towards the box car and the 30 bevel would actually be what the angle the stars are .

You use this tool Image result for how to use  a sliding t bevel squarelike this

So place the body of the tool (plastic or wood ) were the wood would go and put the shinny metal piece along the bottom of the stair stringer , secure that angle then

transfer that to the top edge of the wood…

You’re trying to find the angle were the top of your box and were the stair stringer meet! (https://www.largescalecentral.com/public/album_photo/15/52/02/24dc5_71e4.jpg?c=5a71)

I think I lost him … (https://www.largescalecentral.com/externals/tinymce/plugins/emoticons/img/smiley-wink.gif)too much info … The tool is only $10 bucks or so …

Oh boy! An Angle Getter is a favorite tool of mine.

When I built the tree house I swore off any square angles.

The Getter got 'er done! (https://www.largescalecentral.com/externals/tinymce/plugins/emoticons/img/smiley-foot-in-mouth.gif)

Sean, just so you know, you lost me when you logged onto LSC… (http://www.largescalecentral.com/externals/tinymce/plugins/emoticons/img/smiley-tongue-out.gif)(http://www.largescalecentral.com/externals/tinymce/plugins/emoticons/img/smiley-cool.gif)hehehe

Jon, I figured you were always going to use the under the stairs part… I just wanted to have a lil fun to see if you were really set on under the stairs…

But my recommendations were still valid… hehehe (http://www.largescalecentral.com/externals/tinymce/plugins/emoticons/img/smiley-cool.gif)

Sean said:

I think I lost him … (https://www.largescalecentral.com/externals/tinymce/plugins/emoticons/img/smiley-wink.gif)too much info … The tool is only $10 bucks or so …

I have that tool and know how to use it. But you are not following why it would not help to bevel the edge. I guess I’ll have to create a drawing to illustrate…

Because there is no frame the outside wall must take a fastener. Beveling the .5" (nominal) plywood above the fastener might gain 1/8". However, if you are suggesting that I trim the entire corner off with a beveled wall; technically that would gain a half inch our more, but at the expense of internal clearance. I am already very close to bare minimum and don’t really want to push it by angling the roof. It is also possible that there is just enough room for my 45 Ton diesel to get in. It has a high and wide square roof so it would need all of the corner space!

EDIT to add: I’ll have to check out how it would work out if I put a small triangular framing member down the side. Then I could cut off the entire corner gaining about a half inch.

(http://www.largescalecentral.com/FileSharing/user_1209/Misc/Basement%203-B434.jpg)

If the black was your new piece , and you cut it to fill the void ( in the V pic) and you add it to what you already have ( no cutting of already installed top piece)

(https://www.largescalecentral.com/public/album_photo/15/52/02/24dc5_71e4.jpg?c=5a71)

Wouldn’t that work ?