Large Scale Central

EBT Boxcar Build-along thread

Warren, If you havent glued the roof on, Ill send the supports out to you. I have a bunch of them here.

Use the solvent to glue the styrene on, it works wonders.

Id sand down the extra length now. One of mine was long like yours, and I used a box knife to trim it down. The trimming doesnt have to be real neat, as the corner parts will cover it.

Bruce “Acrylic” Chandler told me a neat trick for the solvent. With the bottle upright, squeeze the bottle a bit, THEN turn it over, so the suction is keeping the solvent in… You can then squeeze/unsqueeze the bottle and control it much better.

I’m going to have to try the bottle. I’ve been using a syringe. It just doesn’t work evenly like I like. Are those bottles available without the solvent?

I don’t have the roof on yet, and do need those supports.

Thanks, Bob.

Roof braces arrived…Thank you!

Warren Mumpower said:
Roof braces arrived...Thank you!
Well, I've sat here this afternoon and read all article pages and posting in reference to this project...I have 2 kits stored and may order the supplies real soon....Bob you did a great job all the way around, and Bruce...where does he find the time to do all he does?

anyway, not building yet, but planning to one day soon…RC and Batt installs to complete first!

thanks!

cale

It’s really hard to build with the weather getting nicer. And, as far as finding time, Cale, I don’t watch very much TV at all. It’s amazing how much time that gives you. :wink:

But, I did get the last of the grab irons on the sides of the cars. So far, that’s about 168 grabs of various sizes. I’ll tell you, I’m not unhappy that part is over.

Next, it’s on to the stirrup steps. I was very fortunate in getting a bunch from Don Winter so I don’t have to bend my own.

Getting close… Almost ready to paint:

I bent a brass strip for the brake levers:

Neglected to leave room for the grab irons on the buffer…

I’ve just finished installing the last cut lever for the last car. I’ve added the last grab irons on the end beams as well. Six cars, almost ready for the paint shop.

Looking back at everything, I’m just amazed how well these cars have turned out. Bob has done an excellent job providing clear instructions with lots of pictures. There’s just so much work involved to get instructions that good.

I have really enjoyed this project. It’s been a cross between scratch-building and a kit, and just a heck of a lot of fun. If you take your time, you end up with some very nice unique cars.

THANKS Bob!

One, more or less, done.

And, in a sunny spot…

Wow Bruce - That came out super!

Where did you come up with the decals?

JR

Really great! “Unfortunately” the good weather is keeping me out of the modeling room. So, mine are not progressing at the moment…but I do have fish tanks…:slight_smile:

Dang, Bruce, that looks great! I gotta get these poling pockets out to you post-haste!

Thanks, guys. I have to thank Bob again. What a delightful project!

Jon, I got the decals from Stan Cedarleaf. He’s done all of my stuff, and was able to make up some EBT decals for me as well. The next 5 will be J&B, and I’ve got the logos and numbers ready to go.

I got some poling pockets from Bob. They clean up very nicely and are a great addition to the end. You can see them in this picture, along with my crude riveting.

I’m using a texture 3d paint…and it’s not consistent in the dot size…but I like the affect. It’s fairly quick - I can do an entire car in under an hour. Just don’t look TOO closely. :wink: This is a closer shot of that first picture and you can see it at least adds some texture. :wink:

Hey, thats pretty nifty… how does the paint hold up to the styrene? Will it flake off, or is it a plastic-adhesive type?

Geez, Bruce. You’re making me feel bad. I’ve wandered (temporarily) off in a different direction and my cars are just sitting…:confused: 
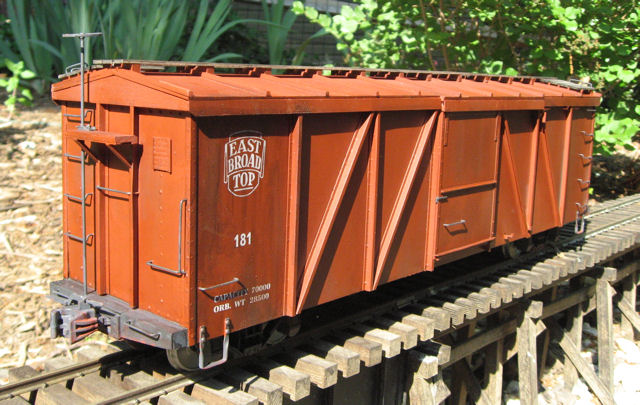
But that is really encouraging me to get back to them. 'Bout all I can say about your car is, “Damn that’s nice looking!”

Bruce -

I think you’ve found the rivet answer. I don’t mind that they are not all identically sized. Hard to see that once painted. Like you say, they add the needed texture to the Z braces and make the model even more believable.

Excellent job.

I’m kind of stuck with Warren on my project. The acrylic is still in the box it came in and I haven’t even started my test box from acrylic I picked up months ago at HD. Working for a living keeps getting in the way.

JR

Well…it’s an answer of sorts. I think I’ll keep it up. I’m still experimenting with different paints - I bought about 4 different types. The key is to have a pretty tiny hole. Also experimenting with some of the glue dispensers.

I haven’t tried to rub off the dots…well…except when I’m putting them on and get a big blob. But, once dry, they seem to adhere pretty well - as far as I can tell. :wink:

Bruce,

Have you counted the rivets yet?

Sorry, I couldn’t resist. Just kidding. I’ll go to my room, now.

Great job.

SteveF

Bruce and guys,

Years ago when my wife first started to tole paint, she used the handle end of her paint brushes to paint dots, or in our case, rivets. She would put some paint in a pie tin and just touch the handle into the paint and gentlely placed the dots. She could vary the size of the dots, er rivets, by changing to a bigger or smaller handle. She would also use this method to paint the pupils on figures. You could also use any small lid to hold your paint. She was so good, she could do four or five rivets between re-loading the paint. Give it a try and let us know how this method works for you. I’m thinking about asking her to rivet my cars, but I’ll need to clean out the dog house first! Good luck.

When I applied the paint-dot rivets to my bridges, I used a nail with the tip filed round. Worked pretty good but I could never do more than one or two dots per dip.