Okay while I almost despise diesel locomotives, being a steam era guy, I do have a soft spot for the St Maries River Railroad and their low nose GP-9s. I have started (awhile ago) doing a USA trains Geep 7/9 bash. I want to get back to it. But I need some parts. Who is the goto detail parts supplier for dismals? I need some fiddly bits but Ozark and Precision have left me wanting. I did recently get my resin printer running and may print what I need, but I’d rather buy if I can. Things like horns, mars lights, MU boxes, etc. Who do we goto for those parts?
Well who would have thunk to look at USA trains for detail parts. Since this is not a rivet counting project they have almost everything I need. A few parts from Ozark and I’ll be most of the way there. What few parts I can’t find I am thinking I can 3D print. Might have to beg a certain engineers help with the CAD work but we just might have it.
I say it isn’t a rivet counting project but I am lying. The STMA locos are 1:1 kit bashed locos. I guess in the real world they kit bash also. STMA took Milwaukee high nose GP-9s and modified them in 1980. They had the four small 24" fans (not dynamic brake fans) removed and put in single 36" fans front and back. And while there were EMD low nose Geep 9s the STMA took high nose Geeps and cut the front hood down. Thats just a few of the things.
So bashing a USA trains Geep 7/9 is a lot like what they did in the 1:1 real world. I need to take the 4 24"roof fans off. The front set will be replaced with USA trains 36" fans. The rear two fans are always covered by winterization hatches so I will add the hatches and just omit fans. I can take the stock nose and just cut it down like the 1:1 RR did. The biggest challenge is rebuilding the cab to add a center split windshield with wipers. Thanks to USA I can get the wipers to match the rest of the loco. the MARS light will be courtesy of Ozark.
A big thank you to Burl Rice for providing the CAD file for his beautiful replacement latches for all the doors.
One thing that is left to figure out is louvers. I have removed all the louvers on the original because one they are wrong and two in oreder to get the paint off it was easier.
Who has an idea for replacement louvers?
1/4 round styrene rod makes for a laborious louvers but it’s doable.
Or draw some up in CAD.
Either way I would only make 1 and resin cast a bunch.
And no one makes any details parts. Us crazy diesel modelers make our own parts.
For inspiration, here is the BEAUTIFUL STMA 102. They have the 101, 102, and 103. I think the 101 is dead. I haven’t seen it the last few years. But a regular site is the 102 and the 103 in tandem. So for my one off I will make the 102 and 103 a permanently MUd pair. The electronics will go in one and the batteries in the other but both will be powered. Not sure if I can pull it off but I am hoping for the best. If I have to like diesels, then the EMD 2 axel road switchers like the Geeps are gonna get the nod. And since my little local shortline used the 9s well its a natural. They also use a SW1200 that I will take a USA NW and convert. I already have the donor. But hopefully this pic will inspire you all to help me get motivated and finish the 2 Geeps. I think the paint scheme of the STMA is simple but beautiful. Besides Craig really wants to see these pair done.
.jpg)
If I get my butt in gear and modify the design for the GP30 etched steps, I will also get some sets made for the GP7/9 models. I think that would look great having scaled etched steps.
I have some generic mesh that I think will work. I am not going to be that picky. I would almost consider keeping the stock steps but since I am going to but micro LEDs in for step lights your eye will be drawn to them so an nice step is a must.
Well if you’re going to install step lights, let me send you the file for the 0802 SMD… And yes I’m not going to let you get by with a “mesh” step…
After doing some On30 stuff I know my printer will do some pretty fine detail holes. It might be possible to make a long strip of step materiel that I can trim to make scale(ish) steps.
honestly the stock ones are not bad.
fair enough
Devon Sinsley said:
honestly the stock ones are not bad.
Whoo whoo hold it there fella…
The stock ones are really, really not anywhere close in away. Trust me, you have much to learn young Luke…
Devon Sinsley said:
… But a regular site is the 102 and the 103 in tandem. So for my one off I will make the 102 and 103 a permanently MUd pair. … I think the paint scheme of the STMA is simple but beautiful.
That will indeed make a nice looking lashup.
Are some nice images of 501 on Railpictures dot net.
Say, since you are generally accurately modeling the locos, are you going to be generally accurately modeling the track, https://www.railpictures.net/photo/747782/
(https://largescalecentral.com/externals/tinymce/plugins/emoticons/img/smiley-wink.gif)
There at edge of cab roof of 501 where cab awning/shade track is attached, are those rivets or dimples from weld marks? https://www.railpictures.net/photo/720461/
Forrest Scott Wood said:
There at edge of cab roof of 501 where cab awning/shade track is attached, are those rivets or dimples from weld marks? https://www.railpictures.net/photo/720461/
I think.those are rivets holding the H channel for the awning.
Both of these are NOW GP9’s… Links below. Having trouble getting them to load herein.
If you’ll note I sanded down and removed most of the original louvers on my GP7’s. Prior to that I made several silicone molds on the body shell of the original stack of ten louvers, I simply mixed the silicone and brushed it over the louvers, allowed to dry and peeled off the molds. Next step was to mix epoxy resin, fill the mold being very careful to not over fill the mold. Pull the louvers from mold, a little clean-up and light sanding, clean all, place the louver assemblies and glue onto body shell. Worked quite well IMO. Each mold is ten individual louvers, I treated them as an assembly. You can also trim them down to however many louvers are required, I also made the small four high louvers on the steps. It takes a few minutes to mix epoxy and pour several molds, a few minutes to prepare them for gluing and and a few minutes to line them up and glue in place.


Michael
Devon,
Shapeways has quite a bit of 1/29 parts The website can be a little hard to search. Website Trains - Shapeways Miniatures
Thingiverse also has some stuff, but their search engine is worse.
Forrest Scott Wood said:
Are some nice images of 501 on Railpictures dot net.
Say, since you are generally accurately modeling the locos, are you going to be generally accurately modeling the track, https://www.railpictures.net/photo/747782/
(https://largescalecentral.com/externals/tinymce/plugins/emoticons/img/smiley-wink.gif)
They have some interesting track work up at the Clarkia end. It used to go all the way to Bovil but it washed away. Hard to believe that at one time it was all Milwuakee. But it shows what happens when you run and maintain on a shoe string budget. They no longer make the run to Clarkia.
Forrest Scott Wood said:
There at edge of cab roof of 501 where cab awning/shade track is attached, are those rivets or dimples from weld marks? https://www.railpictures.net/photo/720461/
Interesting. I don’t know. I have not spent that much time personally looking at nor looked at many pictures of the pair of SW1200s. So I haven’t looked at the details but those are some pretty uniform dimples.
Forrest,
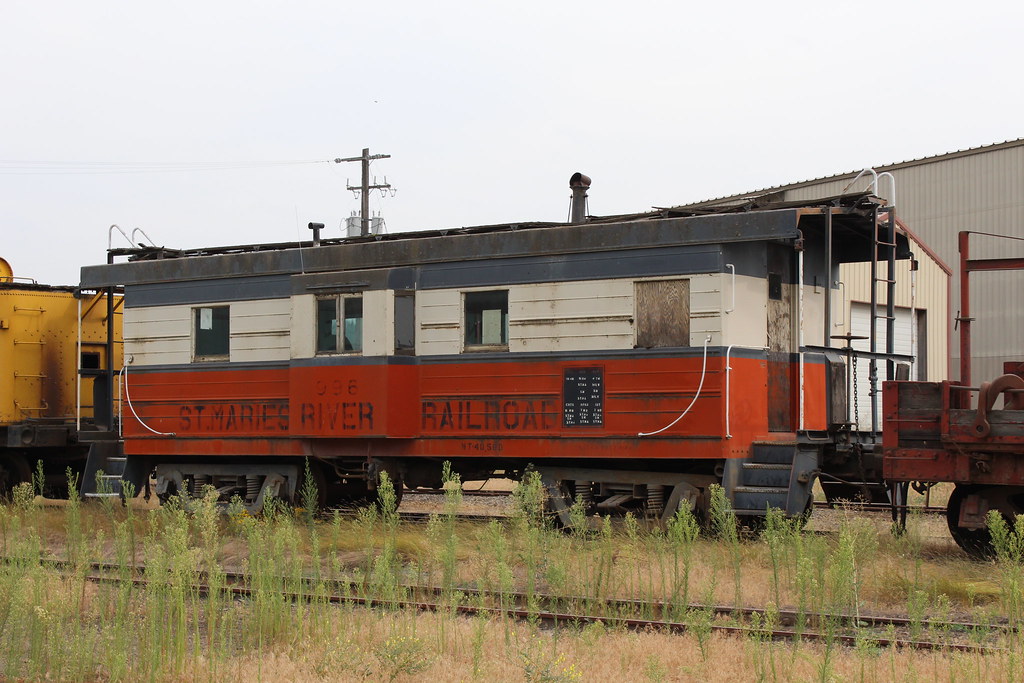
Here is what will tail the train. This is an old Milwaukee bay window. I am not sure how much they ever used it. They had a extended vision cupola that I think they got from BN that did all their caboose work. I know I have never seen the bay window out of the yard. But I was allowed to climb on it, take pictures of it, and measure it. So I hope to make a fairly accurate model of it. But between the two locos and the caboose I think it will be a nice looking consist.
Michael Glavin said:
Both of these are NOW GP9’s… Links below. Having trouble getting them to load herein.
I made a silicone mold from the original louvers. Poured epoxy resin being careful to not over fill the mold. Worked quite well IMO.
Michael
I forgot Michael that you had already done this. When I first started this project I remember us discussing this and that you had already done what I need to do.