That’s a passenger coach reflected in the window.
Some more progress… I added the trim and eaves detail to the underside of the roof, starting with the trim which helps to conceal the joint between the roof and the top of the walls. I used the slick peel-off backing from a sticker as a spacer when gluing the trim pieces to the roof:
(http://www.raydunakin.com/IRRWebfiles/Building3/wIMG_4049.jpg)
(http://www.raydunakin.com/IRRWebfiles/Building3/wIMG_4052.jpg)
Then I added pieces representing the ends of the rafters, supporting the eaves:
(http://www.raydunakin.com/IRRWebfiles/Building3/wIMG_4067.jpg)
I built up one side of the roof where it will abut the next building. It’s hard to tell from the photos but this new section of the roof is high at the front, so the water will run off to the rear:
(http://www.raydunakin.com/IRRWebfiles/Building3/wIMG_4063.jpg)
(http://www.raydunakin.com/IRRWebfiles/Building3/wIMG_4057.jpg)
To prevent rain from getting into the building where the roof meets the “false front”, I made a sort of internal rain gutter, using an “H” column. Small holes at the top of the wall on each side let the moisture flow out:
(http://www.raydunakin.com/IRRWebfiles/Building3/wIMG_4073.jpg)
(http://www.raydunakin.com/IRRWebfiles/Building3/wIMG_4074.jpg)
Next I added the trim along the corners of the building, and the fancy stuff at the top of the “false front”. The brackets at the top were carved out of .125" x .250" styrene rods, using a Dremel with a cutting wheel and also a small drill bit:
(http://www.raydunakin.com/IRRWebfiles/Building3/wIMG_4066.jpg)
(http://www.raydunakin.com/IRRWebfiles/Building3/wIMG_4062.jpg)
The posts in front of the building were made from square styrene rod, with short segments of square brass tube added:
(http://www.raydunakin.com/IRRWebfiles/Building3/wIMG_4080.jpg)
(http://www.raydunakin.com/IRRWebfiles/Building3/wIMG_4077.jpg)
…
Ray,
That is looking SO good!!
After the trim was finished, I painted the entire building with a coat of white primer, inside and out. Next I painted the interior of the second level with a pale yellowish color, and brushed some dark green and brown paint onto the floor. It’s not perfect but it doesn’t have to be. Curtains and furnishings will hide the flaws:
(http://www.raydunakin.com/IRRWebfiles/Building3/wIMG_4097.jpg)
The lower level of the building is where most of the interior detail will be. The floor was painted separately, then glued into place. For now, I decided to keep the interior white with a tan wainscot. The wainscot was made from grooved siding with a half-rod trim at the top, and a rectangular strip along the bottom. The wainscot was painted, then glued into place. I also built a false door and glued it to the rear interior wall. This will give the viewer the impression that there is more to this tiny structure than meets the eye. The rear of the building is hidden so it’s easy to pull off the deception:
(http://www.raydunakin.com/IRRWebfiles/Building3/wIMG_4085.jpg)
(http://www.raydunakin.com/IRRWebfiles/Building3/wIMG_4089.jpg)
(http://www.raydunakin.com/IRRWebfiles/Building3/wIMG_4093.jpg)
At this point I discovered a small mistake… I had forgotten to add the vertical mullions to the window on the front door. Putting them in at this stage of the project was a pain, but I got it done:
(http://www.raydunakin.com/IRRWebfiles/Building3/wIMG_4091.jpg)
(http://www.raydunakin.com/IRRWebfiles/Building3/wIMG_4094.jpg)
… The rest of the interior detail will be added after the exterior painting has been finished.
Painting the exterior… To prevent spattering the interior, I put some paper behind the windows. This must be done gently on the first floor of the building, to prevent damaging the window mullions.
(http://www.raydunakin.com/IRRWebfiles/Building3/wIMG_4106.jpg)
… … The building will be painted to represent an old structure that has weathered, peeled paint. So the first step is to give it an undercoat resembling weathered wood. I use thin washes of craft acrylics, mostly Apple Barrel brand and also Michael’s “house” brand. Be sure to buy the flat version, not the gloss. As you can see from the first photo, I like to build up the color a little at a time, allowing each coat to dry before adding more:
(http://www.raydunakin.com/IRRWebfiles/Building3/wIMG_4101.jpg)
…
(http://www.raydunakin.com/IRRWebfiles/Building3/wIMG_4102.jpg)
… The first couple of coats are done using “Nutmeg Brown”. I also added a few streaks of “King’s Gold” (yellow). Then I applied some “Espresso”, a darker brown, and later some mixes of Espresso, “pewter gray” and black. I didn’t go into too much detail because most of this “wood” effect will be covered with the “peeling” paint.
(http://www.raydunakin.com/IRRWebfiles/Building3/wIMG_4120.jpg)
(http://www.raydunakin.com/IRRWebfiles/Building3/wIMG_4123.jpg)
…
(http://www.raydunakin.com/IRRWebfiles/Building3/wIMG_4114.jpg)
…
(http://www.raydunakin.com/IRRWebfiles/Building3/wIMG_4119.jpg)
…
Glad to see your computers back. Really taking the awards with this one Ray. Beautiful just beautiful.
Wow. That is looking fantastic!
Jon.
Another progress update… With the “wood” underlayer finished, it was time to add the “peeled paint” effect. I combine two methods… one uses a masking liquid to create small blotches where paint has flaked off. I’ve tried rubber cement in the past, but found it difficult to work with. Last time I tried Microscale’s “Micro Mask”. This was easier to use than the rubber cement but still not great. It sometimes required scrubbing the piece to remove all the tiny blobs of mask; and the blue dye in the mask has a tendency to stain my acrylic paints. I wanted something that would work the same way but was colorless and easy to remove. … I soon came up with a “sweet solution”: Wilton’s “Sparkle Gel”, available from Michael’s. It’s a sugary cake decorating gel normally used to write or draw on pastries. It dries to a rubbery texture and washes off easily with water. . .
(http://www.raydunakin.com/IRRWebfiles/Building3/wIMG_4126.jpg)
… I squeezed some gel onto a paper plate, then used a coarse brush from Home Depot to dab small blotches of gel onto the model and let it dry. Here’s a shot of how it looks on the model:
(http://www.raydunakin.com/IRRWebfiles/Building3/wIMG_4134.jpg)
… The second technique I use for peeling paint is to brush on some Testor’s Enamel Thinner right before applying the color coat. The water-based acrylic paint doesn’t mix with the thinner. As a result, the paint streaks and follows the scribed “wood grain”, creating a very realistic worn and aged appearance. I found it works best to brush the paint on in the direction of the grain wherever possible. . . .
(http://www.raydunakin.com/IRRWebfiles/Building3/wIMG_4140.jpg)
… Let the paint dry thoroughly, then wash off the gel. It helps to rub your hand over it under running water. You can also use a soft paint brush to gently dislodge bits of gel and paint from finer areas of the model.
(http://www.raydunakin.com/IRRWebfiles/Building3/wIMG_4153.jpg)
… More to come…
Here’s how the storefront looked after applying the peeled paint, and before painting the trim or doing any touchup:
(http://www.raydunakin.com/IRRWebfiles/Building3/wIMG_4155.jpg)
… It was ok but for some reason it just didn’t quite look right to me. It seemed like the peeled paint was too blotchy, and too “busy” looking. So I decided to tone it down a bit by adding a wash of white paint to most of the store front. I figured these areas were most accessible and the most likely to be repainted… After doing that, I touched up the places where I’d gotten white paint on the trim. Then I used the cake decorating gel to mask off the white areas around the edges of the trim. I had to thin the gel a little with water to do that, and applied it with a fine brush. Once the gel had dried, I started painting the trim. I decided to use only the enamel thinner technique to achieve the weather paint effect on the trim. So I wet the trim with Testor’s enamel thinner and brushed on the trim color (Apple Barrel’s “Tapestry Wine”). This worked out well. When the paint had thoroughly dried, I washed off the gel mask. Here’s how the model looks now:
(http://www.raydunakin.com/IRRWebfiles/Building3/wIMG_4162.jpg)
… I can see in these photos that there’s still a few places that need touching up…
(http://www.raydunakin.com/IRRWebfiles/Building3/wIMG_4161.jpg)
… Eventually I plan to add a worn, faded sign across the false front…
(http://www.raydunakin.com/IRRWebfiles/Building3/wIMG_4172.jpg)
… [mg]
(http://www.raydunakin.com/IRRWebfiles/Building3/wIMG_4176.jpg)
. . . . Here’s how it looks next to the other buildings…
(http://www.raydunakin.com/IRRWebfiles/Building3/wIMG_4177.jpg)
. . .
(http://www.raydunakin.com/IRRWebfiles/Building3/wIMG_4178.jpg)
. . . Next I need to do some more touch up, and I’m still debating whether or not I like the amount of peeled paint. Anyway, I also need finish building, painting and installing the windows on the second level. I also need to add doorknobs to the doors, glaze the windows, add roofing, and other small exterior details; and then do the interior. .
Amazing detail work Ray. Do you have any close up shots of the interior in the small building in the last shot?
Jon.
Ray,
Just my opinion.
I would “whiten” the rest of the front so it all matches.
Leave the back and sides of the building heavily faded…
Great building, whatever you decide to do.
Ralph
Jon Foster said:That's my rock shop. There are photos of the interior here:
Amazing detail work Ray. Do you have any close up shots of the interior in the small building in the last shot?
http://www.largescalecentral.com/LSCForums/viewtopic.php?id=11468
Ralph Berg said:I'm considering that. For now I think I just need to look at it a while decide later.
Ray, Just my opinion. I would "whiten" the rest of the front so it all matches. Leave the back and sides of the building heavily faded.. Great building, whatever you decide to do. Ralph
That is one nice building. I’m really enjoying watching the development of it and it has given me a lot of ideas,
Ray,
Very cool idea for weathering and it looks spectacular!
Here’s what I’ve done since the last update… Added the roofing material. I ran some .001" thick brass shim stock through a paper crimper. The corrugated sheets were then cut to fit the various areas of the roof. Then the corrugated panels were sprayed with Rustoleum’s “Cold Galvanizing Compound”, basically an acrylic-based zinc paint. The sheet metal was glued to the roof using Liquid Nails. I started with some uncorrugated strips in the trough area of the roof, then applied the corrugated panels:
(http://www.raydunakin.com/IRRWebfiles/Building3/wIMG_4183.jpg)
(http://www.raydunakin.com/IRRWebfiles/Building3/wIMG_4187.jpg)
The roof looked good, but too new. I wanted to simulate the appearance of cheap, low-grade galvanized metal which has become aged and rusty. My first attempt was to use a chemical approach. I brushed on a thin coat of Sophisticated Finishes “Iron Metallic Surfacer”. When that dried, it was treated with their “Rust Antiquing Solution”. Unfortunately this didn’t work out as I had hoped. The iron coat was too thin to produce sufficient rust, and the rusting solution blackened the zinc. I tried a couple more coats and got a good rust affect, but it looked like it had never been galvanized. So I gave up on the chemicals and did it the old fashioned way – I painted it. It’s not perfect, but it’ll do:
(http://www.raydunakin.com/IRRWebfiles/Building3/wIMG_4211.jpg)
As discussed previously, I was unsatisfied with the appearance of the wood showing through the peeled paint on the building. So I went over most of it with a thin wash of white, which helped a lot. I used more white on the front of the building, and less on the side, leaving some areas there unmodified. Next I installed .010" thick Lexan “glass” in the storefront windows. This was a pain. In the future I will try to construct such storefronts so that the window frames can be built up separately and installed after receiving the glass. I also finished and installed the upstairs windows. I had considered leaving them off until after I’d detailed the interior, but I didn’t want to wait that long. I added doorknobs to the doors, and a small “PRIVATE” sign on the door leading upstairs. I built up a “wood” frame for the sign over the storefront, and printed up a vinyl sign for it. Here are a few shots of the building, alone and in position on the layout:
(http://www.raydunakin.com/IRRWebfiles/Building3/wIMG_4214a.jpg)
(http://www.raydunakin.com/IRRWebfiles/Building3/wIMG_4217b.jpg)
(http://www.raydunakin.com/IRRWebfiles/Building3/wIMG_4221b.jpg)
Although it looks fairly complete, the building is still a long way from being finished. I still have to get decals made for some additional signs. I also need to add minor exterior details such as light fixtures, plumbing/electrical hardware, smokejacks, etc. And of course I need to create and install all the interior details, which will be a pretty big chore. (Edit: Reduced size of the last two pics.)
I can only think of one word. Amazing!!
That looks great, Ray. I like your article on making figures in GR, as well.
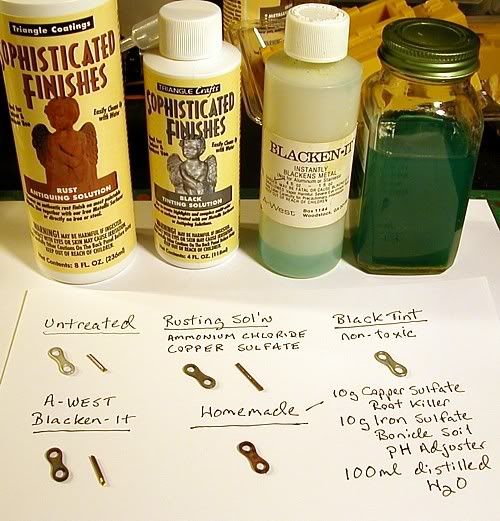
Nice work Ray. I once picked up a can of the cold galvanizing paint by accident thinking it was gray primer. Boy was that a mess. It makes sense that the rusting sol’n would react with the zinc as it reacts with white metal (and brass too) -
(http://i113.photobucket.com/albums/n214/altterrain/GR%20blog/blackening1.jpg)
-Brian
Ken Brunt said:I thought the first building was amazing. I don't know how Ray did it, but he managed to improve on "amazing" Ralph
I can only think of one word. Amazing!!