Large Scale Central

D&RG 315, My week in Silverton

I guess the cotter pin was to catch the wedge if the set screw came loose. So it would not fall all of the way out. But yea, it does seam counter intuitive the way they designed it. There had to be a reason.

And WOW, I had no idea there were that many fiddly parts in the end of a drive rod. Thanks for the lesson in 19th century engineering Dave.

Thanks Dave. Much more complicated than it first appears. Folks like you and the others that care for 315 are rare and precious. I hope some young men are training with you, otherwise those skills could be lost. Great to follow the story.

Interesting! On our engine ww&f #9, the bronze bearing is split so that the wedge can take up for wear. The tapered fit on the pin is the same, but there is no grease fitting.

On a visiting engine the tapered piston rod fit came loose from the crosshead…bad stuff! There is a wedge keeper which was also loose.“fixed” with a sledge hammer…yikes!

If at first you don’t succeed, try a bigger hammer. (http://largescalecentral.com/externals/tinymce/plugins/emoticons/img/smiley-wink.gif)(http://largescalecentral.com/externals/tinymce/plugins/emoticons/img/smiley-surprised.gif)

That old technology doesn’t understand fine adjustments and gentle persuasion, it only responds to brute force. (http://largescalecentral.com/externals/tinymce/plugins/emoticons/img/smiley-wink.gif)

@Eric et, all, That bearing was new at the rebuild, when new they are made to fit the pin, with the intention that when worn, then they are split, and start the routine of re-boring, and shaving the split to tighten the fit.

Did you recall if the taper to the wedge was with the small end, up or down?

Since we had the Main Rod dropped, we took the time to do a little Technical work, that can and will be used later to adjust the timing on the cylinders. At this time, 315 is very square, and we plan on keeping her that way. But should the need arise to re- or Check the timing we needed to check the stroke, and the available space between the piston, and the cylinder’s head. In other words, what is the maximum space for the piston to travel before there is interference between the piston and the head?

Here is 315s power end.
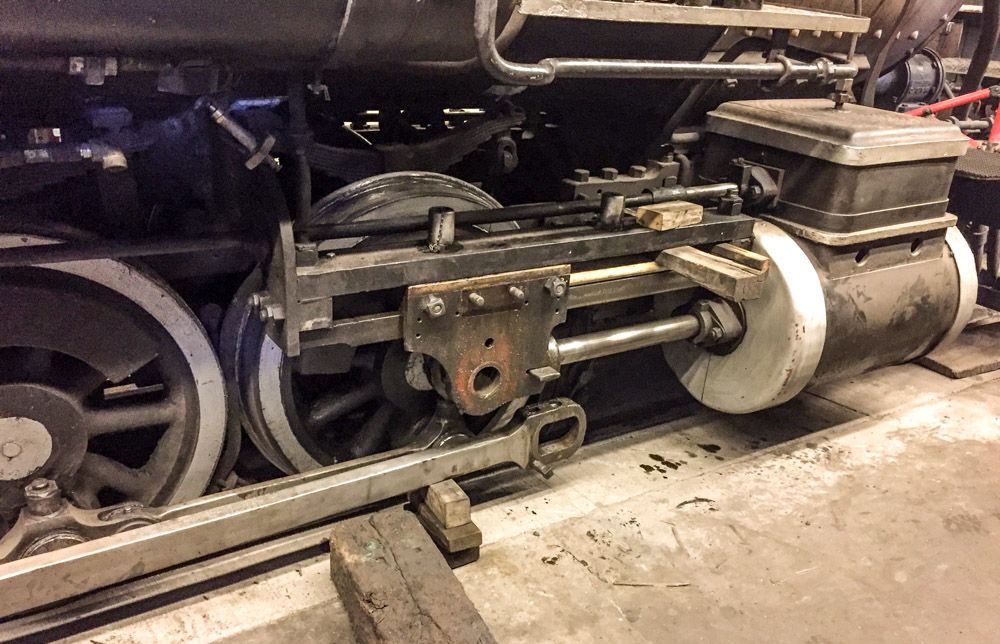
I failed to get a pic of the first step in the process. We pushed the piston all the way to the front, until it hit the cylinder head. At this time, we took a center punch, and then peened a punch mark on the crosshead in the top corner in the front.
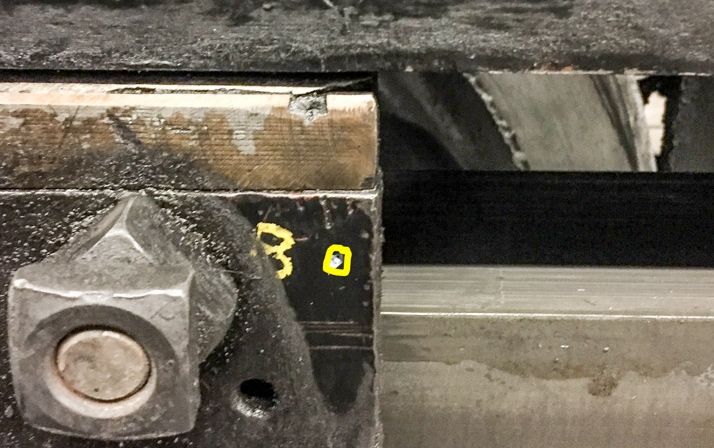
Using a tri square aligned so we could then transfer that peens location, vertically, to the side of the top slide rail, we then peened another reference dot exactly above the one on the crosshead. Sorry no photos of this action.

We then pushed the piston to the rear, until it stopped against the rear cylinder head.
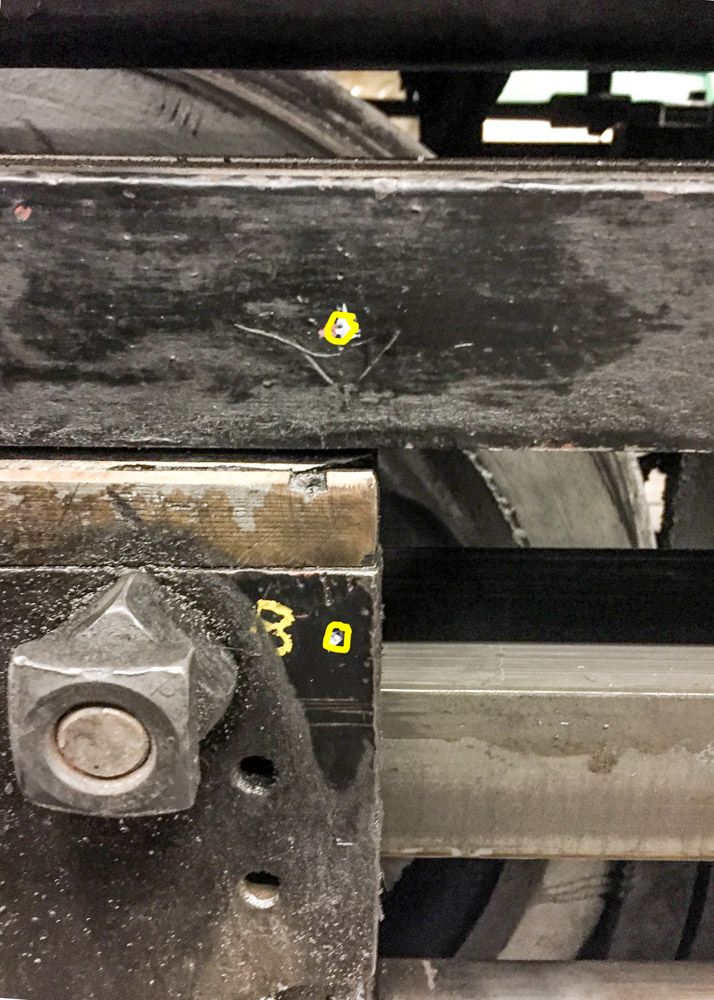
Here you can see that we have transferred the peen mark from the cross head up to the slider using a try square to mark the total rearward travel of the piston, and where it would come in contact with the cylinder head.
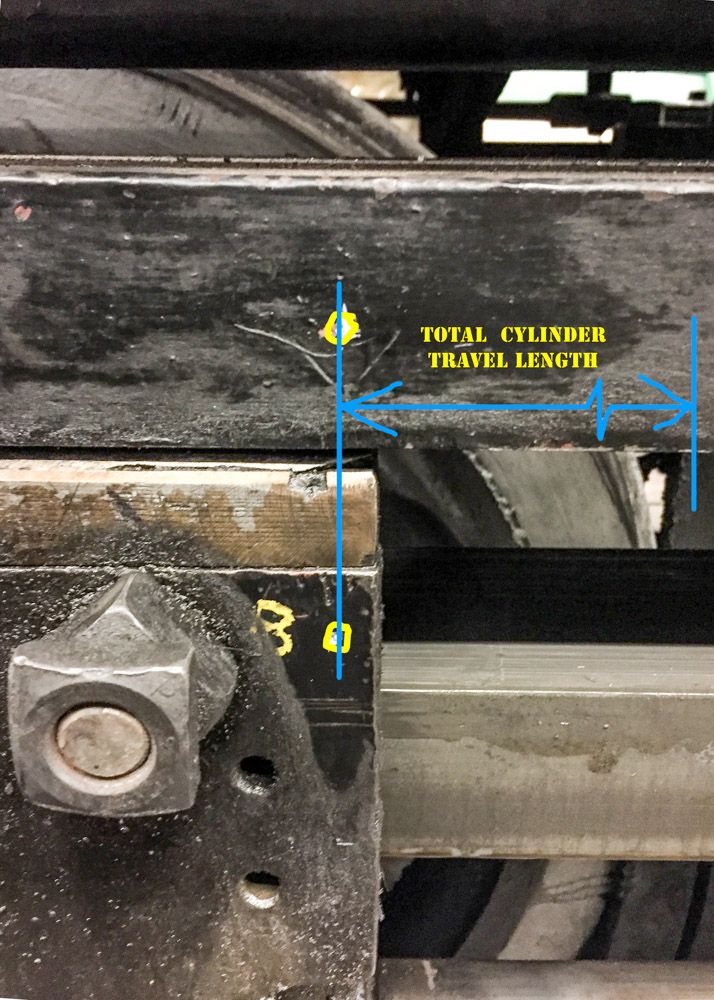
Using these marks, we now can measure the total MAX travel space within the cylinder before the piston hits the heads.

BTW: that would be a VERY BAD THING, if the engine was running.

We can now measure the distance between the front and the rear peen marks. On this side it measured out to be 21-7/8 inches. 315 has a 20 inch stroke, meaning that there is 1 - 7/8 inches clearance, divided by two gives aprox. 15/16 inch in front of the piston and the heads at each end of the stroke. We have not taken a critical measurement of the stroke yet by measuring the distance of the offset of the main rod pin to the center line of the main driver. We also will need to find the physical center of the piston stroke, by centering the main driver pin at TDC ( Top Dead Center ) of the wheel, with the rod attached, and then transferring the crosshead peen mark to the slider. We can then measure the accuracy of the center, and then extrapolate the actual clearance on each end of the piston stroke, which may not be the same.

Note in the pics, when you drop the main rod, the piston is free to do what ever it wants. Which includes becoming a torpedo right thru the Cylinder head, if under pressure someone opens the throttle even a little bit. We do the “Safety” thing and put a 2x4 between the cross head and the cylinder.

Thats all for tonight. More to come.

Seems to me with the bearing being solid the wedge only served to hold the bearing block in place not to allow adjustment of the bearing block for wear which is I assume your reason for making the new block split.

Dave,

That technical explanation was really quite interesting! Thanks.

All very interesting . . . . . . . (http://www.largescalecentral.com/externals/tinymce/plugins/emoticons/img/smiley-smile.gif)

So, if the locomotive were out of square, what do you move/adjust in order to re square it?

@ Gary B. Correct… When new, there is no need to split. Splitting when new would just use up the first 1/8 inch or so of the total usable bearing. So no split when new, the split comes on the first re-build, giving a bearing just a little longer life.

@Maynard. There is no easy simple answer. There are about 10 points in the “total timing system” along the way that can be the cause of “Out of time”. Someday, as I better learn all the kinks to timing, I will start a detailed thread here on all the technical aspects, some of which at this time are above my pay grade. I can tell you that the technique that is used, varies with each of the different type of timing gear, and the different type of valve gear.

Re-timing a loco, at least on the C&T and the D&S, usually is put off until it sees a major overhaul or during its 1472. I’ve been told that on some engines with certain types of valve gear and timing gear that it can take a master mechanic as much as two weeks of shop work to re-set the timing properly. On some locos to fine tune the timing, certain connecting links have to be heated and “Forged” to the correct length and then re-tempered and hardened. And if still not correct, re-do, or mill an offset bushing, if it can be properly set in, or if that is an option at all. And then you add into the whole mess, doing the other side of the engine.

The goal is to have the same amount of generated power on both foreword and back strokes of the piston, with the same throttle setting. And to also set the other side, so that it too is generating the same “Equal” power stroke. This gives maximum power to the engine, and sets up the least variations of applied power to the wheels, and it gives the smoothest ride, causing the least stress on the engine. ALL GREAT GOALS, seldom achieved to perfection.

If you listen to the beats of the exhaust on a steam engine as it is running, listen to the pattern of the chuffs. It should be 1-2-3-4, 1-2-3-4, all at equal spacing, if you hear 1-2-3 and 4, 1-2-3 and 4, 1-2-3 and 4, then it is out of timing. It is easier to tell, if the engine is going at a steady pace at a slower speed. If an engine is way out of time, it can damage an engine.

Dave

How did you move the piston? By hand? And the exhaust pressure of pushing the piston in? Interesting process, you can really understand why the railroads saw diesels as the future.

Dave I understand that there is no easy answer. I thought maybe there was some adjust built in somewhere. But I see what you are saying. I could feel the one steam locomotive I was riding behind surge, as one stroke produced a bit more power then the other 3. Of course the one opposite the stronger pulse was probably actually a bit weaker then the other 2.

The other thing that perplexed me was the old 4-4-0s that mounted the pistons and front truck to the boiler, without a frame. As the boiler heats up, its going to get a bit longer. So setting the timing on one of those would be a real challenge, since it would appear out of square when cold, but when at operating temperature it could be in square.

@David M. et all. I didn’t know the answer about the 4-4-0 timing. But I asked a couple of people, and lo an behold neither did they. Which led to the discussion about the timing. The end of all the speculation ended with the universal agreement that, You are right in your speculation, that the timing would indeed change with the expansion of the boiler. In the early days we decided that they were probably just happy that there ran at all. We also decided ( without any reference ) that they didn’t build them for to long without a proper frame, and that ended the " Stretch Timing "

Good news… I have talked my wife into painting another painting, in her “Narrow Gage Stations” series. This will be the fourth in the series, Durango. The first three, Farmington, Chama and Aztec have all been good sellers.

This is from a photograph I took in Durango, from a night shoot I was hired to put on for a Photo Special. Just getting started on the easy parts.

I’ll post some more pics as she keeps going along.

Dave,

Most artists do not like unfinished works to be seen. Are you sure she is OK with you posting it here? (http://largescalecentral.com/externals/tinymce/plugins/emoticons/img/smiley-undecided.gif)

Joe Zullo said:

Most artists do not like unfinished works to be seen.

A bit of tangent, but hey. I think a case can be made that the artists themselves are unfinished works - they are working out their being as they work out their art.

Cool! Does she sell prints, or just the original painting?

@Joe Well I guess the artists that you know are a lot more insecure with there work then my wife is. Her studio is part of a co-op studio with several other artists , with a coffee (expresso) shop and gallery combined. She paints out in the open, where everyone can see, and watch. She even has had people buy the original before it was even 2/3 done, and they kept coming in daily to watch the progress of “There” painting.

@Ray Yes she does, All her art, is available as artist enhanced Giclee’s, in any size thats proportional to the original.

Scheduled to be back in Antonito early morning Friday. We will put the main rod and pin back together. Then onto general maintenance. and some more stuff…

Also, a little more work on the Durango painting.